by Sharon | Jul 11, 2015
It seems we can’t get our fill of the delightful summer treat S’Mores.
I’m always on the look out for easy recipes that I can make all year round . . . then pretend I’m out camping while sitting in front of my fireplace.

S’More Bars Recipe
Ingredients:
- 1-1/4 cups of all-purpose flour
- 3/4 cup fine graham cracker crumbs
- 1/4 teaspoon baking soda
- 1/4 teaspoon salt
- 1/2 cup softened unsalted butter
- 1/2 cup packed light brown sugar
- 1/4 cup granulated sugar
- 1 large egg
- 1 teaspoon vanilla extract
- 2 extra large Hershey Milk Chocolate Bars
- 1 7 ounce jar of marshmallow creme
I know what you’re thinking . . . what’s with all these ingredients? All you need are graham crackers, chocolate and marshmallows, but marshmallow creme is a good touch. I’m right there with you. What’s with all the sugar? But instead of fighting the recipe, I decided to follow it — can you imagine? Anyway, stay with me . . .
Directions:
- Preheat your oven to 350° F.
- Butter an 8 by 8-inch baking dish.
- In a mixing bowl whisk together the flour, graham cracker crumbs, baking soda and salt for a whole 20 seconds and set aside.
- Get out the good electric stand mixer and put in the paddle attachment.
- You’re going to blend the butter, brown sugar and granulated sugar together until creamy.
- Mix in the egg and vanilla extract. It will smell yummy.
- Set the mixer speed to low and slowly add in the dry ingredients and mix until combined.
- Divide the dough in half.
- Put down a layer of parchment paper and butter the paper lightly, then press one half of the dough into the baking dish you prepared.
- Lift it out. That’s right lift it out and set it aside — this will be the top layer of your s’mores bar.
- Now, since this parchment paper thing was so easy, I buttered my pan again and set a layer of parchment in the pan and lightly buttered it before pressing the other half of the dough into the baking dish.
- You have a mixture of the bottom layer of your s’mores bars and the top layer set aside ready to use after you put in the filling.
- Place the chocolate side by side over the dough layer in the baking pan.
- Next comes the marshmallow creme that you’ll want to spread evenly over the chocolate.
- Now, this may be a bit tricky, but I’m sure you can do it. You’re going to take the saved dough on the parchment, gently flip it over on top of the marshmallow creme. Fit it in place carefully, not to mess up the marshmallow creme. You did it, right? Right? Hey, where’d you go?
- Bake in your preheated oven for 27 to 30 minutes until it’s a light golden brown.
- Pull up the parchment paper to get it out of the pan and let it cool completely on a wire rack before cutting into squares.
- I like to keep it on the paper and transfer to a cutting board, cut into squares and gently lift onto a plate for serving.
They’re delicious, right? This dough does add something special to the old fashioned way of making s’mores. You don’t lose your marshmallows either. It’s all smooth and oozes the delicious chocolate and marshmallow blend.
Now aren’t you glad you tried the recipe? Your family will thank you, too, with the happy smiles on their faces when they’re savoring every delicious flavor.
Thanks for stopping by!
by Sharon | Jun 24, 2015
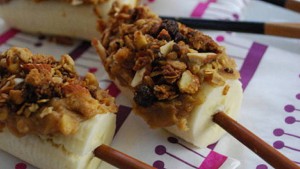
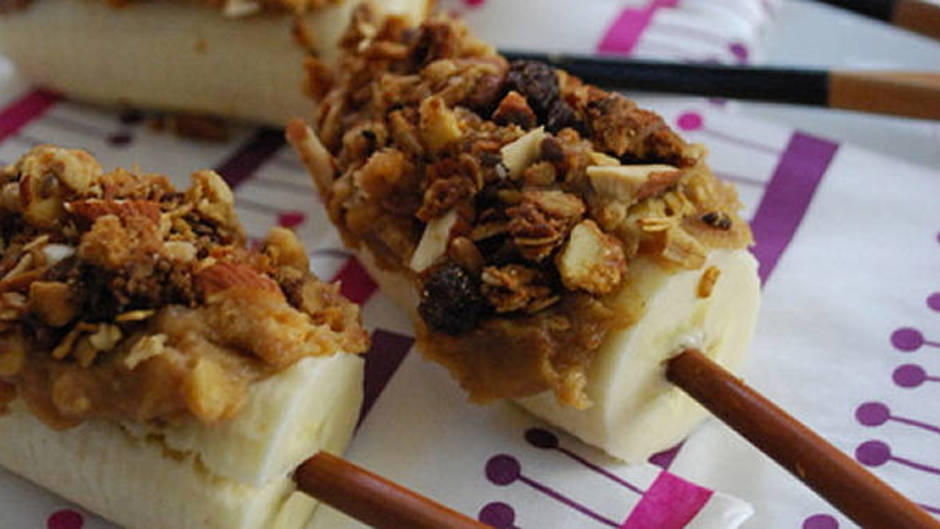
Rachael Ray comes through with this great snack that makes a wonderful breakfast, too.
It serves four and has great ingredients:
- 1/2 cup of chunky style peanut butter
- 2 tablespoons of honey
- 1 cup granola with nuts and raisins — I suppose you could substitute trail mix
- 2 large bananas
- you’ll also need sticks which could be popsicle sticks or lollipop sticks or wooden skewers or even chop sticks
They’re quick and easy to make:
- Heat the peanut butter in the microwave on high for about 20 seconds to loosen it
- Stir in the honey
- The granola is lightly crushed up in a food processor to get it all blended together — you may be able to use a blender
- Peel and cut each banana in half. Insert the stick into the cut end of each banana half’
- Since you have four banana halves, spread one side of each banana on a stick with 1/4 of the peanut butter and honey mixture. Coat with the granola, gently pressing it into the peanut butter
- Although you’ll be eating this treat on a stick, serve it on a plate to collect the crumbs
If you’re serving it for breakfast, you may want to add a hard boiled egg to the plate or make an omelette or one of those breakfast sammies in an English Muffin. They’re fine alone, too.
It’s nice to have healthy snacks the whole family will enjoy.
by Sharon | Jun 21, 2015

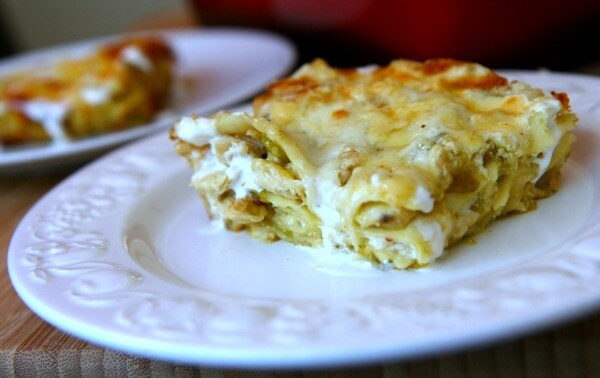
It’s hot outside and I’m giving you a recipe to make a hot meal in the oven . . . but if you do this recipe right, then you’ll have a feast for several days to come.
Remember, recipes are only a suggestion . . . you can substitute ingredients or add some of your own . . . you can make an excellent lasagna that is made to order for your family!
Green Chili and Chicken Lasagna Recipe
This recipe makes one 8 x 12 inch pan of lasagna that serves 9 to 12. Prep time is about 20 minutes and actual cooking time is approximately 40 minutes, so this is a relatively quick recipe to prepare.
You’re going to need:
- 3 cups cooked, shredded chicken — some have used eggplant or zucchini to make a vegetarian lasagna
- 2 cups shredded jalapeno cheese of your choice
- 1 cup shredded mozzarella cheese
- 15 ozs of sour cream or plain yogurt maybe even heavy cream
- 10 oz can of fire roasted green chilies
- 1 cup salsa verde
- 1 teaspoon cumin
- 1 teaspoon chili powder
- salt and pepper to taste
- 12-16 no-boil lasagna noodles or you can use flour and/or corn tortillas dipped in green sauce instead of the noodles or eggplant or zucchini to substitute for the noodles.
I’ve really messed with this recipe . . . I hope you’ve made variations of your own as well.
All right, time to get this lasagna put together:
- Preheat the oven to 375 (F)
- In a bowl you’re going to season the shredded chicken with cumin, chili powder, salt and pepper. Then stir in the fire roasted green chilies, salsa verde and the cup of jalapeno cheese. Combine it all together nicely.
- In the bottom of the baking dish, spread a small amount of the chili chicken mixture.
- Top with a layer of noodles or whatever you decided to use either tortilla or vegetables. Spoon or pour your sour cream or plain yogurt or even a cream of mushroom soup (which I didn’t add in the ingredients). You want to make sure this mixture is spread even into the corner edges of the pan. Then top with the shredded cheeses — mozzarella and jalapeno.
- Continue building the casserole layers, alternating between lays of noodles, green chili chicken mixture and the creamed and shredded cheeses layer.
- Cover with aluminum foil and bake in the preheated oven for 30 minutes.
- After 30 minutes, remove the foil and continue baking for another 5 to 10 minutes until the cheese on the top has melted and the entire casserole is bubbling hot.
- Allow the casserole to cool for about 5 minutes before serving.
I know it may have gotten confusing with the substitutions and the layering, but I’m sure you figured it out with your ingredients.
Thanks for stopping by!
by Sharon | Jun 20, 2015
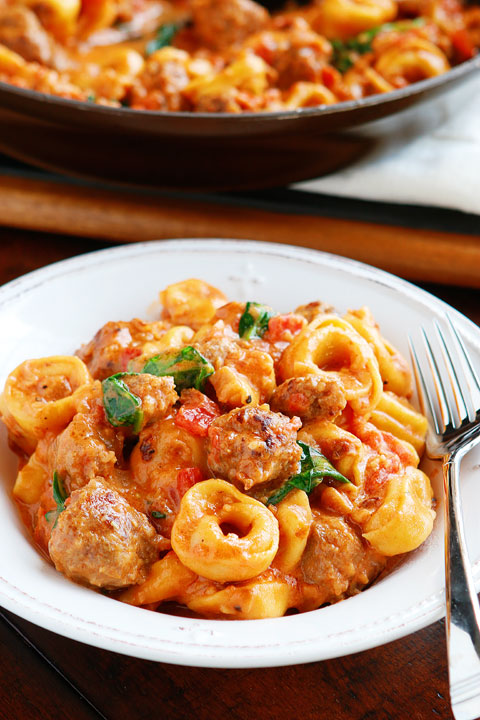
I absolutely love one skillet cooking — makes for easy clean-up. Yes, I am lazy . . . but I prefer to think of it as smart.

Italian Sausage Tortellini Recipe
This recipe makes 4 servings . . . so double the recipe for a larger group . . . or just play it by ear as I do . . .
You’re going to need:
- 1 tablespoon of olive oil
- 2 cups of diced onions
- 1 lb of Italian sausage — I go for the mild, but you know your family’s taste preference
- 2 or 3 minced cloves of garlic
- 3/4 cup of chicken broth
- 1 14.5 ounce can of petite diced tomatoes
- 1/2 cup regular or heavy cream
- 9 ounces of fresh or frozen tortellini
- salt and pepper to taste
- 2 cups fresh baby spinach, loosely packed
Now, let’s put this recipe together in a 12-inch skillet — or larger if you’re making more or just like using a larger skillet.
- Begin by heating the olive oil in your skillet over medium heat. When it gets hot, add the diced onions.
- The problem with Italian sausage is removing the casing . . . so slice it and squeeze it out of the casing. You’re going to squeeze out your sausage right into the pan over the onions.
- Break up the sausage into bite-sized pieces. Increase the heat to medium-high and cook, stirring occasionally until the sausage is browned.
- Reduce the heat to low and add the garlic and stir until the aroma makes you swoon — that’s about half a minute.
- Add the broth, tomatoes, cream and tortellini to the skillet. Stir to combine. Increase the heat and bring it to a boil.
- Cover, then reduce the heat and simmer for 15 minutes until the tortellini is tender and heated through.
- Taste the sauce and add salt and pepper to taste.
- Add the fresh spinach and stir until softened and wilted.
- Remove from heat and serve.
Now, that wasn’t so difficult. And, now you have a delicious meal your whole family with love and you won’t be spending much time in the kitchen cleaning up.
You can use whatever pasta you like or use hamburger instead of the Italian sausage or whatever meat you want to use or no meat if you prefer . . . maybe add vegetables and you’ll have a great little feast your family will enjoy.
Thanks for stopping by!
by Sharon | Jun 13, 2015

These mini banana split firecrackers will be a definite hit at your 4th of July BBQ. You’re going to need some cherries with the stems, bananas, blue chocolate melts, sprinkles and some whipped cream. Melt the blue chocolate melts in the microwave. Peel the banana and cut it into the size you like. Dip it in the chocolate melts, roll in the sprinkles, set it upright, add a spritz of whipped cream and a washed cherry and you’re ready to do another. Serve immediately so your whipped cream doesn’t melt.
You may want to do the bananas and dip them in chocolate and the sprinkles, then when you’re ready to serve them put on the whipped cream and the cherry.
Once your guests see these, they won’t last long!!