First off, I must say to family and friends — the youngsters . . . I am so very envious that you get a whole week off from school to celebrate Thanksgiving. When I was your age . . . I got 2 days . . . 2 . . . count them 1 . . . 2 days — Thursday and Friday.
All right, I’m an adult . . . I’m over it . . . two stinking days. . . and they get a whole cotton picking week . . . a whole week!
Enough foolishness! I have things to put together so your week . . . will be great with goodies . . .
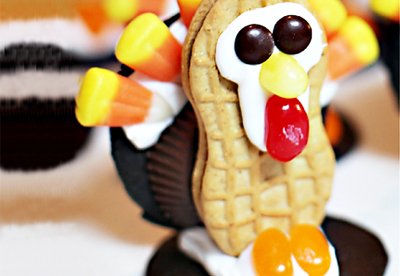 This little turkey has lots of pieces to put in place. Have you guessed all the ingredients? And . . . you can change them to make them original to you.
Here are the ingredients . . . how many did you get right?
- Nutter Butter Cookies — that was a give-away with the peanut shape, but you could use Vienna Fingers if peanut butter isn’t your thing
- Mini M&Ms — use the brown ones to be traditional or go a bit wild, you’re creating these turkeys — you can also use those candy eyes
- Betty Crocker White Cookie Icing — this is a must use for taste and the glue quality — you don’t want it falling apart
- Jelly Bellys — yellow, red and orange
- Reeses Peanut Butter Cups — hummmm, if peanut butter isn’t your things . . . you’ll have to work on that one . . . or use another Nabisco Famous Chocolate Wafer Cookie or a whole Nabisco Oreo Cookie — whew I thought of an alternative 🙂
- Nabisco Famous Chocolate Wafer Cookies — if they’re not in the cookie section of your store, you’ll find them in the ice cream section
- Candy Corn
Now, just follow the picture and before you know it you created a delicious cookie turkey! And since you bought all the ingredients you might as well make a whole bunch of them. A “rafter” of turkeys . . . not a flock . . . or a gobble . . . since you have a whole doggone week off, you should still learn something!
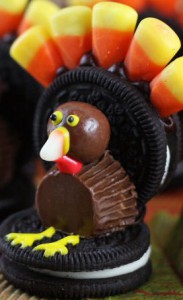
Moving on, we have this handsome fellow:
Once again, do you know what you need to make these adorable turkeys? Maybe this is just too easy, but it’s lots of fun!
Here’s what you’re going to need (some left overs from the above recipe will work fine):
- You can use Double Stuff Oreo Cookies or the regular ones for the base and the tail feather base
- Candy Corn for the tail feathers
- Whoppers for the head — did you guess this one?
- Mini Peanut Butter Cups — here we go again . . . will Rolos work or are they too small? I think they’re too small . . . maybe a chocolate covered marshmallow will work . . . think about it . . .
- Betty Crocker Frosting in the tubes: Chocolate, Yellow, Red and Black
- You can make the eyes with frosting or go for the candy eyes
Now, putting these together may be a challenge.
- I usually like to begin from the bottom up, but this time we’re going to start with the tail feather Oreo cookie . . . put some chocolate frosting inside to hold the candy corns as you place them around the top section or do it however you like . . . top of the tail feathers or add a few more for a fuller look . . . up to you. I also cut off the white tips to use for the beak . . . it also helps to have a flat surface on your candy corn to stick in the chocolate frosting. Just my preference.
- Put down an Oreo cookie — this is your base. Use some chocolate frosting to “glue” the tail feather Oreo to the base Oreo.
- While the chocolate frosting is setting . . . unwrap your mini Peanut Butter Cups . . . with the bottom up and using a sharp knife (kids don’t do this part) cut a sliver off of one side using a sawing motion to keep from breaking the whole peanut butter cup. You’re making a flat surface and a nice little taste . . .
- Once you finish sawing a flat spot in all the peanut butter cups, carefully flip over your stuck together Oreo cookies — you now want the tail feathers on the table . . . and the base up in the air. The flat spot you made in your peanut butter cup is going to be “glued” with chocolate frosting to the Oreo base . . . and the top of the peanut butter cup is going to be “glued” to the Oreo feather (candy corn) holder . . .
- Keep the Oreos in this position . . . the frosting needs time to set. Next comes the Whopper . . . that’s the turkey head . . . the back of the head is “glued” with chocolate frosting to the Oreo cookie tail piece . . . also glued on top of the peanut butter cup . . . you’ve created a flat turkey belly with the bottom of the peanut butter cup now a round head with the whopper . . . check out the picture . . . don’t want you putting the head in the wrong place . . .
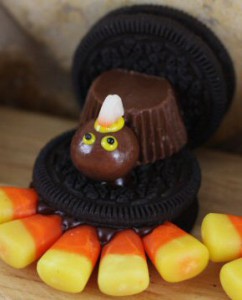 Is this how your turkey cookies look? If not, then my directions stink! This is how it’s supposed to look on your work space . . . glue on the white candy corn tips for the beaks and do the eyes however you choose to do them . . . with frosting or those candy eyes . . .
 - Another lesson!!! Whoopeee!!! What’s that red thing you’ll be adding across the beak and down to one side? It’s not a “gobble gobble” and it’s not a “wattle” . . . give up? It’s a “snood” . . . yes a “snood”. I’d go into more detail about the thing, but we’re working with food here and “snood” completes your lesson 🙂
- Once the beak has set and is staying in place . . . gently flip the cookies over to set on its base with the tail feathers up in the air . . . like the first picture . . . Now, with the turkey sitting properly, you can add the red snood. (Aren’t you glad you learned what that thing is??!!)
- Give the little guy some yellow frosting feet and I think you’re done!
All right, one more . . . a Pilgrim hat:
This is so easy . . . I’m almost cheating on this one! Here’s the picture:

Do you know the ingredients for this Pilgrim Hat? Need a hint? There are only four ingredients:
- Chocolate-Striped Shortbread Cookies
- Package of Chocolate Chips or Chocolate Candy Melts
- Marshmallows
- Tube of yellow decorators’ frosting — I go for Betty Crocker, but you can choose what you like
Putting the Pilgrim Hats together:
- Cover a tray with wax-paper and set the Chocolate-Striped cookies stripes down, chocolate side up . . . give them some space between cookies
- Melt the chocolate chips or chocolate candy melts in the microwave or a double boiler
- One at a time, stick a toothpick into a marshmallow and dip it into the melted chocolate, covering it completely.
- Center the chocolate covered marshmallow on top of the shortbread cookie.
- Gently remove the toothpick and dip the remaining marshmallows, etc.
- Chill the hats in the refrigerator until the chocolate sets.
- Once chilled, pipe a yellow frosting buckle on the front of each hat.
All done!
There you have three Thanksgiving themed goodies the kids can help you make.
Thanks for stopping by! Have a Happy Thanksgiving!!!
