by Sharon | Jul 13, 2014
Candy Box Templates are great to have all year round to fill with all kinds of goodies for your family and friends. They’re great for Halloween Parties as party favors or for children to give their teachers and friends. They are even good to take to a party and give to your host and hostess. I like surprising my neighbors with a fun filled box of treats. This Halloween Candy Box compliments of http://www.spoonful.com is no exception. It’s perfect for you to print out on cardstock, fold and fill with goodies.
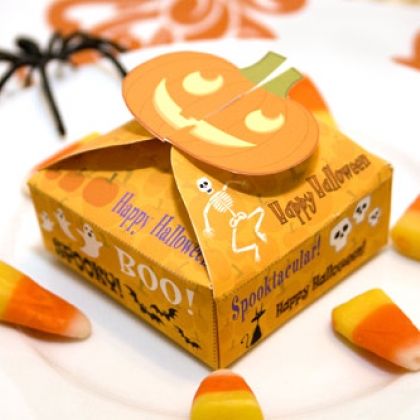
Click Here to Download your Halloween Candy Box.
This is one of those Free Templates I recommend you print out several extras. Someone will always pop up and it would be nice to give them a bit of a surprise. And the kids will always think of one or two extra people to give these to, too.
I think they’d work great in the office. Adults like Halloween treats, too.
by Sharon | Jul 12, 2014
These Grape Caterpillars are good enough to eat . . . and a healthy snack, too. I don’t know why kids will eat creepy stuff, but refuse to eat ugly vegetables. It may definitely be the presentation. Maybe anything on a thin wooden skewer with eyes is the secret.

This is a simple recipe.
- Buy a bunch of grapes, thin wooden skewers, a small tube of white frosting gel and a bag of chocolate chips.
- Wash the grapes.
- Remove the stems.
- Place 12 green grapes on a thin wooden skewer.
- Squeeze out a bit of frosting gel for the whites of the eyes and put a chocolate chip in the center of the white frosting.
- Chill in the refrigerator before serving.
Now, wasn’t that easy!
There you have it — Grape Caterpillars!
by Sharon | Jul 12, 2014
This is an excellent open candy box that is a delightful hostess gift. My cousin made dozens of these last year for Halloween. By using the Free Templates she traced the outside of the shoe on black cardstock and the inside on printed scrapbooking paper. She adored them by using a variety of buttons and used ribbons that were printed with Halloween themes.
This is one of those templates that can be used for many occasions. It has been used as hostess gifts for a bridal shower. Everyone loves having chocolate goodies wrapped up in a pretty shoe. A Special birthday party is another occasion where these templates have been enjoyed as party favors. I’m sure you can think of other uses for this template, too.

This image and Free Templates are compliments of http://www.skiptomylou.org
Here are the Free Templates:
Shoe Template
Shoe Lining Template
To make these Witches Shoes, you’ll need:
- black cardstock for the outside of the shoe
- printed scrapbook paper for the inside of the shoe
- templates for both the outside and inside of the shoe
- carbon paper to place between the template and the cardstock or scrapbook paper to mark the folded lines
- you may want to use a ruler when marking the folded lines onto your cardstock or scrapbook paper
- folder tool
- glue stick
- mini clothes pins to hold the glued pieces together until dry
- white pencil to trace around the template on the black cardstock
- suitable pencil or pen to trace around the template on the scrapbook printed pattern paper
- assorted buttons
- assorted ribbon
- any other adornments you want to put on your shoes
Assembling your shoes:
- Print out the templates on card stock for tracing onto your black cardstock and scrapbook printed pattern paper
- Cut out the outline of your templates — be sure to mark them for the outside shoe and inside shoe
- Use carbon paper to trace the folded lines onto the cardstock and scrapbook paper using the appropriate template
- Cut out the cardstock outside shoe and score the folded lines with a folder tool
- Fold it following the instructions on the template and glue, holding it together with mini clothes pins
- Use the same instructions when tracing around the template for the inside shoe and tracing the folded lines from the template to the scrapbook paper
- Cut out the scrapbook paper inside shoe and score the folded lines with a folder tool
- Fold the inside of the shoe following the instructions on the template and glue inside the black cardstock outside shoe, hold into place until dry using mini clothes pins
- Once your shoe dries you’re ready to decorate it
- Once all your embellishments are in place, you’re ready to fill them with goodies
With all the directions and materials you’ll need to complete this project, you’ll find it is much easier to put together than it seems reading the directions. If you’re going to make quite a few of these, you can get an assembly line going and have these completed in a relatively short time.
It’s a fun project once the shoes are made. That’s when the kids will want to help you decorate them with buttons, bows, and maybe even sequins. There’s no telling where your or their imaginations will take you or them.
by Sharon | Jul 11, 2014
She got a cupcake with green frosting dropped on her, of course.
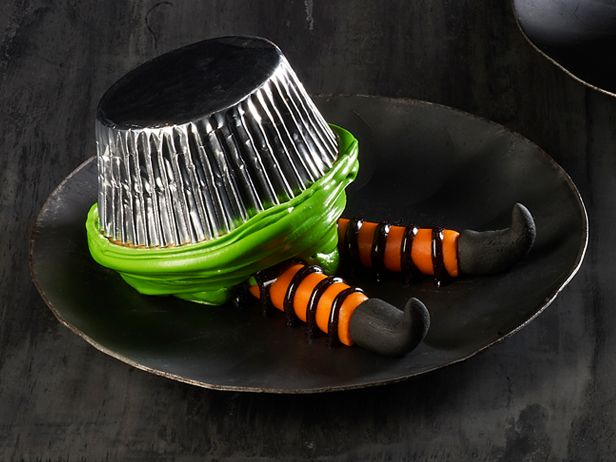 Image and concept compliments of http://www.foodnetwork.com
I know, it’s not what happened in the Wizard of Oz, but that’s definitely what can happen on your plate when you make cupcakes, decorate them with green frosting and plunk one on orange fondant legs (2 3″ long rolls). You make the shoes with black fondant and use black decorating gel to finish off the witch’s stockings. It’s an upside-down decorated cupcake!
Kids will love them and your adult guests will, too.
They’re fun and make me laugh.
by Sharon | Jul 10, 2014
Here’s a clever idea for your front porch. The sign reads, “It’s all about the CANDY” with two clip boards used for the numbers you’ll be changing daily counting down the days until Halloween or Trick and Treating. This should get the neighborhood kids excited as they walk by on their way to school in the morning and the whole neighborhood as well. It’s a reminder of how many more days they have to get their decorations up or to stock up on candy. Or prepare for their Halloween Party. Oh, my goodness what to wear?
You can use pallet wood or fence wood, cut 2 1/2 feet long for each part of your sign that you’ll nail to two 7 foot long 2″x2″ posts.
For the kids it may all be about the candy and this sign works quite nicely, but it is Halloween and I’m sure you can come up with some spooky sayings to go along with your countdown sign. Maybe to do with witches flying around in the night sky or something about ghosts . . . pumpkins and carving jack-o-lanterns or getting your costume . . . there are several original directions you can go with this project.

This image of the front porch Countdown Sign is compliments of http://www.cornerhouseblog.com I like the bottom display with pumpkins, the skull and hanging skeletons and is that a raven?
The more involved you get with the lettering the more you’ll realize the need for a Silhouette CAMEO Electronic Craft Cutter Deluxe Bundle – Vinyl + Tools to cut out the stencils you’ll be using for your sign. And then you can paint over this one and do something clever for Christmas. For me, it’s all about recycling what I make to use for other holidays. Once you make it, it can be used again instead of just storing it in the garage. For me, it’s not something I would use again next year. My neighbors expect something new.
Besides the pallet boards or fence boards and the two 2″x2″ posts, you’ll want some white paint and use it as a wash over your boards. To make a wash you add water to the white paint so it’s runny and does a light coloring to the wood. You can distress the wood by hitting it with the back of the hammer or the garden tools you have around. Just to mark up the wood so it doesn’t look new.
I use butcher paper to lay out my design to figure out how many boards I need and how I’m going to place everything on the sign. In this sign there were candy corns.
Once you have this all worked out, you’re ready to nail the boards to the posts using 2 to 4 nails for each. Then put down your stencils and paint them using a foam paint brush for dobbing the paint inside the stenciled letters. You’ll also need a variety of paints you can use for this project. I also have a drop cloth on my patio so I don’t leave evidence of this or other projects.
Once the sign is done and while it’s drying you can get to work on the display that’s going to be on the porch to help hold the sign in place and to add some Halloween color.
I forgot the clipboards and the numbers you can print out on your computer, but I’m sure you already figured that part out.
As I said earlier, this is a clever idea that you can use with the saying of this project or work out one of your own.


