I heard about it several years ago, but didn’t think much of it . . . until now.
I got thinking about the layering of paper many crafters do. Then I wondered how quilling could be a part of that, especially when it involves 3-D objects. And the ability of designing them out of paper.
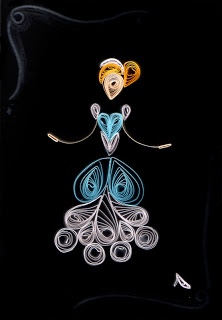
The rolling of paper and manipulating it into different shapes is absolutely amazing as in the picture on the right. Quilling does allow the image to come out of the paper background without the use of pop-dots or foam dots. It is truly a unique way of layering paper.
It is quite lovely, but I was looking for something more . . .
I’ve worked with clay in the past with a kiln and all that, but with paper . . . that would truly be amazing.
This is when I discovered quilling could be the answer. Strips of paper rolled up with several layers of thin strips of paper could be shaped in such a way as to make 3-D objects.
I’ve been mesmerized for the past few days . . .It is truly amazing what can be created from rolled up strips of paper. They don’t have to be glued to a piece of paper. They can stand alone . . . and they can be dressed up with paper . . . it is truly amazing what can be created with these strips of paper.
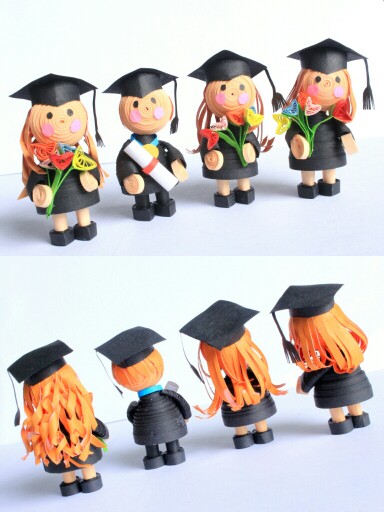
Take a good look at these graduates . . . front and back . . .
The nose is the center of the rolled up strip of paper. Eyes were added and they do have a smile . . . The hair is paper as are all the other elements.
Quilling isn’t as popular as it once was . . . if it was ever truly popular . . . There are many crafters who make quilled earrings. This is has been a nice business for them. Some make up pictures and use quilling to make them pop out.
I love this 3-D art concept of quilling. You don’t really need that many tools and the supplies are relatively inexpensive compared to other hobbies . . . but the reward you receive by creating these 3-D objects is absolutely priceless.
I was on a website earlier today where a woman made a whole family of minions. She loves them . . . Each one is different, she says . . . of course they are . . . each one is made separately! They would have their own personality given the number of eyes and how their arms and legs have settled . . . Just as these graduates. The girls are holding flowers . . . the hair is different and the way they wear their cap is a bit different . . .
And even the tassels on their cap is a bit different. And, their hands and feet and legs could be a little different as well as their bodies.
The thing is, once you get started, you’re hooked and you continue to make more and more. It is a learning process . . . and we always enjoy doing what we do well . . . and tweak it a bit.
I do love the attention to detail . . . front and back that this allows you to make. And they are solid — not hollow.
The woman I spoke of earlier with her minions, well she sold some. I think this was a good thing at the time, but she did enjoy looking at them and even playing with them. This does bring the kid out in you. Which I believe is definitely a good thing. Also the fact that she sold some of her minions, gave her an opportunity to make more.
The surprising thing is that she was able to make her minion invasion in about a week . . . It does take time to make each one, but the time spent is thoroughly enjoyable. And one leads to another and another . . . until you have more than you know what to do with . . . but they are small and will fit nicely in a shoebox . . .
Here are some quilling tools and materials you may find helpful . . . if you want to try it out:
I do hope this blog post was enjoyable and gave you something to think about. Maybe try your hand at this quilling craft.
I know it is way early to be thinking about Halloween, but . . . it doesn’t hurt to get started with some of your Halloween decor.
I know people who plan for their Halloween party immediately after their last Halloween party . . . the guests haven’t even gotten home when one friend of mine is thinking about next year . . . or maybe a summer Halloween bash.
Some people love this season so much that they celebrate it throughout the year.
With some crafts, it does take quite a while to complete . . . especially if you’re making more than one . . . or having fun adding all kinds of stuff to it.
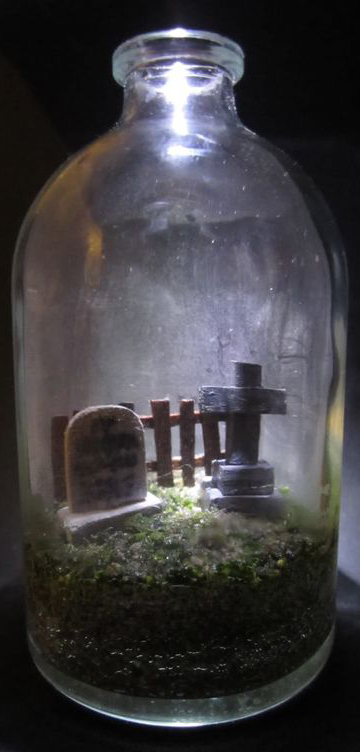
I think it’s fun to mix up the holidays a bit and enjoy them throughout the year . . . maybe not formally, but with making stuff. And making a Halloween scene inside a bottle just may be the challenging project you would completely enjoy.
I do like the idea of making a cemetery scene in a bottle . . . maybe a skeleton could be added to the setting with him thinking about his situation or the situation of the person whose grave site he’s visiting. Maybe a pumpkin or two would dress up this scene a bit.
I don’t know how to do it . . . but it would be fun to use some paper and make the elements . . . stick them in the mossy stuff you put in the bottle — maybe some dirt, too . . . then with a string and a long thin stick you can set things up . . .
Just roll them up, pop then through the top of the bottle and help stand it up in the right location. It could be much more challenging than those video games you’re so fond of playing . . . maybe get the family involved . . . see who has the best dexterity skills . . . take advantage of the skills developed playing on the computer.
I don’t know about you, but this looks like fun . . . and since I have plenty of time before Halloween . . . I can take my time . . . and make several of them . . .
Let’s look at some suitable bottles or jars:
I like the milk bottle . . . the opening is large enough to set your Halloween scene up quite nicely . . . or decorate the outside with your Halloween scene and fill with candy.
Have fun and enjoy making this or a different craft in preparing for Halloween . . . or you could put your party invitation in a bottle . . . that’s an interesting thought . . .
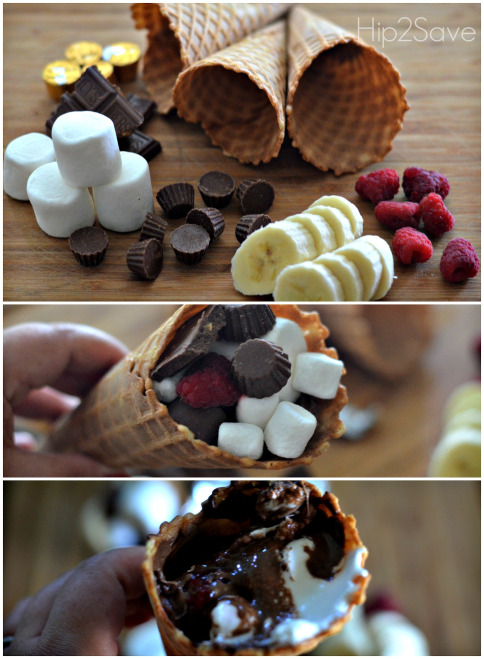
Line a terra cotta pot with aluminium foil, put in some charcoal, light it and you have a mini campfire where you can roast marshmallows . . . or make some s’mores . . . or make a delicious sugar cone filled with fruit and chocolate and marshmallows . . . heat it on your mini campfire . . .
While you’re enjoying your delicious treat, you can tell some wonderful ghost stories . . .
Plus you can surprise Dad with this for Father’s Day!
And, once you do this . . . you’ve found the go-to-treat your family will ask for all summer long.
Be sure to be responsible with adult supervision. You don’t want to have a huge fire, even if you use a larger terra cotta pot . . . you just need enough heat to melt the chocolate and the marshmallows.
Sugar Cone or Waffle Cone Delicious Summer Treat Recipe
This will be easy for you to make and find all the ingredients . . . it’s just stuff you love and would like to have all melted together into a cone.
You can make these on the grill after BBQ-ing, on a campfire and even in the oven . . . I kind of like that idea — a delicious treat that can be made throughout the year — just a thought.
It is quite clever to use a waffle cone in place of the graham crackers in the original s’mores tradition.
I wonder about adding some chopped nuts . . . or if this would be chewy enough with the cone . . . or adding some broken up pieces of graham cracker . . . or even cookie pieces . . .
These will definitely be easier to put together and have stay together from the first to last bite.
Here is a list of suggested ingredients — be sure to add some items of your own — and delete some as well:
marshmallows
Reese’s peanut butter cups
chocolate bar pieces
Rolos
butterscotch chips
chocolate chips
banana slices
sliced raspberries
sliced strawberries
Now:
Fill the cone with desired amounts of marshmallow and other ingredients.
Cover the cone with aluminium foil.
Place over the campfire for about 3-5 minutes or on a heated grill for 5-6 minutes or in the oven at 375° F for about 5=8 minutes. You want the toppings melted.
Enjoy the warm and gooey melted feast of chocolate. marshmallow and fruit pieces.
This is definitely a winner . . . something I can see offering throughout the summer . . . into the fall . . . and winter, too!
I hope you’ll try these out and see how it works for you.
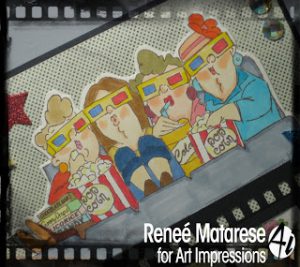
These ladies know how to have fun . . . and fun they do have throughout the pages in my mini-albums and on various greeting cards I make for family and friends.
These stamps for me have become a “family” . . . they are very much part of my everyday life . . . And the thing is, I can’t buy just one set of these stamps . . . One leads to another . . . and another . . .
I don’t fancy myself as a “stamper”, but when it comes to these ladies . . . I am so hooked . . .
They are excellent to create adventures for them to share with you through the pages of your journals . . . scrapbooks . . . mini-albums . . . greeting cards . . .
As I said earlier, they have become “family” for me.
These are Art Impressions Girlfriends Cling Rubber Stamps. They are individually trimmed and mounted on repositional cling cushion. The detailed image gives a great stamping experience because of the high grade gray rubber used. These stamp sets are easy to store and are used with acrylic blocks that are sold separately and can be used for other stamp sets as well. These are individually packaged and include black and white as well as colored “actual size” image samples.
I absolutely love them!! They remind me of ladies I know . . . who have never really grown up . . . and have the time of their life each and every day!! Yes, life is a celebration for them!
I could go on and on with more and more links for you. I know you will be able to explore on your own once you click one of the links above to get just the right stamps that fit in with your crafting style.
There are the ladies at the movies, at the pool, celebrating a birthday . . . there they are at the beauty shop . . . and having some fun at a party. I do hope you love them as much as I do . . . they truly make me laugh!
These girlfriends are going to accompany me on many great adventures . . . Maybe they’ll feel right at home with you and your family, too.
Well, I’m not that patient. But I do rack up quite a few hours watching how to videos.
Watching isn’t doing — watching isn’t “practice.”
There are definite things you’ll need to do in order to achieve your goal . . . and you may be able to do it in just 20 hours!
Do you want to know how?
Watch this:
Yes, I believe by following these 4 steps, you’ll be able to do whatever it is you’d like to do. The most difficult part is step 3 for me. But, it all depends upon how badly I want to be able to do something.
I think another difficult step it breaking everything down into steps . . . you really have to know what you need to know in order to do what it is you want to learn.
And, this could be half the fun!
It’s like taking baby steps, making corrections along the way and practice for the 20 hours and more if necessary. And, I believe it doesn’t stop there. Once you get to a level, you may want to take it to the next . . . then the next. And, before long, you’ll be mastering it . . . and perhaps reaching that 10,000 hour benchmark.
Time does fly when you’re making progress . . . and love what you’re doing!
I found this TED Talk quite motivating and I hope you found it motivating, too.