by Sharon | Nov 2, 2014
Don’t You Just Love Them!!!

Image is compliments of http://family.disney.com
Minnie, Mickey and Daisy are available to give you a hand in getting your favorite fall recipes in order. You may want to print out dozens on either card stock or plain copy paper. I prefer the card stock, but use what works best to you.
I don’t know about you, but some colorful recipe cards are exactly what I need to get in the mood to bake up batches of cookies, pies and other delicious fall concoctions. When I see these cards in my recipe box, I immediately know to pay attention to them.
These are also great when you’re sharing recipes with family and friends.
Here’s your first recipe Mickey and Mini’s Pumpkin Whoopie Pies
This is what you’re going to need:
- Dig in the kitchen cupboards and drawers for: mixing bowls, whisk, electric mixer, wooden spoon
- 2 cups of flour — your choice, try out the gluten free variety that seems really popular
- 1 teaspoon baking powder
- 1 teaspoon baking soda
- 1 teaspoon ground cinnamon
- 1/2 teaspoon salt
- 1/2 cup softened butter
- 1 cup brown sugar
- 1 large egg that you’re going to beaten ever so lightly
- 1 cup cooked pumpkin puree
- 1 teaspoon vanilla extract
Goodness, I never thought this list was going to end!
You’re going to need some more stuff to put these delicious whoopie pies together:
- For you fancy and seasoned bakers out there, you’ll need a Pastry bag with 3/4-inch opening OR, if you want to do it the easy way, I’d go for a Large Plastic Food Storage Bag and snip out a lower corner, but don’t snip it out now 🙂
- Baking sheets
- Parchment paper
- Cooling rack
- Cream cheese frosting — use your recipe or go for the store bought — or use a frosting of your choice
Let’s get these whoopie pies made, shall we:
- Heat the oven to 350 degrees.
- In a mixing bowl, whisk together the flour, baking powder, baking soda, ground cinnamon, and salt.
- In a second mixing bowl, beat the butter and brown sugar together until creamy.
- Beat in the egg, pumpkin puree and vanilla extract.
- Stir the flour mixture into the butter mixture.
- Then spoon the batter into the pastry or plastic food storage bag. Once it’s filled, snip off a corner, if you’re using a plastic food storage bag. You may want to experiment with your snips 🙂
- For the Mickey faces, pipe 2.5-inch blobs of batter on a parchment paper lined baking sheet, not too close. Remember, you need two for each whoopie pie. Use a clean fingertip to gently flatten the blobs into uniform circles. You’re going to have to keep your fingertip clean, so a wet paper towel works well or you can dip your fingertip in water — the batter is going to be sticky.
- Pipe small ear blobs at the top of each batter face, keeping them as close in size as possible. Again, use a wet fingertip to flatten them.
- Pop them in the oven and bake the Mickey pumpkin cakes until they spring back when you press down on the center. This will take 8 to 10 minutes.
- Take them out of the oven and allow them to cool on the baking sheet before transferring them to a wire rack to cool completely.
- Spoon cream cheese frosting into a pastry bag or get another handy dandy plastic food storage bag and snip off the corner.
- Pair up the baked pumpkin cakes, matching the shapes and sizes as best you can.
- Working with one pair at a time, turn one of the cakes face down and pipe moderate mounds of frosting on the face and ears.
- Top the frosted cake with its match and gently press down to spread the filling and hold the whoopie pie together.
Well, there you have it. And, I would say it is definitely worth it when you see your kids gobble them up. There is definite satisfaction in knowing you made these yourself. The big plus for me is knowing exactly what’s in it.
Enjoy the recipe cards and this great Mickey and Mini Mouse Pumpkin Whoopie Pie Recipe.
by Sharon | Oct 9, 2014
I got up early this morning. Just looking around for something interesting to share.
I absolutely love paper crafts with FREE templates. I have a Haunted House on my other website http://oldhauntedstuff.com and thought for here at TwoCansOnAString.com I could do so very much better. I could give you a whole village with a whole lot of micromonsters to add to it. Along with anything else that grabbed my attention.
I understand this is a major undertaking on my part and will be a major project for you. I am very much into family and having a family work together on projects. That’s what makes paper crafts so very much fun as far as I’m concerned.
Haunted Houses are very popular for Halloween with ghosts, ghouls, witches, vampires, zombies and all things creepy.
This is a wonderful craft project you can use as a centerpiece on your dining room table. It may look nice on your mantle. Or any space you would like to decorate for Halloween.
When people realize you made these yourself, be prepared to print out some more or tell them about TwoCansOnAString.com I would greatly appreciate it.
All right, enough rambling, let’s get started!
I print these free templates on card stock. The instructions I print out on regular printer paper.
All Images and Free Templates compliments of http://ravensblight.com
Haunted House with a Secret Chamber


Ghost House Assembly Instructions
Ghost House
Starc Manor

Starc Manor Assembly Instructions
Starc Manor
Darc Mansion

Darc Mansion Assembly Instructions
Darc Mansion
The Cliff House

Cliff House Assembly Instructions
Cliff House
Gothic Chapel With Hidden Chamber


Gothic Chapel Assembly Instructions
Gothic Chapel
Ravensblight Manor

Ravensblight Manor Assembly Instructions
Ravensblight Manor
Ravensblight Main Street
What’s really great about Ravensblight Main Street is that you can either print out more buildings or change the signs . . . you can even add your own . . . now that should be fun! There are also two backdrops: Moonlit sky or Sunset sky . . . or you can have two different Main Streets . . . one by Moonlight and another at Sunset . . . There’s even a miniature hearse you may make and set up wherever appropriate.

Ravensblight Main Street Assembly Instructions
Ravensblight Main Street
Hidden Cemetery
You can have some fun with the Hidden Cemetery — you can make it as large or small as you choose. You can place it anywhere you like in your Haunted Village . . . or you may want more than one . . . just a thought.

Hidden Cemetery Assembly Instructions
Hidden Cemetery
I’m wondering who or what lingers around this Haunted Village . . .


My, my, my what an interesting group of characters we have here . . . Yes, I do believe they fit in quite well with Ravensblight Village.
I may add just one more for fun: Pop-Up Card Haunted House

Haunted House Pop-Up Card Assembly Instructions
Haunted House Pop-Up Card
Postal Envelope
Parchment Envelope
I hope you’ve found something here you’re going to make and enjoy.
Thanks for stopping by!
by Sharon | Oct 4, 2014
Getting into the spirit of Halloween! Free Halloween boxes are great fun to fill with all kinds of interesting things.
Click Here
Now, let’s see what else I have for your excellent Halloween celebration.
 Compliments of Diana Evans dianaevans.blogspot.com
Free Printable
I do love boxes! They are so very easy to stack up . . . also print out some extras so you’ll be prepared for “unexpected” guests.
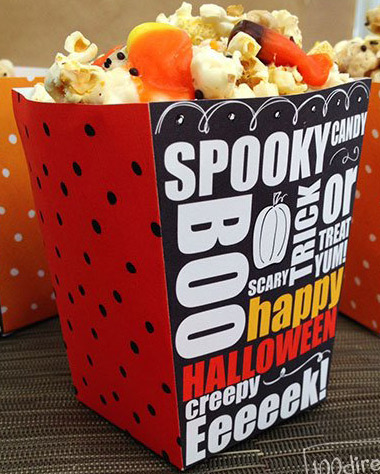
How about a Halloween Popcorn Treat Box from Jen Goode 100directions.com ?
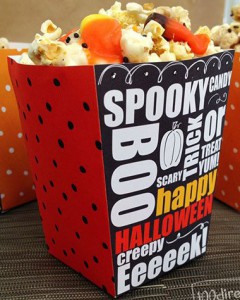
Halloween Popcorn Box
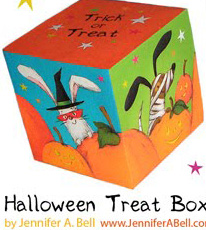
Here’s another box you may enjoy making and filling with some special treats.

Image and Free Printable Compliments of Cameron Blazer of cottage-industrialist.com
Just Click Here
I do have an added treat for you. It’s a vintage collection of cupcake wrappers and toppers. Just click the words: Vintage Collection
That about wraps it up until next time. Thanks for stopping by!
by Sharon | Oct 2, 2014
Have you met Ezra, Phineas, and Gus?
They’re the Hitchhiking Ghosts from Disney’s Haunted Mansion. They would absolutely love to join your party.

The Image and Free Templates are compliments of http://family.disney.com
These 3D ghosts are excellent to print out and put together and use to decorate various places around the house. They may be used as a centerpiece for your Halloween Party spread. They are absolutely adorable!
Click Here for the Free Printable.
You may also like the Hitchhiking Ghost Masks

They’re fun for kids and stuffed animals. I also put them on pumpkins, brooms and even hang them on the wall. You can probably think of dozens of uses for these great masks to print out on card stock, cut out and have fun.
All three of the Haunted Mansion Hitchhiking Ghosts are in this Free Printable
I’ll be adding more great Halloween stuff for you to make and even eat.
Thanks for stopping by!
by Sharon | Aug 30, 2014
Halloween would not be complete without Jack Skellinngton hanging on your door. He can hang indoors or outdoors depending on your decorating pleasure. It doesn’t have to be your front door or back door, but any door in the house. Or you may prefer to hang him on a wall. I doubt Jack would mind as long as he shares in your Halloween Fun.
You know his likeness is going to adorn cupcakes and cookies. For some reason his mug gets into something I make for Halloween. The kids absolutely love him and, of course, we have to watch The Nightmare Before Christmas, too. He is quite a dapper gent and would look great wherever he hangs.
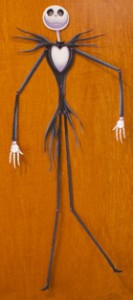
Image and Free Printable Compliments of http://www.spoonful.com
You can download Jack Skellinnington on either plain paper or cardstock. I prefer cardstock because his arms and legs are so skinny, but you decide what is best for you.
I hope you and your family enjoy having Jack around this Halloween.
by Sharon | Aug 25, 2014
Free is always good. These pumpkin face stencils can be used for your pumpkin carving project or cut them out of fabric to decorate a t-shirt and I’m sure you can think of a dozen other uses for these free stencils.
Just off the top of my head, I’m thinking about using these stencils to paint some goofy and scary faces on pumpkins. You could paint bottles and fill them with candy. You could decorate all kinds of things with these stencils, maybe even make a costume or use them for face painting.
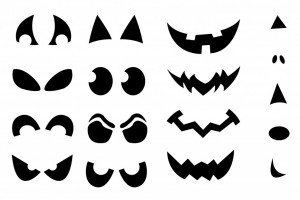
Image and stencils compliments of http://www.craftbuds.com
Have fun and create all kinds of great things . . . they may make some spooky cookies or cupcakes, too.