by Sharon | Jul 25, 2014
I’ve recently learned about this tradition of Boo-ing Neighbors. You do it a few weeks before Halloween. It’s quite exciting, actually. What you do, for those of you who don’t know about this, is make up some signs one with a poem about “Being Boo-ed” and one announcing “We’ve Been Boo-ed” — it’s a sign neighbors are asked to put on their door or in a window to let others know they’ve been boo-ed and to go boo someone who hasn’t been boo-ed, yet. You put the poem and sign in a container of your choice with candy and goodies. I go with the wrapped candy and goodies, because no one knows from whom it came.
Here’s a Halloween Party Favor Treat Cone Free Template you may like as a container for your “Boo Delivers.” Here’s the link right here at Two Cans On A String.com https://twocansonastring.com/halloween-party-favor-treat-cone-with-free-templates/

Image and Free Printables Courtesy of http://www.sistasfun.blogspot.com
Under cover of darkness you deliver your “boo deliveries.” The fun part is ringing the doorbell and running for cover so you don’t get caught. Kids really like this part, sneaking up to porches, leaving the goodies, ringing the doorbell and running for cover in the bushes, behind trees and maybe they make it down the street to where you’re waiting in the “get-away car.”
I like the idea, because it is a nice thing to do for a neighbor. It also creates a buzz of goodwill around the neighborhood of neighbors doing something nice for neighbors. It’s fun to see the “I’ve Been Boo-ed” signs pop up on doors or in windows. The great thing is when everyone has been boo-ed.
You can start this tradition this year. You can give just one or more. Neighbors are encouraged to do the same to two neighbors . . . then those two boo two others . . . it should spread throughout the neighborhood quickly . . .
Here are the Free Printables:
You’ve Been Boo’ed and We’ve Been Boo’ed
If you’d like to give packages of Pumpkin Poo as treats, here’s another Free Printable: Labels for Cheese Puffs
I make up four of these and place them at houses where I know there are elderly people who don’t normally participate in Halloween, but deserve something special. I leave it on their doorstep without ringing the doorbell. I also make up two more for families with kids. I know they are very likely to participate in this boo-ing activity. That does get the ball rolling — and when I get boo-ed I can make up two more and have some more fun. Or, I can put the “We’ve Been Boo-ed” sign on my door to help keep the mystery going of who started this. . . but, to tell you the truth, I do like getting “Boo-ed.”
by Sharon | Jul 24, 2014
I love making things from common, everyday objects. This miniature Spooky Tree is made from a brown lunch size paper bag. If you would prefer a larger Spooky Tree as a centerpiece, you can use the grocery size brown paper bag. It may be fun to make several of the small ones and place them around your table with different displays at the base. I filled my paper bag with plastic pellets to give it some weight while I blended the center to make the trunk and the branches. Some may glue it to a cardboard base, but I find the plastic pellets to work well.
It’s always good to have a video to show you how it’s done:
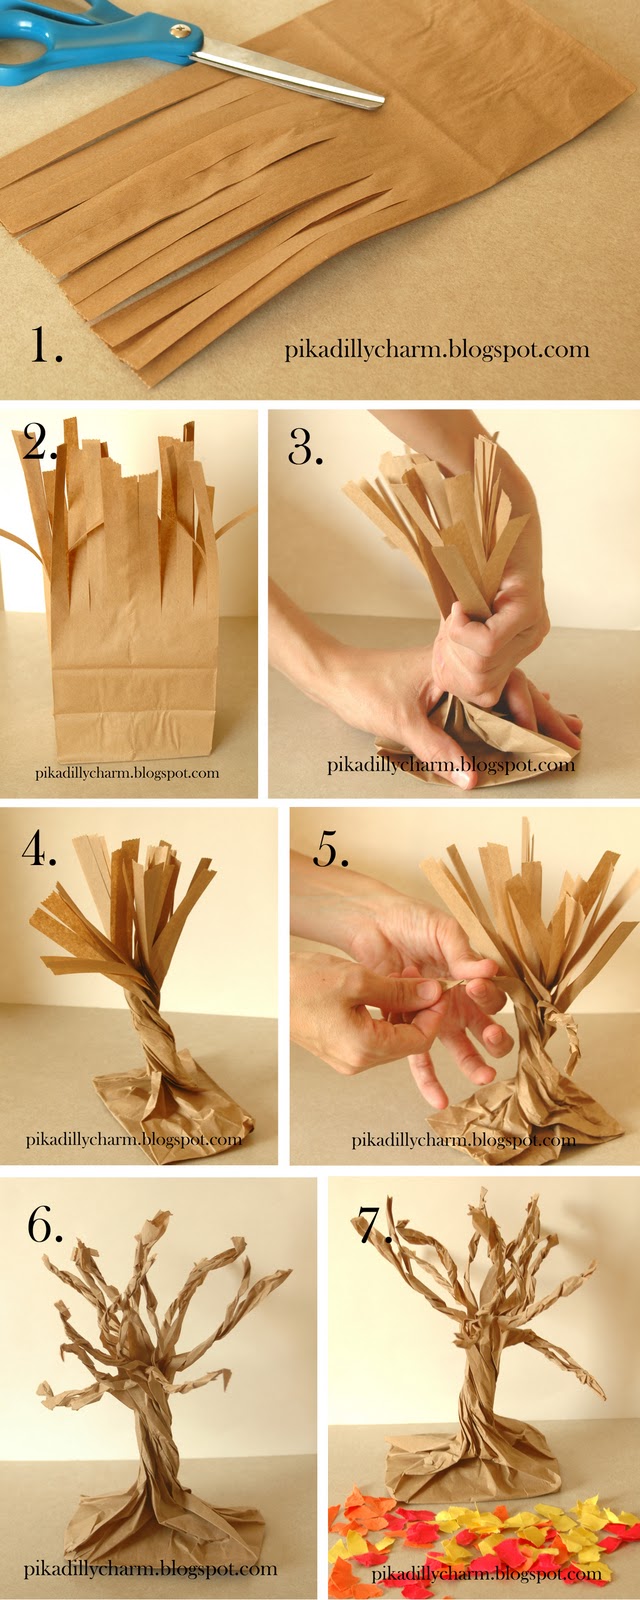
There are many different techniques you can use. I prefer to lay out my brown paper lunch bag and cut 1 1/2 inch strips cutting the open double layer of the bag into strips.
Then I carefully open the bag and pour in some plastic pellets for weight before twisting the trunk of the tree. I have found it easier to put the pellets in before I cut my strips, but it works however you choose to do it. Some people have found it doesn’t need extra weight, but it is entirely up to you.
I twist two strips together and depending how many small branches I want, I’ll cut and twist these separately.
The fun thing is when your tree begins taking shape and you improvise the next step for the next branch. That way each spooky tree you make and each set of branches you create are all different.
It’s a fun project to do while watching television, listening to music, or just some down town when you want to relax for a few minutes.
by Sharon | Jul 23, 2014
Halloween is an excellent time to have Party Favors for your guests. I consider Trick-or-Treaters guests, too. Without them scurrying up and down the street, Halloween wouldn’t be worth celebrating. I enjoy the variety of costumes and the enthusiasm these youngsters bring to make the night exciting for those of us who are home handing out the candy.
These Halloween Treat Cones are easy to make, fun to decorate and I do enjoy looking for just the right candies to put inside. The Free Template has the pattern printed on it and there’s another Free Template that gives a Halloween sentiment.
I suggest you make a couple dozen of these to be the highlight of this Neighborhood Halloween Celebration.

Image Compliments of http://www.hgtv.com
Here are the free templates: Halloween Striped Treat Cone and Halloween Party Circles
Now, what do you do?
You’re going to need a few things:
Now, what?
- Print out the free templates on white card stock
- I would print out a dozen or so of the cone template and one or two of the party circles. There may be some expressions you like better than others to put on your party favors treat cones.
- Cut out the cone around the edges. Form it in a cone shape and secure it in place with the double sided tape.
- On both sides of the cone, punch a hole for the ribbon handle on top and embellishments on the sides. I like using curly ribbon to make them look festive and even to have loose ones to top off the top of the cone.
- I have a 2 1/4″ circle paper punch to cut out the party circles, but you can use a compass or jar lid that will give you the size circle you like. Or you can keep it a square for a different look. Once it’s cut out, put it on the front of your cone with double sided tape.
- Fill the cone with tissue paper — I like to tuck it in the pointy part of the cone to keep things from falling out. I also like to have some tissue paper peeking out to add color and to leave room for step 7.
- Fill it up with Halloween candy and Halloween related items you picked up along with the candy.
There you have it! Once you’ve done your first dozen, you may decide you need another for friends, neighbors and unexpected guests.
by Sharon | Jul 20, 2014
I’m learning that a gingerbread man cookie cutter can be used for so much. Just allow your imagination to go a bit wild and these cut outs can become a variety of Halloween icons. I thought the Vampire Gingerbread Men were adorable, but I now have a new favorite with these Gingerbread Men Skeletons. They take a bit more decorating time and patience, but it is well worth the effort. I’d also invest in some 4-inch gingerbread man cookie cutters to allow space for your creativity to soar.
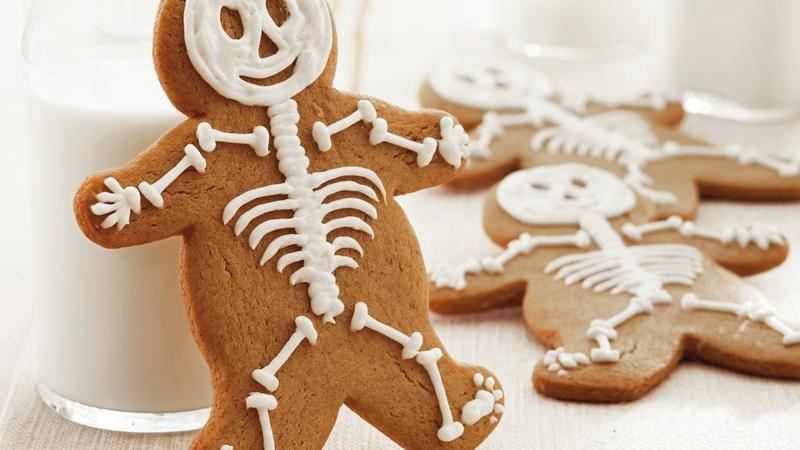
Image compliments of http://www.bettycrocker.com
Use the recipe for the Vampire Gingerbread Men Cookies. The only difference is that you’ll be using white frosting in a piping bag to do your decorating magic.
-
The trick to getting this frosting to flow nicely is by putting it in the microwave on high for 30 seconds.
-
Stir until smooth before spooning it into a resealable food-storage plastic bag.
-
Seal the bag nicely before cutting off a tiny hole in the corner of the bag. I forgot to mention to get all the air out of the bag before sealing.
-
Twist the bag above the frosting, squeeze bag gently to pipe frosting in a skeleton design on cookies.
To be honest with you, if you aren’t a gingerbread cookie fan you can do the same with sugar cookies which I have to admit are my favorite. You decide if it’s the shape of a gingerbread man or the taste of a gingerbread man that is more important to you.
If it’s authentic gingerbread man cookies you’re after, then click here for the recipe. If you want to go with a sugar cookie recipe, keep reading for the recipe.
You can always find a sugar cookie mix, but if you want to go traditional, here’s the recipe:
Ingredients:
1 1/2 cups powdered sugar
1 cup softened butter or margarine
1 teaspoon vanilla extract
1/2 teaspoon almond extract
1 egg
2 1/2 cups all-purpose flour
1 teaspoon baking soda
1 teaspoon cream of tartar
Directions:
1. Get out the mixer and a large mixing bowl. You’re going to beat 1 1/2 cups powdered sugar and the butter with electric mixer on medium speed.
2. Mix in vanilla, 1/2 teaspoon almond extract and the egg.
3. Mix in flour, baking soda and cream of tartar.
4. Cover and put in the refrigerator for about 2 hours or until firm.
5. After the dough mixture has cooled. Heat oven to 375°F.
6. On lightly floured cloth-covered surface, roll half of the dough at a time 1/8 inch thick.
7. Cut into desired shapes.
8. Place your cookie shapes 2 inches apart on an ungreased cookie sheets.
9. Bake 7 to 8 minutes or until light brown.
10. Remove your cookies from the cookie sheet to a cooling rack. All to cool for about 30 minutes.
11. Now you’re ready to decorate.
I know this recipe jumps around a bit, but this was the best way for me to get the most important information to you the quickest.
This is one of those decorating sessions that will be thoroughly rewarding . . . especially when you receive the oooohs and awwwws!
Enjoy!
by Sharon | Jul 20, 2014
Did you ever imagine adorable gingerbread men being turned into vampires? Well it can be done with just a bit of frosting gel to his precious smile. It seems whatever recipe you have, you can turn it into something special for Halloween. I’ve never been a great fan of gingerbread cookies, but I have acquired a taste for them through the years. I guess next will be the quaint gingerbread houses turned into haunted houses. Hummm, decorating these could be quite fun.
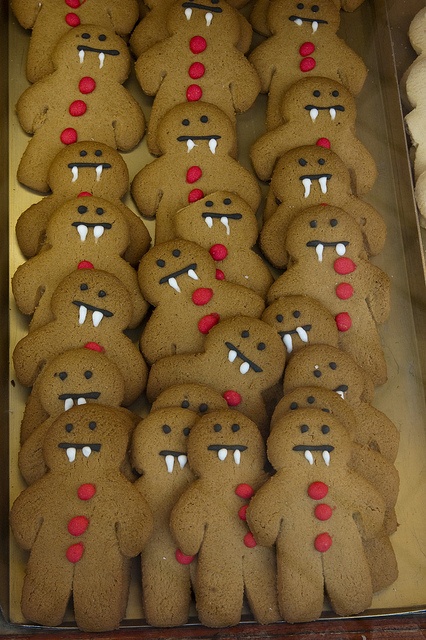
This image is compliments of http://www.flickr.com
Can you imagine having a tray of these greeting your guests at the food table? They are frightfully delicious! I think they would be great fun to put in a box and hear the screams of fright when the box is opened.
Well, you’ve seen the image, now to get down to the traditional gingerbread men recipe.
Ingredients:
1 cup packed brown sugar
3/4 cup softened butter or margarine
1/2 cup molasses
1 egg
3 cups all-purpose flour
1 teaspoon baking soda
2 teaspoons ground ginger
2 teaspoons ground cinnamon
1/2 teaspoon salt
1/2 teaspoon ground cloves
frostings of your choice for decorating
You may want to use M & M’s or Skittles for the buttons down the front of the body
You may also like to have a Gingerbread Man cookie cutter.
Now, to get this dough mixed up and popped in the oven:
1. Get out your mixer and large mixing bowl. You’ll need it to beat the brown sugar, butter, molasses and egg on medium speed until well blended.
2. Turn the mixer down to low speed as you beat in the flour, baking soda, ginger, cinnamon, salt and cloves.
3. You’re now ready to remove the dough from the bowl onto a lightly floured surface. Just make the dough into a ball and press into a flat disk. Wrap it up in plastic wrap and pop it in the refrigerator for an hour or until firm.
4. Back to work on your cooled, firm dough.
5. Heat oven to 350°F.
6. Get out the cookie sheets and give them a light glaze of cooking spray.
7. Lightly flour your working surface. Now, you’re ready to roll out the dough to a 1/4-inch thickness. I lightly flour my rolling pin to keep it from sticking and pulling out pieces of the dough.
8. Now for the fun part, cutting out the gingerbread men. Using a gingerbread man cookie cutter which needs to be lightly floured, too. That’s some sticky dough!
9. Place your gingerbread men 2 inches apart on prepared cookie sheet.
10. Reroll dough scraps together, roll them out to 1/4-inch and cut out additional cookies. Do this step as many times as necessary.
11. Bake 10 to 12 minutes in the oven.
12. Immediately remove from cookie sheets to cooling racks. Thorough cooling takes about 30 minutes.
13. Now, you’re ready to decorate!
This is a fun recipe that allows you to get creative.
by Sharon | Jul 18, 2014
I absolutely love Vintage art. This collection of Free Printables is compliments of http://www.catchmyparty.com
It’s such a delightful collection that includes invitations, drink bottle labels, plus other labels you can use in a variety of ways to add a special touch to your elegant food display and a Trick or Treat Banner for your party decorating theme.
I’m thinking this would be an excellent theme for that Tween Halloween Party your kids are begging you to let them have. Yes, my Two Cans On A String are vibrating with excitement for this party pack of free printables.

I’m thinking the Martha Stewart Coffin Treat Boxes would fit in nicely with this gothic theme.
Yes, excitement is in the air. Fall can’t come too soon for me.
Thanks for stopping by!


