by Sharon | Apr 28, 2015

It’s excellent to have an easy recipe on hand when your family is going in many directions during the evening. The pictures shows you have to make these delicious Pepperoni Rolls, but a simple explanation may be helpful.
You’re going to need some basic ingredients:
- 56 pepperoni slices
- Italian seasoning
- Garlic powder
- 3 cans Pillsbury Buttermilk Biscuits
- 1 egg
- 1 jar Pizza sauce
- 1 block cheese
- Parmesan cheese
Of course, you can substitute ingredients to those of your choice.
So, basically you have 30 canned biscuits, pepperoni, cheddar jack cheese. Egg wash with garlic and Italian seasoning. Bake following the biscuit directions and enjoy.
This is one of those recipes you’ll want to keep handy for something quick and easy to make that your family will thoroughly enjoy.
by Sharon | Apr 22, 2015

This is truly a delicious spring and summer dessert your family will absolutely love — unless strawberries aren’t your thing. You can always use a berry of your choice. I like the idea of using Oreo Cookies — the vanilla ones rather than the regular ones. Let’s get started making these!
Ingredients:
- 3 tablespoons melted unsalted butter
- 24 golden Oreo Cookies
- 1¼ Cup diced medium sized strawberries
- 1 tablespoon sugar
- 1 tablespoon water
- 2 teaspoons freshly squeezed lemon juice
- ½ teaspoon cornstarch
- 8 oz softened cream cheese
- ⅓ cup sour cream
- ⅓ cup sugar
- ½ teaspoon vanilla extract
- 1 large egg
Directions:
- Preheat oven to 350 degrees. Place half the golden oreos in a food processor. Pulse until it forms crumbs, add in the melted butter and pulse again until crumbs are covered in butter.
- Press crumbs into a 8 inch baking pan lined with parchment paper or foil. Bake in oven for 5 minutes, take out and let cool on counter.
- Place strawberries in pot with 1 tablespoon sugar and 1 tablespoon water. Bring to a boil, cover and simmer for 10 minutes until soft. Stir every few minutes.
- Combine lemon juice with cornstarch and stir into mixture and simmer an additional minute until thickened. Place strawberry mixture in food processor and pulse until smooth. Place in a bowl and set aside.
- Place cream cheese, sour cream, remaining sugar, vanilla and egg in food processor.
- Pulse until smooth and combined. Pour on top of oreo crust.
- Pour half of the strawberry sauce on top of cheesecake. Use remaining sauce however you wish — on ice cream or pancakes or waffles. Bake at 325 degrees for 36 minutes or until cheesecake is just slightly jiggly.
- Take out of oven and let cool on a wire rack. Crush remaining oreos and sprinkle on top, gently pushing into the bars.
- Place in a fridge covered and let set for at least 3 hours until cutting into squares.
- Serve and enjoy!!
It’s not only delicious, but also has eye-appeal.
by Sharon | Apr 19, 2015
I awoke this morning thinking about “copycat recipes.” Is the recipe we’re trying to copy all that great or is it because of the “fame” of the place who serves it? And where do these “brand” coffee houses and restaurants get their recipes? Do they hire chefs and do a major taste test or is this an in-house thing where it’s an old family recipe of the CEO or workers?
Then we have homemakers who come up with knockoff recipes of these “brand” ones. They’re all over YouTube and individual websites as well as books. It makes me wonder how accurate are they? Are they just trading on the “brand” to ride on their coattails?
With all this thinking, it got me hungry for coffee cake. I suppose I could claim it to be a copycat recipe of some famous place, but I don’t want to ride the coattails of the “famous.” This recipe is either good on its own merits or it isn’t. You know, not everyone likes the coffee cake from the famous place. The best thing we having going is that we’ve made it fresh and serve it fresh. It hasn’t been brought in from someplace else and cut up, waiting in a glass case. And with fresh baked goodies from your very own kitchen, you can add or delete ingredients to make them uniquely your own.
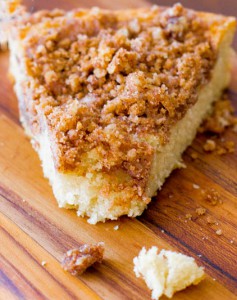
Well, enough about that and on with a tasty coffee cake recipe. Oh, but one more thought: what distinguishes a coffee cake from an ordinary cake? I believe it’s the topping and this recipe is heavy on the topping.
Ingredients:
- 2 cups all purpose flour plus 1 tablespoon to coat the pan
- 1 cup plus 2 tablespoons granulated sugar
- 1 teaspoon salt
- 1 1/4 sticks unsalted butter
- 1 teaspoon baking powder
- 1/2 teaspoon baking soda
- 3/4 cup buttermilk
- 1 large egg
- 2 teaspoons vanilla extract
- 2/3 cup packed brown sugar
- 2 teaspoons ground cinnamon
Directions:
- Preheat oven to 350°F. Spray a 9-inch spring-form pan with cooking spray or grease with butter. Sprinkle the bottom of the pan with a tablespoon of flour, coat the pan thoroughly and tap out the excess.
- Put the flour, sugar and salt into a large mixing bowl and whisk until combined. Cut in the butter (I cut the butter into very small pieces). Using a pastry blender or a fork, smoosh it up until the mixture resembles coarse crumbs. Set aside one cup of this mixture for the topping.
- Mix in the baking powder and baking soda into the remaining flour mixture. Add the buttermilk, egg and vanilla. You can use an electric mixer for this or continue working by hand. This batter is going to be very thick, so I’d opt for the mixer. You want this mixture to resemble frosting — smooth and fluffy. Then you’re ready to spoon the batter into the prepared spring-form pan. Then you’ll smooth the top.
- Remember that cup of topping you saved? Well, get it out and put it in a bowl. You’re going to add the brown sugar and cinnamon to it. Toss it with a fork until it’s well blended. Sprinkle the crumbs over the batter, pressing lightly so it will stick in place.
- Bake for about 50 to 60 minutes. Be sure to check it with a toothpick.
- Allow to cook for 10 minutes or so, then remove the sides of the spring-form pan. Then allow the cake to cool completely before serving. This could take a couple of hours.
Many people make it ahead of time with the belief that cake tastes better the next day. I don’t know if this is true or not, all I know is that bakeries don’t advertise 1 or 2 day old cakes. I prefer to make it early in the morning. That’s an excellent way to wake up your family on a Saturday or Sunday morning.
You can always add nuts, but I prefer coffee cake without them.
by Sharon | Apr 17, 2015

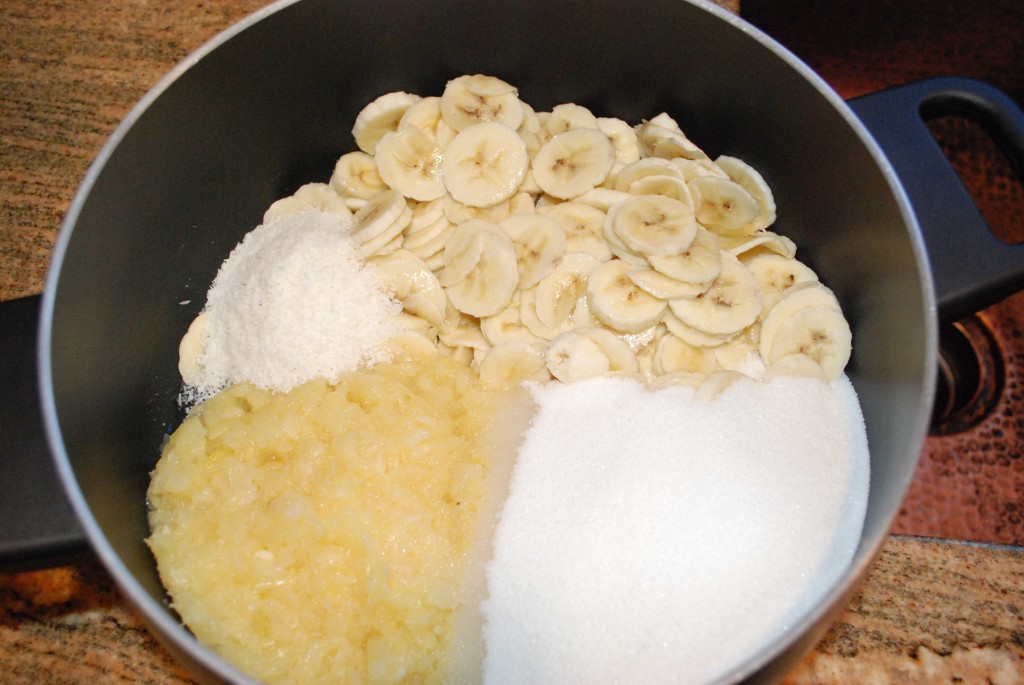
This is a sweet butter your family will love on pancakes, waffles, toast, even vanilla ice cream and I’m sure you can think of more.
Let’s take a look at the recipe:
- 5 medium size ripe bananas
- 20 ounce can of crushed pineapple — not drained
- 1/4 cup ground coconut — but if you can’t find it flake coconut will do just fine
- 3 cups of granulated white sugar
- 3 tablespoons lemon juice — bottled or fresh
Just looking at the ingredients, I cut the granulated white sugar in half when I started making this monkey butter. But I kept the other 1 1/2 cups available after a taste test. I think it better to have less sugar than too much. Then I could add to get the right sweetness. After the boiling process, I got a little on the spoon to cool and a bit of a taste . . . then I slowly added more sugar to get to what was pleasing to my taste.
Here’s what you need to do:
- Begin by peeling and slicing the bananas.
- Put them into a large pot.
- Add the rest of the ingredients.
- Put the pot on the stove and bring to a boil — stir constantly.
- After bringing to a boil, lower to simmer and cook until thickened — you still need to stir continuously.
- After properly thickened, spoon the mixture into sterilized glass jars and allow to cool.
- You can refrigerate the monkey butter. It should keep for 4 to 6 weeks, if it lasts that long — your family may go absolutely “ape” over this!
Now, you’ve been introduced to Monkey Butter . . . it was totally new to me, so I had to check it out. I’m pleased you did, too. It’s a catchy name for a delicious homemade butter.
Enjoy!
by Sharon | Apr 15, 2015
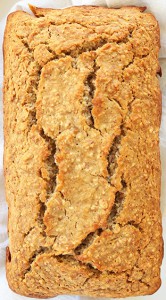
Here we have a vegan banana bread recipe that is also gluten free. Isn’t it amazing that 20 years ago we didn’t even know anything about gluten . . . maybe you did, but I didn’t. Every recipe is a new adventure. And on that note, you can add nuts and maybe even chocolate chips — as long as they’re vegan.
INGREDIENTS
- 1 cup gluten-free oat flour
- 1 cup gluten-free all purpose flour
- 1/2 teaspoon baking soda
- 1/2 teaspoon baking powder
- 1/4 teaspoon salt
- 1/2 cup olive or coconut oil
- 3 very large and very ripe bananas
- optional: 1/2 cup vegan chocolate chips, plus an extra handful for the top
- optional: 1/2 cup walnuts or almonds
INSTRUCTIONS
- Preheat oven to 375° F.
- Get out a large mixing bowl and sift the gluten-free oat flour and gluten-free all purpose flour together.
- Add baking soda, baking powder and salt to the mixing bowl and whisk it all together.
- Get out a medium mixing bowl, this is for the very large and very ripe bananas. You’re going to peel them and mash them up with either a fork or your hands.
- Add the mashed bananas, oil, optional chocolate chips and/or optional nuts to the dry ingredients. You’re going to mix this all together gently — don’t overdo it.
- Spoon the mixture into a lightly oiled 5 x 9 inch loaf pan. Add the handful of optional chocolate chips on the top.
- Bake for 20 to 30 minutes. You want the top to be lightly browned. Test with a toothpick — you want it to come out clean, not gooey with batter.
- Allow to cool thoroughly before removing it from the pan.
- Wait about an hour before slicing it — you don’t want it to crumble on you.
- Enjoy!
by Sharon | Apr 11, 2015

This should be no big surprise, but almond butter is made with almonds. That’s it! That’s all there is. Now, some people roast their own almonds and others buy roasted almonds. You’ll need a pound of almonds roasted, or roast raw almonds yourself. You’ll need either a food processor or a vitamix to make your almost butter.
Place the roasted almonds into your food processor or vitamix and process on High for 5 to 6 minutes. To make your almond butter smoother, you may want to process it longer, but make sure your processor doesn’t get too hot.
Once you’ve made it and sampled it, keep it refrigerated because there are no preservatives added.
Now that you know how to make Almond Butter, you can make Cashew Butter and even your own Peanut Butter.
Thanks for stopping by!