by Sharon | Mar 23, 2015

I’ve always loved cupcakes in all flavors. The crowning glory for these cupcakes are the bunny ears. They’re so easy to make. You may have figured it out that they’re marshmallows cut on the diagonal with the freshly cut inner sections dipped in pink sprinkles. They’re placed in frosting with shredded coconut. You may be tempted to add eyes, a nose and whiskers, but in my opinion the ears are enough.
Carrot Cake seems to be appropriate for these cupcakes, but with the coconut added to the frosting, it seems Coconut Cupcakes would be a delicious bunny treat.
Coconut Cupcakes Recipe from http://foodnetwork.com
Makes approx. 24 cupcakes
Ingredients for the cupcakes:
3 sticks softened unsalted butter
2 cups sugar
5 extra-large eggs at room temperature
1 1/2 teaspoons pure vanilla extract
1 1/2 teaspoons pure almond extract
3 cups flour
1 teaspoon baking powder
1/2 teaspoon baking soda
1/2 teaspoon kosher salt
1 cup buttermilk
14 ounces sweetened, shredded coconut
Ingredients for the frosting:
1 pound softened cream cheese
3 sticks softened unsalted butter
1 teaspoon pure vanilla extract
1/2 teaspoon pure almond extract
1 1/2 pounds sifted confectioners’ sugar
Directions:
Preheat the oven to 325 degrees F.
In the bowl of an electric mixer fitted with the paddle attachment, cream the butter and sugar on high speed until light and fluffy, about 5 minutes. With the mixer on low speed, add the eggs, 1 at a time, scraping down the bowl after each addition. Add the vanilla and almond extracts and mix well.
In a separate bowl, sift together the flour, baking powder, baking soda, and salt. In 3 parts, alternately add the dry ingredients and the buttermilk to the batter, beginning and ending with the dry. Mix until just combined. Fold in 7 ounces of coconut.
Line a muffin pan with paper liners. Fill each liner to the top with batter. Bake for 25 to 35 minutes, until the tops are brown and a toothpick comes out clean. Allow to cool in the pan for 15 minutes. Remove to a baking rack and cool completely.
Meanwhile, make the frosting. In the bowl of an electric mixer fitted with the paddle attachment, on low speed, cream together the cream cheese, butter, and vanilla and almond extracts. Add the confectioners’ sugar and mix until smooth.
Frost the cupcakes and sprinkle with the remaining coconut.
Adorn the top with a pair of marshmallow bunny ears.
There you have it. A delicious cupcake that fits the season.
by Sharon | Mar 17, 2015
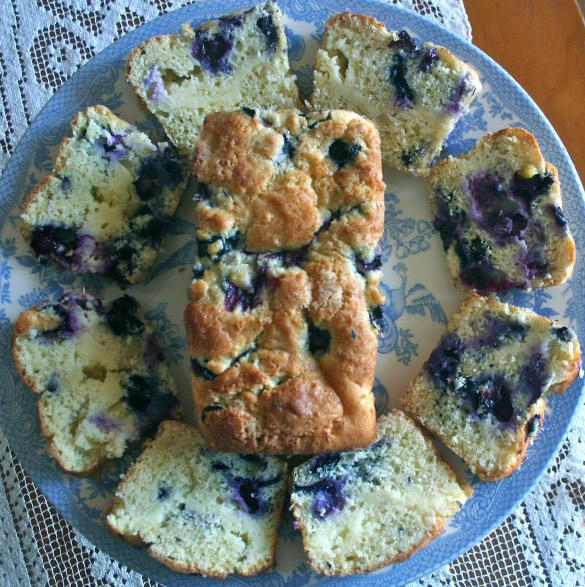
This Blueberry Cream Cheese Recipe could be made into muffins or loafs. It’s a moist delicious variation of ordinary blueberry muffins your family and friends will enjoy. It’s great for breakfast, brunch, an afternoon snack with coffee or tea and as a dessert. This is definitely my kind of recipe. . . for any time of day or evening — even a midnight snack. The only problem with this recipe is that it does taste better the next day . . . but it never stays around that long.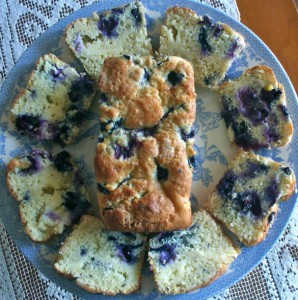
BLUEBERRY CREAM CHEESE BREAD
Recipe Yield: 1 large loaf or 4 mini loafs
FOR THE BREAD:
- 1 stick of softened butter
- 3/4 cup sugar
- 1/4 teaspoon salt
- 1 teaspoon vanilla extract
- 2 whole eggs
- 1 1/2 cup all-purpose flour
- 2 teaspoons baking powder
- 1/3 cup milk
- 2 cups blueberries
FOR THE FILLING:
- 8 ounces softened cream cheese
- 1/2 cup sugar
- 1 tablespoon flour
- 1 whole egg
Directions:
Preheat oven to 350 degrees Fahrenheit. Grease and flour one large loaf pan or four mini loaf pans. Set aside.
Let’s begin with making the filling:
In the bowl of a stand mixer, cream softened cream cheese, 1/2 cup sugar, 1 tablespoon flour, and whole egg. Set filling aside.
Now for the bread:
In another bowl cream together butter and sugar until light and fluffy (about 3-4 minutes). Add salt and vanilla extract. Add eggs, one at a time, beating well after each addition.
In yet another bowl, whisk together flour and baking powder.
Fold in half of the dry ingredients into butter-sugar mixture, then add milk, then the remainder of dry ingredients. Toss blueberries in a tablespoon of flour and fold into batter. Your batter will be thick.
Spread half of batter into the bottom of prepared loaf pan(s).
Spread cream cheese filling on top.
Spread the remainder of the batter over cream cheese.
Bake in preheated oven for 30-35 minutes (for mini loaf pans) or 50-55 minutes (for large loaf pan).
Allow to cool in pan for at least 20 minutes before removing.
Serve and enjoy!
Wrap leftover bread in plastic wrap and store in refrigerator.
The recipe is a bit involved, but well worth the effort. I do enjoy the mini loafs. They’re great to give as gifts. You may want to make a large blueberry cream cheese loaf to serve and another batch of mini loafs to give to family and friends.
This is a great all occasion recipe.
by Sharon | Mar 8, 2015

I enjoy making easy bite size recipes. This is great for a quick snack and also for parties. It allows you to have after school snacks for the kids, too.
Let’s get started!
Ingredients:
- 1 can (16.3 oz) Pillsbury™ Grands!™ Flaky Layers refrigerated original or buttermilk biscuits
- 1 lb lean (at least 80%) ground beef, cooked or 16 frozen (thawed) cooked meatballs
- 1 block (8 oz) Cheddar cheese or cheese of your choice, cut into 16 cubes
- 16 slices bacon
- Long toothpicks or skewers
- Canola oil for frying
- Feel free to add or delete ingredients
Directions:
- Separate dough into 8 biscuits, then cut each biscuit in half. Press into 3 inch diameter circles.
- In the center of each piece of dough, place 2 tablespoons cooked ground beef (or 1 meatball) and 1 cube of cheese. Wrap the dough around the beef and cheese and pinch seams to seal.
- For the Fried Version: Wrap each stuffed sealed bite size cheeseburger with 1 bacon slice. Secure loose bacon with toothpick by inserting it through bacon and halfway into the burger piece. In 3-quart heavy saucepan or deep fryer, heat oil to 350°F. Fry each piece for 4 to 5 minutes or until dough is golden brown on all sides. Place on paper towels to cool. Repeat with remaining pieces. Serve warm with condiments of your choice.
- For the Baked Version: Heat oven to 400°F. Place bacon on foil-lined cookie sheet with sides. Bake about 8 minutes to partially cook bacon. Wrap each stuffed sealed bite size cheeseburger with 1 slice partially cooked bacon slice. Place bacon wrapped dough 2-inches apart on two foil-lined cookie sheets with dough seam side down. Bake 13 to 15 minutes or until golden brown. Serve warm with condiments of your choice.
This is an easy recipe. Fried or Baked, your family will love them.
Thanks for stopping by!
by Sharon | Mar 4, 2015
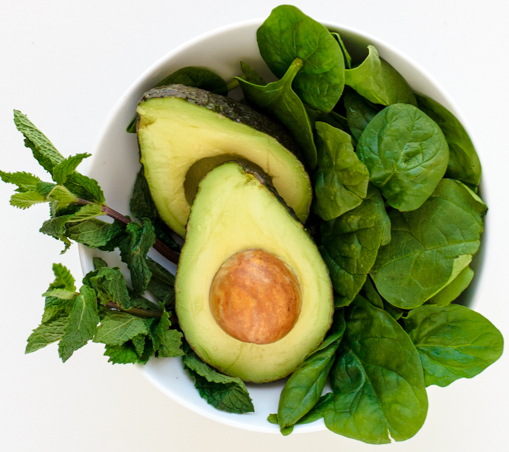
St. Patrick’s Day makes me think “green.” Then there’s smoothies — those delicious and healthy suck-through-a-straw treats. Green, healthy, low fat, gluten free and let’s add vegan. All right! That’s moving us in the right direction for a smoothie. No artificial coloring. All natural ingredients.
Have I hit a snag? Yeah, yeah, I know I’m going a bit far, but the question is: Can I deliver? Yes, yes, yes, indeed I can. Need an image?

That’s not all the ingredients, but it’s giving you a major hint. You’re going to need avocado, spinach, mint . . . don’t wrinkle your nose, it’s going to be delicious.
St. Patrick’s Day Smoothie
This recipe makes one delicious serving
You’re going to put these ingredients in your blender, then puree to blend thoroughly:
- 1/2 of a medium avocado without the skin and the seed
- 1 cup firmly packed fresh spinach leaves thoroughly washed
- 1/4 of a cup firmly packed fresh mint leaves — you’re going to need about 20 or more of them (thoroughly washed)
- 2 large bananas, cut up and frozen
- 1 to 2 tablespoons of honey or sweetener of your choice — remember less is more
- 3/4 cup unsweetened vanilla almond milk
- 1/4 of a teaspoon of pure peppermint extract
Once it’s all blended together you’ll see it’s a nice green color. Doesn’t it look delicious? Pour it in a nice glass, give it a bit of a taste for sweetness. Add what you need. Then spritz on some whipped cream and some chocolate sprinkles. You could do shavings of those chocolate mint candies of your choice to carry on the “green” theme to the very top of your smoothie. Add a straw and enjoy.
It’s good, huh!!!
Thanks for stopping by. Be sure to tell a friend or two or twelve 🙂
by Sharon | Mar 1, 2015

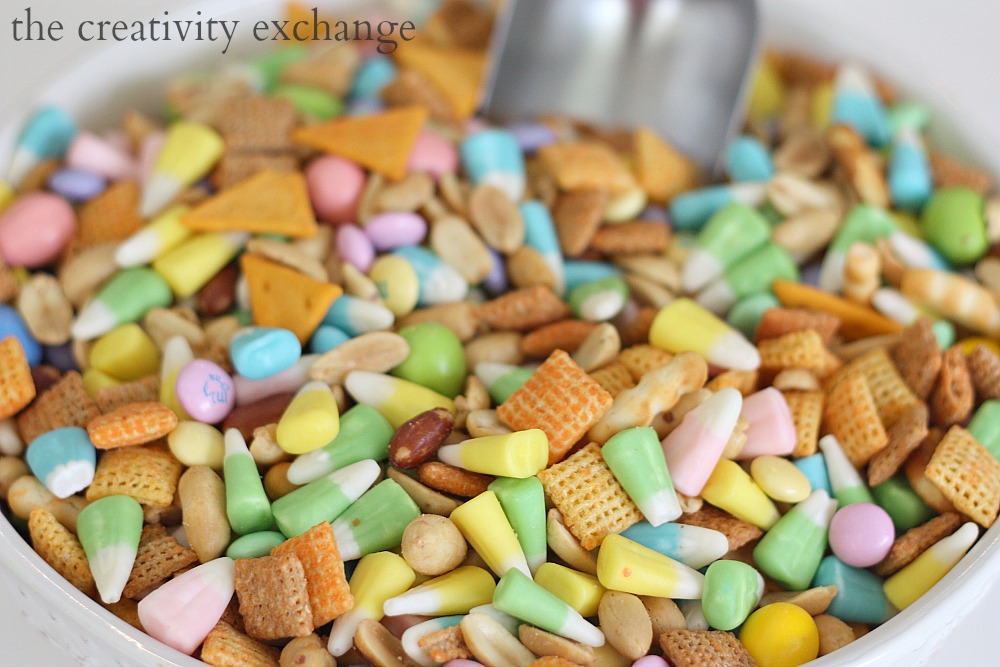
Jump into Spring with this tasty snack you can put together in no time. It’s wonderful to use all the spring candies available in your local market. I’m sure you can figure out the ingredients from the picture, but a recipe is always helpful:
Spring Snack Mix
- Spring Candy Corn
- Cheddar Chex Mix
- Reeses Pieces Eggs
- Cocktail Peanuts
- Pastel Colored Milk Chocolate M&M’s
You can add regular Chex Mix and other candies and nuts of your choice. You may want to add those Cheddar Fishes that are so popular. I like a snack recipe that is just the starting point to creating something fresh and different. You may want to keep it in an airtight container. It would also make a tasty snack you can put in a ziplock bag to add to your children’s lunches or in their backpack for a tasty surprise. It’s also great for an after school treat.This makes a delightful mix of sweet and salty that will give your taste buds a zing.
Thanks for stopping by!
by Sharon | Feb 17, 2015

Image Compliments of http://tablespoon.com
It certainly is amazing what can be done with simple noodles, food coloring and zip-lock bags. Yes, indeed, that’s all you need! I doubt I need to go further with the instructions, but I will just for the fun of it.
You get your bag of spaghetti noodles and cook them following the instructions on the package. Then you get out your zip-lock bags and prepare the colors for your pasta strands by putting 2 tablespoons of water in each zip-lock back and 20 drops of food coloring. Mix it up nicely to get the color you want — more or less drops of food coloring.
When your pasta is cooked, put it in a strainer and pour cold water over it.
You’re now ready to have some fun putting strands of cooked noodles in the various zip-lock bags. Once the bags are full of noodles, zip the bag closed and mix the noodles in the food coloring making sure they are thoroughly covered. Let this set for about a minute before returning the noodles to the strainer.
Once the colored noodles are in the strainer, give them a cold water rinse and return them to the pot where you’re going to mix the colored noodles together.
Serve your pasta however you like. It will be a great hit with your family.