by Sharon | Sep 16, 2015
Have You Made Jello Worms?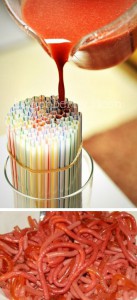
If you can make jello, then you can make these squiggly worms to delight and disgust your family and friends.
All right! Here’s the recipe:
Ingredients:
- 2 – 3 ounce packs of a red jello of your choice
- 1 package of unflavored gelatin for extra firmness
- 3/4 cup whipping cream
- 3 cups of boiling water
- green food coloring, about 15 drops
- 100 flexible straws or enough to fill your container — or you can bundle them together with rubber bands
- tall container about 1 quart in size
Directions:
- Empty the packets of gelatin into a bowl and add the boiling water.
- Allow to cool to lukewarm before adding the whipping cream and drops of green food coloring.
- Bundle up your straws and put them in the tall 1 quart container.
- Fill up your straws allowing the mixture to flow into the container.
- Allow your jello to set until firm in the refrigerator.
- When the jello has set, hold the straws under warm water. The worms should slip right out of the straws. Pinch one end to get it moving. Be sure to catch them in a bowl.
This is an interesting recipe that takes some time to set and some effort in getting them out of the straws. In the end it is all worth it.
Thanks for stopping by!
Please leave me a comment,
Sharon
by Sharon | Sep 14, 2015
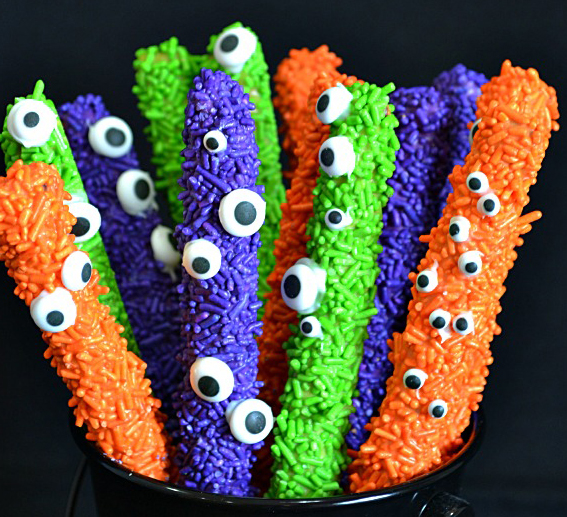
These delicious pretzel sticks will dress up your Halloween Snack Table
These are easy and fun to make. The kids would love to give you a hand.
You and the kids will have a great time decorating pretzel sticks with sprinkles and edible eyeballs to create an assortment of Halloween Monsters.
You’ll need:
- wax paper to cover a cookie sheet
- cookie sheet
- pretzel sticks
- sprinkles in a variety of colors
- edible eyes
- candy melts
Feel free to add what you like to make these little monsters.
Directions:
- Cover your cookie sheet with waxed paper.
- Melt the candy melts following package instructions.
- Lay out your pretzel sticks and put your sprinkles in separate bowls with a teaspoon in each one.
- Once the candy melts have melted, you’re going to dip a pretzel stick into the melted goo.
- I leave some bare pretzel to handle, but you can get all gooey if you prefer.
- I turn the pretzel as I’m sprinkling on the sprinkles.
- I let them set on the waxed paper before adding the edible eyes.
- I repeat the process until all the pretzel sticks are covered with sprinkles.
- I use some left over candy melt to stick on the edible eyes.
- There you have it!!
If you want to buy the ingredients online here are some helpful links:


I could go on and on, but it is bet for me to stop and let you get on with your own shopping.
Thanks for stopping by.
Please leave me a comment.
Sharon
by Sharon | Aug 31, 2015
 I absolutely wasn’t going to jump into Halloween!
Then . . .!
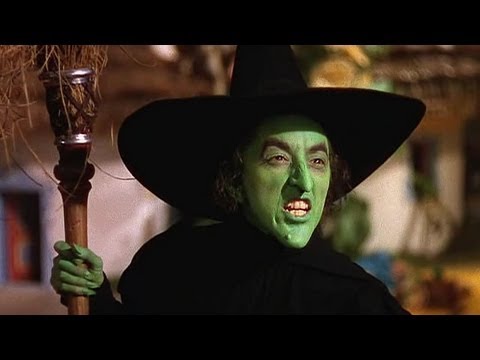
I thought of The Wicked Witch of The West from the Wizard of Oz and then I saw the picture below and 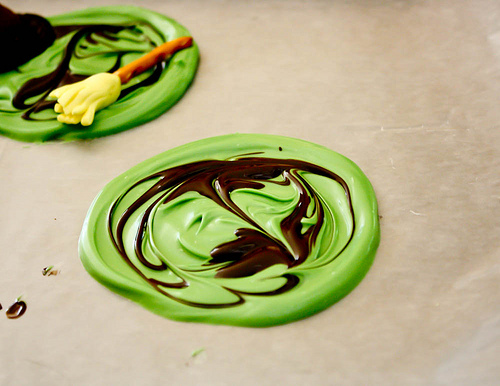 these Melted Wicked Witches of the West were born! It is such a fun concept. The kids will eat them up!! This will truly be the highlight of any Halloween Party for kids as well as for adults. Remember the line: “I’m melting, I’m melting!” Oh yes, indeed!!!
You can make the Wicked Witch goo by melting green candy melts and dark chocolate candy melts separately in the microwave.
You won’t need much of the dark chocolate candy melts. A bag of the green candy melts made about 2 dozen of these melted wicked witches and as you can see from the picture, you just need to drizzle the dark chocolate in to make it look interesting — maybe give it a gentle swirl.
Do you see the witches hat and broom? You’re going to want to make those first before melting the candy melts. I guess I better stop dreaming about these gooy witches and get down to business.
Ingredients for the Melted Wicked Witches of the West Food Craft Recipe:
- A bag of green candy melts for 2 dozen of these beauties
- A bag of dark chocolate candy melts to drizzle into the green globs and to attach the kisses to the Oreo to make the witch’s hat
- A bag of pretzel sticks for the broom handles
- Yellow Laffy Taffy
- Oreo Cookies
- Hershey Kisses
To make the wicked witch’s hat you’ll need half an Oreo cookie and stick a Hershey’s Kiss on the non-filling side of the cookie. These you can make after you melt the candy melts and made your green gooy globs on a large cookie sheet covered with wax paper. I’d go with a little bit larger size than a regular cookie — maybe a cookie and a half size — especially if you want to put these in ziplock bags for Halloween Party Favors.
To make the witch’s broom you’ll flatten the yellow taffy and cut it in half horizonally, then cut the the broom fringe with sharp scissors and attach the non-fringed side of the broom bristles to a pretzel stick.
All right, you got your brooms made, right? You’ve melted your green and dark chocolate melts in separate bowls, right? You put wax paper on a large cookie sheet, right?
Let the assembly begin!
Spoon a nice generous amount of green candy melts onto the cookie sheet, trying to keep it in a neat circle. Drizzle the dark chocolate into the green goo and give it a swirl with a toothpick or butter knife. Separate an Oreo Cookie and put the frosting side into the green goo to the left edge. Add an unwrapped candy kiss dipped into the melted dark chocolate candy melt and attach to the center of the Oreo Cookie. Now put your pretzel broom into the green goo to the right. There you have it!
Continue the process until all of your Melted Wicked Witches of the West are complete and set in the refrigerator to cool.
I’m sure you’ll get the feel of making these in no time. You could be making quite a few of these once you get started. Have fun!!!
Sharon
In case you’re having difficulty finding the ingredients, here are some links:


Thanks for stopping by!
by Sharon | Aug 30, 2015
August is almost over. September is within sight. My thoughts turn to apples and all the great fall recipes.
Bet you thought the subtitle was going to rhyme. Sorry, not a poet. It’s just a statement. Trying not to jump into Halloween. I’ve been doing quite a bit of that lately.
Wouldn’t these cookies go great with vanilla ice cream?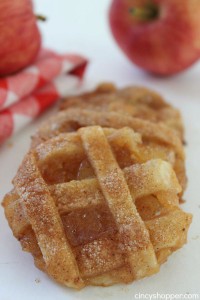
I know I’m a bit boring when it comes to pies and ice cream. I go for the very traditional. My mother was always baking pies. She got it from her mother. So, it’s a tradition. And that tradition isn’t following a recipe. You just “know.” I cheat . . . I taste. I’m not claiming to be the pie maker like my mother nor my grandmother. I at least don’t get “that look” when my mother would ask, “What kind of pie would you like?” I don’t know why she’d give me “that look,” she knew before she asked what I’d say . . . apple. And my brother had his favorite: Lemon Meringue. So, my mother was left to decide for herself. Of course, she baked all kinds of fruit pies . . . but your favorite was always your favorite.
Caramel Apple Cookies Recipe
Ingredients:
- 1 package Refrigerated Pie Crust which is 2 crusts
- 5 ounce Caramel Topping
- 10 ounce Apple Pie Filling
- 1 Egg
- 1 teaspoon Cinnamon
- 1/4 teaspoon Nutmeg
- 1/4 cup Sugar
Directions:
- Preheat oven to 350°F
- Spray cookie sheet with non-stick spray and set aside.
- Dust work area with flour and roll out crusts. One is for the cookie and the other is for the lattice on the top of the cookie.
- Using one crust, cut out circles for the cookies.
- Spread a thin layer of caramel on these cookie disks.
- Cut the pie filling into smaller pieces and spread over the top of the caramel.
- Cut the other crust into 1/2 inch strips. You’re going to use these strips to create a lattice over the apple filling.
- Once you’ve created the lattice over your cookies, transfer them to the prepared cookie sheet.
- Beat the egg in a bowl until well blended.
- In another bowl mix together the sugar, cinnamon and nutmeg.
- Brush lattice tops with egg wash and sprinkle with sugar mixture.
- Bake for 20 to 25 minutes until golden brown.
There you are . . . they’re as delicious as they are lovely to the eye.
Please leave me a comment about these great cookies.
Thanks for stopping by!
Sharon
by Sharon | Aug 22, 2015
Halloween Themed Cookie Recipes To Kickstart National Cookie Month — And A Halloween Cookie Exchange.
Please leave me recipes in the comments.
Here are some Oooie Gooie Monster Cookies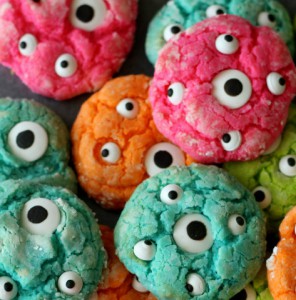
Ingredients:
- 1 box of White Cake Mix
- 1/2 cup of softened butter
- 1/2 teaspoon vanilla
- 1 8 ounce package of softened Cream Cheese
- 1 large egg
- Powdered Sugar
- Food Coloring
- Candy Eyeballs
Direction:
- With an electric mixer beat the butter, vanilla, egg and cream cheese until fluffy.
- Mix in the cake mix.
- Divide the batter into bowls for the number of colors you want.
- Add food coloring to each individual bowl and mix thoroughly for even coloring.
- Chill the colored batter for about 30 minutes.
- Roll into balls and dip in a bowl of powdered sugar.
- Place on greased cookie sheet and smoosh them down a bit.
- Bake at 350°F for 10 to 12 minutes.
- Add the candy eyeballs while the cookies are still warm.
- Let cool.
You may be ready for another batch after you see how easy these are to make and how delicious they are.
But, before you go, let me share with you the variety of candy eyeballs I’ve found to make your monster cookies extra fun:

There are regular eyeballs, bloodshot eyeballs and flirty eyeballs . . . what a great selection!!!!
Thanks for stopping by!!!
Sharon, Owner of TwoCansOnAString.com
by Sharon | Aug 11, 2015
Do you believe it?!! You can be camping and you can have pizza on the campfire. Delightful!!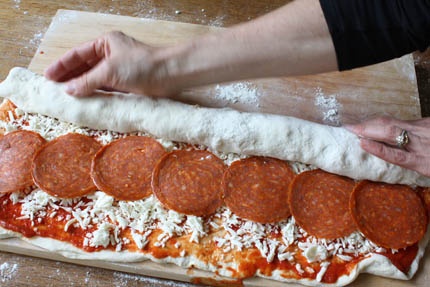
Here’s what you need:
- Canned pizza dough (in refrigerator section)
- Pizza sauce
- Mozzarella cheese
- Toppings of Choice
- Dried Italian seasoning
- salt and pepper
- Roll out pizza dough to form a rectangle.
- Spread pizza sauce over top.
- Top with cheese, toppings of your choice, and add the seasoning.
- Roll pizza up to form a log and tuck edges in.
- Wrap in thick foil.
- Place in freezer until ready for your camping trip.
- Place in cooler or set out until almost thawed.
- Place pizza log, still in its foil on hot grill or fire pit.
- Cook for about 15 minutes flipping over and cook an additional 10-15 minutes.
- There you have it!! Fresh and delicious over your very own campfire out in the wild or in your own backyard.
I hope you try this recipe on your camping trip . . . on your BBQ or fire pit right in your own backyard. I do like recipes you can make ahead.