by Sharon | Aug 1, 2014
This catapult is popular around my house. You can learn a lot about people when you have a few paper craft toys on the coffee table enticing your guests to play with them.
This one is great fun! It has a range of up to 10 feet. Be sure to make several so you can give them as gifts for your guests to take home. It’s always good to have a couple around just for fun. It can be addicting. I always want to see how many times I can hit my target in a row and then beat my last score.
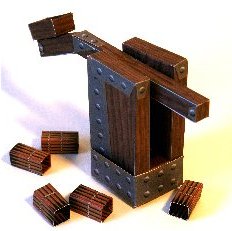
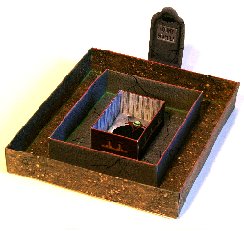 This is what you’ll get — a catapult and a target of a vampire grave plus a dozen bundles of stakes.
The images and free templates are compliments of http://www.ravensblight.com
I know you’re eager to get the instructions and free templates so you can begin playing:
Assembly Instructions
Catapult and Target
Print the assembly instructions on regular printer paper, but use a heavy card stock for the catapult, target and bundle of stakes. These are definitely going to get a workout.
Thanks for stopping by!
by Sharon | Aug 1, 2014
Tri Cornered Pirate Hats are fun for kids of all ages. Even Chuckles, my dapper skull enjoys wearing it from time to time. He enjoys the eye-patch, too. This project is made from brown wrapping paper at least 2 feet wide and 4 feet long.
You’re going to need a bowl about the size of the head that’s going to be wearing it, three twist ties, scissors, a pencil and glue. Plus the directions that include the eye-patch and emblems you may want to add to your brown paper tri cornered pirate hat.

The image and Pirate Hat Instructions plus Eye-Patch are Compliments of http://www.ravensblight.com
Pirate Hat Instructions Plus
Well, there you have it. This pattern could be adapted to any material you think is appropriate for your Pirate Hat. I’d make one out of paper first before cutting into fabric.
Enjoy and Thanks for Stopping by!
by Sharon | Jul 29, 2014
Once in awhile an irresistible ghostly craft comes along that I must try before putting it here to share with you. I didn’t make just one, I have a full dozen of them lined up on my mantle.
This adorable ghost sets on a pedestal so you know it’s a real ghost going trick-or-treating, not a child dressed up as a ghost. He is well equipped with a lantern and a pumpkin to hold all the goodies he’ll be collecting in the neighborhood.
I know all my will friends will want one of these to decorate their own houses. In the meantime I can enjoy them.

Image and Free Templates Compliments of http://www.paper-replika.com
Click Here for your Free Templates
Enjoy! I did print these out on thick card stock.
by Sharon | Jul 28, 2014
A paper skull doesn’t give me that creepy feeling that I get with the ones that are formed from some plastic concoction . . . I hope it’s some plastic concoction and not the real thing, but it makes me wonder. . . they do look and feel real. Yeah, like I would know.

The image and Free Templates are Courtesy of http://www.ravensblight.com
I’ve named him Chuckles, because as I’m looking at him from over my laptop, he is happy about something. I’m sure I don’t want to know. The joke may be on me.
He may be anticipating visiting you at your house sometime very soon.
Here are the Free Templates to print out on heavy white cardstock:
Print out the Instructions on regular paper.
Chuckles Assembly Instructions
Chuckles
Optional Base
Chuckles doesn’t like the base, he likes to be “free standing” in all his skullness.
I wonder if he’d like to visit my dentist. Chuckles is a true testimonial to brushing and flossing after each meal and limited sugary snacks.
I have a great Haunted House I’d like to share with you with free templates. It’s a true treasure with a secret chamber. The construction is quite involved, but well worth the effort.
Thanks for stopping by!
by Sharon | Jul 24, 2014
I love making things from common, everyday objects. This miniature Spooky Tree is made from a brown lunch size paper bag. If you would prefer a larger Spooky Tree as a centerpiece, you can use the grocery size brown paper bag. It may be fun to make several of the small ones and place them around your table with different displays at the base. I filled my paper bag with plastic pellets to give it some weight while I blended the center to make the trunk and the branches. Some may glue it to a cardboard base, but I find the plastic pellets to work well.
It’s always good to have a video to show you how it’s done:
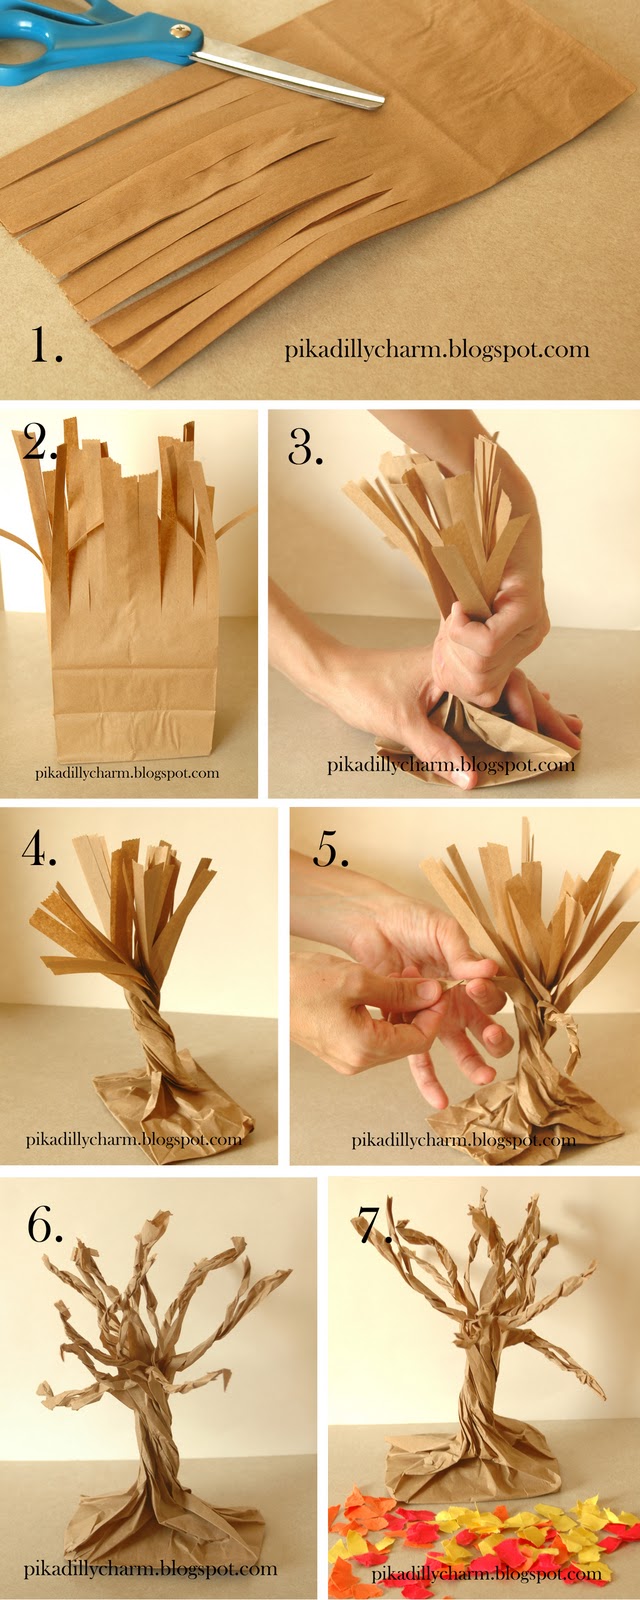
There are many different techniques you can use. I prefer to lay out my brown paper lunch bag and cut 1 1/2 inch strips cutting the open double layer of the bag into strips.
Then I carefully open the bag and pour in some plastic pellets for weight before twisting the trunk of the tree. I have found it easier to put the pellets in before I cut my strips, but it works however you choose to do it. Some people have found it doesn’t need extra weight, but it is entirely up to you.
I twist two strips together and depending how many small branches I want, I’ll cut and twist these separately.
The fun thing is when your tree begins taking shape and you improvise the next step for the next branch. That way each spooky tree you make and each set of branches you create are all different.
It’s a fun project to do while watching television, listening to music, or just some down town when you want to relax for a few minutes.


