by Sharon | Aug 15, 2014
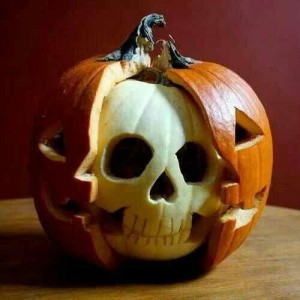
With a little imagination, you can turn your Halloween pumpkin into something magnificent. This Pumpkin Skull is very clever. I found it on Pinterest. No instructions are necessary. What you see is what you do.
- Clean out your pumpkin
- Split it open by slicing out a piece to accommodate a skull
- Carefully place a skull inside
- You can put a battery operated votive or tea light inside the skull
- Carve a face on the pumpkin, half on each side
You may have your own idea of how to do this Halloween craft, but this seemed to work for me. Instead of a skull, you could set up an interesting diorama.
If you do use the skull, you can add some interesting extras like plastic spiders or others bugs. Allow your imagination to go wild.
This is a fun family project. The kids will enjoy embellishing the skull and the pumpkin if they are too young to carve the pumpkin.
Here are some helpful links to get your imagination into high gear:


Have fun looking around your local dollar store. You’ll come up with some delightful embellishments.
Thanks for stopping by!
by Sharon | Aug 14, 2014
This is one scary pumpkin! If you dare, look closely and you’ll see pumpkin guts clinging to the skeleton rubs. You’ll need to save the insides of the pumpkin before carving the head. My concern is how is this going to smell. I’m also wondering what this would attract. I don’t know if I would want to set it out on my porch, maybe in the yard with gravestones and ghosts. I wonder if the squirrels would enjoy it, hummm.
I may opt for dry leaves. There is moss on his shoulders. This is truly a clever pumpkin-skeleton combination that I saw on Pinterest. I had to share it with you.
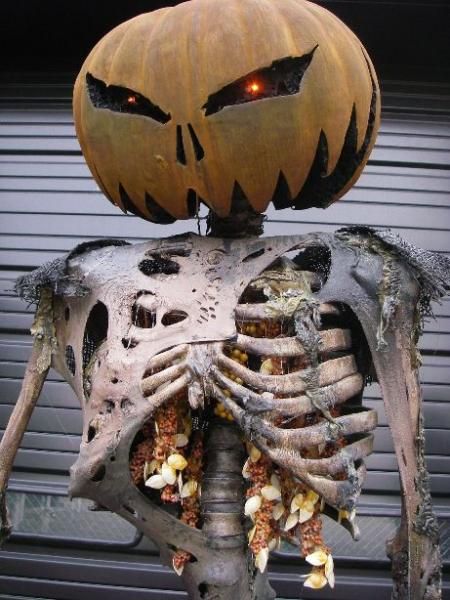
Image Compliments of http://www.halloweenforum.com
There are no DIY directions, but the picture explains it all. I also believe the lights in the eyes are battery operated tea or votive lights. You could wedge something inside the pumpkin head to set the lights on or wire them around the neck of the skeleton.
Let me see if there are any suitable links to help you out with this project.


I’m sure the photo above and the options here have gotten your imagination in gear. I do like the idea of a pumpkin head, but . . . the guts . . .
I’ll keep bringing you interesting things, we have awhile before Halloween.
Thanks for stopping by!
by Sharon | Aug 13, 2014
I get inspired by seeing what others are doing or have done for Halloween. It’s great to find something that would brighten up someone’s Halloween.
I find it fun to look for a suitable shoe at my local thrift shop. The size isn’t important and for this project a single shoe will work nicely, if the price is right. If you plan on making several of these or you want a pair to use as a centerpiece, you could really allow your imagination to run wild.
A picture is the starting point.
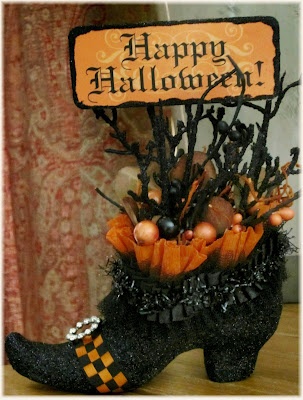
Image Compliments of http://www.bygonewhimsies.blogspot.com
You do want to make something unique. I started with an old grandma style shoe and added the pointy tip and curled it up. I used black paper and glued the cone tip to the shoe. To hide the seam I wrapped it with a nice wide piece of ribbon and put an embellished buckle on top.
Now some people go all out and put some black brocade fabric over the shoe and fashion the tip and stuff it with batting. That seems like a good idea, depending how involved you want to get with this project. And it depends upon the type of witch’s shoe you want to make and how you want to display it.
You can make it as fancy or as plain as you like. There are plenty of different items you can find at your local hobby shop or fabric shop.
The real fun begins when you’re ready to put stuff inside. Now, I don’t want to get gross on you, but think for a minute. This is an old used shoe. The idea creeps me out a bit. I put black inside, you could use fabric. I also stuff it with tissue paper. I don’t want the germs, yes germs, cooties, bacteria, etc. from the previous owner to contaminate my witch’s shoe creation. And, go ahead and laugh, I use rubber gloves when handling the shoe. I know, I’m a bit of a germ-a-phobe.
Craft stores have all kinds of interesting things you can buy and put together as a display for your shoe. Or you can make a grocery bag tree in there and do your decorating from there. Or you may like the various coffins I’ve posted on this site. There are also suggestions and other templates on that post of paper craft jewelry items. It is worthwhile to look through our archives of various craft ideas that would be suitable for this project. You could even make up some witches:

Image and Free Templates are Compliments of http://www.ravensblight.com
These aren’t the most attractive or friendliest looking witches you’ll ever encounter, but they do fit in nicely with the display for your original shoe design.
Here are the Instructions
Scarlatina
Mrs. Vericella
Aunt Rubella
And if that is too tame for you, how about:

MicroMonsters
This is definitely a fun assortment of ghouls for your decorating pleasure.
I hope you are inspired to get started with this project. If you prefer, I do have a witch’s shoe template you can use so you won’t have to go rummaging through thrift stores. You can use it to display a Halloween scene instead of Halloween Treats and you definitely could do both.
by Sharon | Aug 10, 2014
These Halloween Lanterns can hang indoors or outdoors and will be illuminated by a battery operated votive candle light. I buy these candle lights by the dozens to illuminate paper crafts or to put behind them to give them a creepy glow. These hanging lanterns are made from orange translucent vellum paper. They’ll give an eerie glow to wherever you hang them.
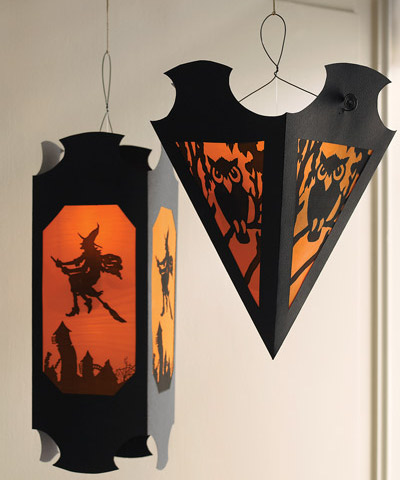
The image and free printables are compliments of http://www.marthastewart.com/913799/hanging-vellum-halloween-lanterns
Just click the link above for the directions and the free printables.
Here are links for some items you’ll need:
heavy black paper
Orange Vellum
Clear Monofilament
Battery-Operated Votive Candles
I hope you enjoy this project!
Thanks for stopping by!
by Sharon | Aug 9, 2014
When I saw this on Pinterest I just had to make my own, but there were no templates and no instructions. But, as they say, “A picture is worth 1000 words.” So, by looking at the picture I decided I’d make these using fence boards and other materials. I did want them to be water proof if I was going to place them outside, or if I’d put them in a window, I could use just about anything from Styrofoam to thick poster board or whatever that stuff is called. It’s always fun to see what’s available at your favorite craft store.

The pumpkin is relatively easy to make with all the templates available on-line for carving pumpkins. You could get a suitable face to paint on or cut out of other materials. The same is true for the ghost and even Frankenstein. Now, the mummy is what caught my eye with the burlap and muslin wrap. You’ll be able to find the burlap and muslin at your local craft store, cut out some strips and have this project wrapped up in no time. Add embellishments and you’ll have some Halloween friends that will be the envy of the neighborhood.


