by Sharon | Dec 8, 2014

I don’t know these ladies nor where they were when this selfie was taken, but I can only imagine their surprise when they took a good look at it. The ghostly figure looks happy enough. I guess she was having a good time, too.
It may give some people pause and others a bit of a fright. There are also nay-sayers who will claim it’s fake. That’s fine, too. I’m wondering why the image is so small compared to the women in the picture. It makes me wonder if there was a picture on the wall behind them or some sort of reflection.
I do find the picture interesting . . . I have no real explanation . . . I can’t answer my own questions. I don’t like to think everything is a fake, but this doesn’t ring true to me, but what do I know. I could be taking a selfie one day and get the same type of thing and need to go through all kinds of explaining . . .
Well, real or fake it’s interesting. I do have a story, of course I do 🙂
Here’s Jake’s Story and why he now believes in ghosts.
He was up at his family’s cabin in Michigan with some friends on a Saturday night. He was afraid of the woods at night. Not that he believed in ghosts, but he was uncomfortable with what could be out there that he couldn’t see. It makes sense to me.
He began talking brave about the woods and such, so his friends decided to call his bluff. They bet that he couldn’t go out in the middle of the woods alone to a particular old logging site that is told to have a single grave with a candle that is always burning.
Jake wasn’t going to admit he was just “talking big” so he agreed. The proof was to take a selfie at the grave.
As he walked through the woods with a flashlight in one hand and his cell phone in the other, he thought about the cute animals that would be in the forest. He didn’t want to jump out of his skin when he heard the “hoot” of an owl.
The woods were quiet. He could hear the crunching of dead leaves and small twigs with every step he took.
He did find the grave, but the candle was not lit. He lit the candle and snapped the selfie.
Jake thought he heard someone talking. He looked around, but could see nothing. He thought a lone grave out in the middle of the woods was activating his imagination. He was curious, but also didn’t want to see anyone out in the woods — real or spirit.
He heard something fall with a loud thump. He looked around. Then he saw a man walking around in circles, like he was looking for something he lost. The strange thing was that his footsteps didn’t make any sound among the dead leaves and twigs.
Jake took off running for the safety of the cabin with the selfie to prove to his friends.
Sorry to report that there was nothing with him in his selfie snap shot.
©Sharon Harvey 12/2014
https://oldhauntedstuff.com
by Sharon | Dec 8, 2014

The picture seems to tell it all. I do have my take on the best way to make this Christmas craft project work.
You’re going to need:
- vase of flowers
- a clean round container the vase of flowers would fit in
- candy canes
- two-sided tape
- large rubber band
- red or white ribbon
Let’s put it together:
- I’d put two strips of two-sided tape around the outer container: approximately halfway down the container and also about a half inch from the bottom of the container to make sure my candy canes will be securely placed.
- Attach the candy canes to the container.
- For added security, I’d slide a rubber band from the bottom of the candy canes and up under the crooks of the candy canes as in the picture where you see the ribbon.
- Next I’d tie a ribbon to hide the rubber band.
By having the vase of roses or flowers of your choice in a container placed in another container, watering will be easier and gives some space away from the candy cane decoration.
You can always do variations of this idea by using small glass or plastic containers and the mini candy canes to use as place setting cards or give as hostess gifts.
This is a festive idea that will dress up your dining table or wherever you choose to put it.
Thanks for stopping by!
by Sharon | Dec 7, 2014

Elf Shoe Paper Napkins
I find it amazing what can be done with paper and cloth napkins that will make your holiday dinner table interesting and exciting for family, friends and guests.
I believe napkin folding is an art form, not unlike origami, but a bit less complicated . . . so I tell myself.
Here’s a video tutorial that explains the process in 8 steps:
What’s great is that you can play it over and over again until you get it!
I hope this was fun and informative for you.
by Sharon | Dec 6, 2014
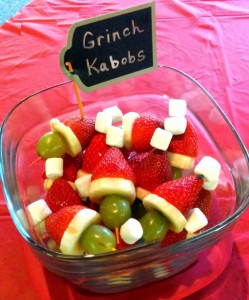
Do you believe it? Grinch Kabobs!!! I’m rolling on the floor laughing!!! And they’re healthy, too!!! Grinch and Healthy don’t seem in any way, shape or form to be healthy . . . but this is a definite exception!!!
You probably don’t need a recipe, but I have to give you one . . . just to feel important . . . please indulge me.
Let’s get the ingredients together:
- Strawberries
- Green Grapes
- Banana Slices
- Mini Marshmallows
- Lemon Juice
- Toothpicks
No surprises there 🙂
Now to put them together:
- Wash/Rinse the strawberries.
- Cut the tops off the strawberries. Do it like slicing off the top because this is Santa’s hat and it’s going to fit on top of a sliced banana, so you want the strawberries to have a flat surface.
- Slice the banana and brush on a little bit of lemon juice to coat them — you don’t want them turning brown.
- Wash/Rinse the grapes.
- Push a toothpick gently through the top of the strawberry, the banana slice and into the grape.
- You’ll probably need another toothpick to push down into the strawberry so you can add a mini marshmallow on top for the pompom fur-ball thing on top of Santa’s hat.
- Then repeat the assembly process.
There you go! Now that wasn’t so difficult, was it?
Oh, I forgot the sign! You have to have a “Grinch Kabobs” sign!
Enjoy and Thanks for stopping by!
by Sharon | Dec 5, 2014
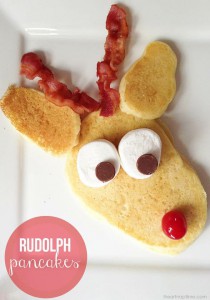
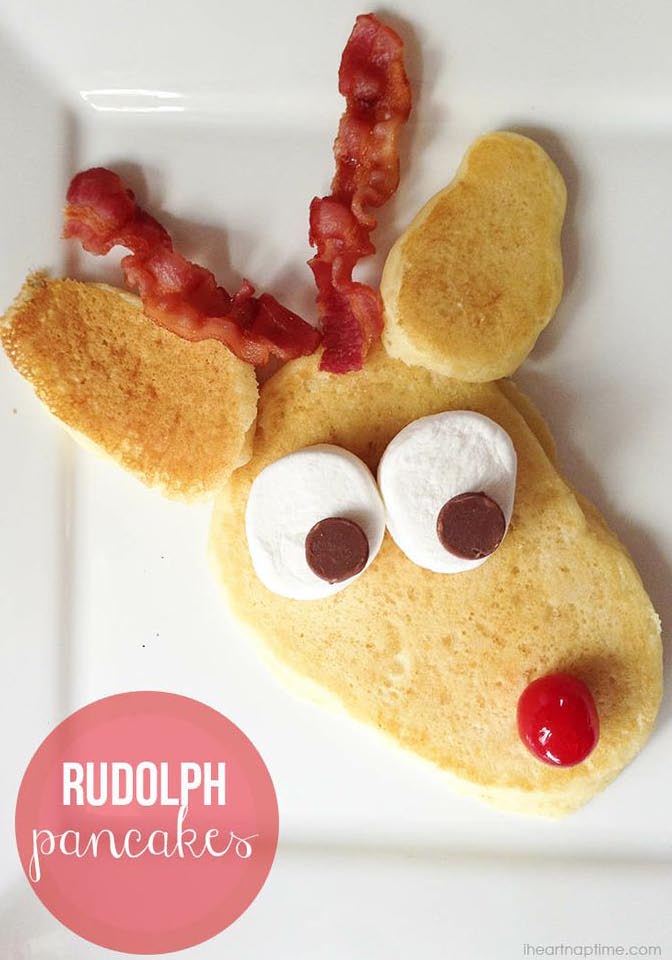
Image Compliments of http://iheartnaptime.net
I absolutely fell in love with these Ruldolph pancakes. They’re a real hit with kids and adults, too. The thing with pancakes is that they’re not only for breakfast. They’re great for brunch, lunch and dinner. A friend of mine was watching her grandchildren one afternoon. It was snowing outside. Her daughter and son-in-law were doing their Christmas shopping . . . she watched the clock approaching the dinner hour. The children were getting hungry. She decided to make these great Ruldolph pancakes for the kids. By the time they were ready, her daughter and son-in-law arrived. She thought she’d make regular pancakes for them . . . wrong, they wanted Ruldolph pancakes! Even Grandpa wanted what the kids were eating.
Now, for the recipe, there are many techniques people use to create designs for their pancakes. It’s all about control and getting the right thickness. The condiment squeeze bottles seem to work nicely for this. Also a measuring cup with a pouring spout.
- Prepare the bacon of your choice either on the stove or in the microwave.
- Prepare your favorite pancake mix.
- In the pan make an elongated oval shape for the face.
- Make the oval ear shapes at the top.
- Cook to a nice golden color.
- Get it out of the pan, carefully and put it on a plate.
- You can either continue the process over and over again to have lots of these delicious pancakes or go to Step 8 to decorate Rudolph.
- You’re now ready to make Ruldolph come alive by adding a cherry for the nose, cut a large marshmallow in half for the eyes with a chocolate chip placed towards the bottom . . . You may be able to use banana slices for the “whites of the eyes” . . . then set the bacon antlers in place on top of the head between the ears.
It’s always fun to see the reaction of the “kids” when they’re brought to the table.
I know these are Rudolph, but you may have the other reindeer, too, with Whopper candies for the nose. And, instead of the cherry you could use a strawberry or red grape.
Have fun with these and come up with your own variations.