by Sharon | Nov 25, 2014
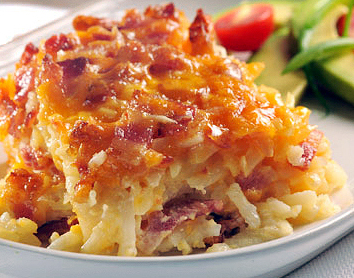
A hearty breakfast is a “must have” on Thanksgiving Day or Christmas Day. Those days when you’ll be waiting for dinner . . . maybe Easter Day, too. I’m not picky — this is a great breakfast casserole you can make any time.

This casserole serves 6
Ingredients:
- 4 cups frozen shredded hash brown potatoes
- 1/2 cup finely chopped onion
- 8 ounces cooked and crumbled bacon
- 1 cup shredded cheddar cheese
- 1 can evaporated milk
- 1 large egg — beaten
Directions:
- Preheat oven to 350 degrees F.
- Grease an 8 ounce square baking dish.
- Layer 1/2 of the potatoes, 1/2 the chopped onion, 1/2 the crumbled bacon and 1/2 the cheese.
- Repeat for the remaining potatoes, onion, bacon and cheese.
- Combine the egg and milk in a small bowl.
- Pour evenly over potatoes, etc. in the baking dish.
- Cover.
- Bake in the oven for 55 to 60 minutes.
- Uncover. Bake for an additional 5 to 10 minutes.
- Wait 10 to 15 minutes before serving.
This simple recipe is a real hit with family and friends. Give it a try. Add other ingredients or substitute ingredients. This would work well with left over turkey, ham or whatever left-overs you may have.
by Sharon | Nov 22, 2014
First off, I must say to family and friends — the youngsters . . . I am so very envious that you get a whole week off from school to celebrate Thanksgiving. When I was your age . . . I got 2 days . . . 2 . . . count them 1 . . . 2 days — Thursday and Friday.
All right, I’m an adult . . . I’m over it . . . two stinking days. . . and they get a whole cotton picking week . . . a whole week!
Enough foolishness! I have things to put together so your week . . . will be great with goodies . . .
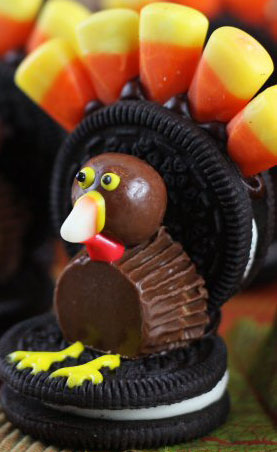
 This little turkey has lots of pieces to put in place. Have you guessed all the ingredients? And . . . you can change them to make them original to you.
Here are the ingredients . . . how many did you get right?
- Nutter Butter Cookies — that was a give-away with the peanut shape, but you could use Vienna Fingers if peanut butter isn’t your thing
- Mini M&Ms — use the brown ones to be traditional or go a bit wild, you’re creating these turkeys — you can also use those candy eyes
- Betty Crocker White Cookie Icing — this is a must use for taste and the glue quality — you don’t want it falling apart
- Jelly Bellys — yellow, red and orange
- Reeses Peanut Butter Cups — hummmm, if peanut butter isn’t your things . . . you’ll have to work on that one . . . or use another Nabisco Famous Chocolate Wafer Cookie or a whole Nabisco Oreo Cookie — whew I thought of an alternative 🙂
- Nabisco Famous Chocolate Wafer Cookies — if they’re not in the cookie section of your store, you’ll find them in the ice cream section
- Candy Corn
Now, just follow the picture and before you know it you created a delicious cookie turkey! And since you bought all the ingredients you might as well make a whole bunch of them. A “rafter” of turkeys . . . not a flock . . . or a gobble . . . since you have a whole doggone week off, you should still learn something!
Moving on, we have this handsome fellow:
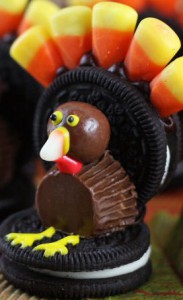
Once again, do you know what you need to make these adorable turkeys? Maybe this is just too easy, but it’s lots of fun!
Here’s what you’re going to need (some left overs from the above recipe will work fine):
- You can use Double Stuff Oreo Cookies or the regular ones for the base and the tail feather base
- Candy Corn for the tail feathers
- Whoppers for the head — did you guess this one?
- Mini Peanut Butter Cups — here we go again . . . will Rolos work or are they too small? I think they’re too small . . . maybe a chocolate covered marshmallow will work . . . think about it . . .
- Betty Crocker Frosting in the tubes: Chocolate, Yellow, Red and Black
- You can make the eyes with frosting or go for the candy eyes
Now, putting these together may be a challenge.
- I usually like to begin from the bottom up, but this time we’re going to start with the tail feather Oreo cookie . . . put some chocolate frosting inside to hold the candy corns as you place them around the top section or do it however you like . . . top of the tail feathers or add a few more for a fuller look . . . up to you. I also cut off the white tips to use for the beak . . . it also helps to have a flat surface on your candy corn to stick in the chocolate frosting. Just my preference.
- Put down an Oreo cookie — this is your base. Use some chocolate frosting to “glue” the tail feather Oreo to the base Oreo.
- While the chocolate frosting is setting . . . unwrap your mini Peanut Butter Cups . . . with the bottom up and using a sharp knife (kids don’t do this part) cut a sliver off of one side using a sawing motion to keep from breaking the whole peanut butter cup. You’re making a flat surface and a nice little taste . . .
- Once you finish sawing a flat spot in all the peanut butter cups, carefully flip over your stuck together Oreo cookies — you now want the tail feathers on the table . . . and the base up in the air. The flat spot you made in your peanut butter cup is going to be “glued” with chocolate frosting to the Oreo base . . . and the top of the peanut butter cup is going to be “glued” to the Oreo feather (candy corn) holder . . .
- Keep the Oreos in this position . . . the frosting needs time to set. Next comes the Whopper . . . that’s the turkey head . . . the back of the head is “glued” with chocolate frosting to the Oreo cookie tail piece . . . also glued on top of the peanut butter cup . . . you’ve created a flat turkey belly with the bottom of the peanut butter cup now a round head with the whopper . . . check out the picture . . . don’t want you putting the head in the wrong place . . .
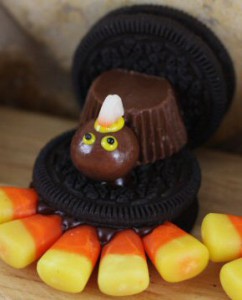 Is this how your turkey cookies look? If not, then my directions stink! This is how it’s supposed to look on your work space . . . glue on the white candy corn tips for the beaks and do the eyes however you choose to do them . . . with frosting or those candy eyes . . .
- Another lesson!!! Whoopeee!!! What’s that red thing you’ll be adding across the beak and down to one side? It’s not a “gobble gobble” and it’s not a “wattle” . . . give up? It’s a “snood” . . . yes a “snood”. I’d go into more detail about the thing, but we’re working with food here and “snood” completes your lesson 🙂
- Once the beak has set and is staying in place . . . gently flip the cookies over to set on its base with the tail feathers up in the air . . . like the first picture . . . Now, with the turkey sitting properly, you can add the red snood. (Aren’t you glad you learned what that thing is??!!)
- Give the little guy some yellow frosting feet and I think you’re done!
All right, one more . . . a Pilgrim hat:
This is so easy . . . I’m almost cheating on this one! Here’s the picture:

Do you know the ingredients for this Pilgrim Hat? Need a hint? There are only four ingredients:
- Chocolate-Striped Shortbread Cookies
- Package of Chocolate Chips or Chocolate Candy Melts
- Marshmallows
- Tube of yellow decorators’ frosting — I go for Betty Crocker, but you can choose what you like
Putting the Pilgrim Hats together:
- Cover a tray with wax-paper and set the Chocolate-Striped cookies stripes down, chocolate side up . . . give them some space between cookies
- Melt the chocolate chips or chocolate candy melts in the microwave or a double boiler
- One at a time, stick a toothpick into a marshmallow and dip it into the melted chocolate, covering it completely.
- Center the chocolate covered marshmallow on top of the shortbread cookie.
- Gently remove the toothpick and dip the remaining marshmallows, etc.
- Chill the hats in the refrigerator until the chocolate sets.
- Once chilled, pipe a yellow frosting buckle on the front of each hat.
All done!
There you have three Thanksgiving themed goodies the kids can help you make.
Thanks for stopping by! Have a Happy Thanksgiving!!!
by Sharon | Nov 17, 2014
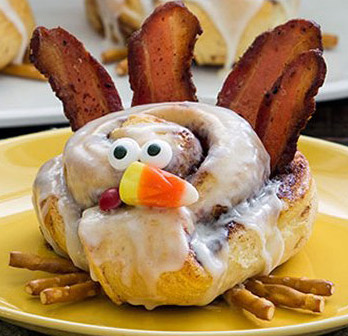
Thanksgiving will definitely be special with these Turkey Pillsbury Cinnamon Rolls

These Pillsbury Cinnamon Roll Turkeys will bring a smile to your breakfast table Thanksgiving morning.
Here’s what you’ll need to make 5 servings:
- 1 can Pillsbury Grands! Refrigerated Cinnamon Rolls with Icing
- 10 slices of bacon of your choice
- 5 candy corns for the beak
- 5 small red candies — red hots seem appropriate
- 10 candy eyes
- 15 mini pretzel sticks that you cut in half
Now it is all a matter of assembling them together after the cinnamon rolls have baked
- Heat oven to 350° F.
- Set the icing aside for now.
- Divide the dough into 5 cinnamon rolls
- Arrange your cinnamon rolls on a cookie sheet — spray with cooking spray or cover with parchment paper
- Unroll each cinnamon roll about an inch to tuck in forming the neck. It’s basically the folded up section where the candies will set to create the beak and waddle
- Bake for 20 minutes or until golden brown
- Remove from oven and let cool before removing them from the cookie sheet to a cooling rack
- Cook the bacon until crisp, blot dry. Cut each piece in half and set up into the backend of the cinnamon roll to look like tail feathers
- Drizzle the icing over the top of each cinnamon roll
- Decorate with candy eyes, candy corn beak and red hot
- The pretzel sticks will slide under each “turkey” to look like feet
This would be a nice brunch, too.
Happy Thanksgiving!
by Sharon | Nov 16, 2014

You’re going to make these Sugar and Cinnamon Almonds in a slow cooker. They take about 3 to 4 hours to cook with stirring every 20 to 30 minutes or so. They are going to smell yummy and so will your whole house. Don’t be surprised to have neighbors wandering over to see what you’re doing.
Are you ready to get started?
Ingredients:
- 1 cup of Granulated Sugar
- 1 cup of Brown Sugar
- 3 tablespoons of Ground Cinnamon
- 1/8 teaspoon of Salt
- 1 Egg White
- 2 teaspoons of Vanilla
- 3 cups Almonds
- 1/8 cup of water
Directions:
- Get out a large bowl and mix the sugars, cinnamon and salt together.
- Get out another bowl and a whisk. You’re going to mix together the egg white and the vanilla until frothy.
- Add the almonds and coat them thoroughly with the frothy mixture.
- Get out the slow cooker and spray it with cooking spray. This mixture is going to sticky.
- Add the cinnamon, sugar and salt mixture to the almonds.
- Put it all in the slow cooker and turn it to low.
- Stir until the cinnamon sugar mixture is coating the almonds well.
- Depending upon your slower cooker, it should cook for about 3 to 4 hours. You’ll want to stir every 20 minutes or so.
- After the almonds have cooked for about 2 hours, add 1/8 cup of water into the slow cooker and stir well. This helps the mixture harden and become crunchy.
- When your almonds are done, line a baking sheet with parchment paper and spread the coated almonds out to cool. The almonds are going to be sticky so carefully separate them. You don’t want almond clumps, but coated individual almonds.
These are absolutely delicious and make wonderful gifts.
by Sharon | Nov 15, 2014
I’m into easy, no-bake recipes.
Well, that a definite laugh to call this a recipe.

What you see is what it is!
- Buy a bag or box of Oreo cookies
- Buy some mini peanut butter cups
- Buy square sprinkles or get some red hots
- You’ll also need chocolate frosting
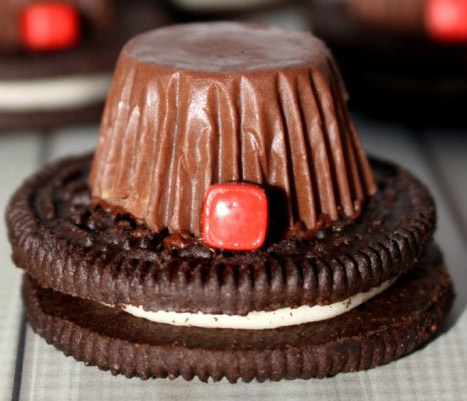
Now, let’s assemble this simple no-bake Pilgrim Hat:
- Get out an Oreo cookie.
- You may want to either open up the Oreo cookie and scrape out the white frosting in the center and use just the one cookie portion for the hat brim OR you can scrape out the white frosting and replace with chocolate frosting OR cover the white frosting with a bit of chocolate frosting and roll in some chocolate sprinkles OR any other clever thing you can think of.
- Put a bit of chocolate frosting on the top of the peanut butter cup and place it in the center top of the oreo cookie.
- Find a little square candy sprinkle to use for the hat decoration or use a red hot. Secure in place with a dab of chocolate frosting.
There you have a clever Pilgrim Hat and you didn’t bake a thing. It will be a lovely dessert everyone will love and think you’re so clever!
Thanks for stopping by!
by Sharon | Nov 2, 2014
Don’t You Just Love Them!!!

Image is compliments of http://family.disney.com
Minnie, Mickey and Daisy are available to give you a hand in getting your favorite fall recipes in order. You may want to print out dozens on either card stock or plain copy paper. I prefer the card stock, but use what works best to you.
I don’t know about you, but some colorful recipe cards are exactly what I need to get in the mood to bake up batches of cookies, pies and other delicious fall concoctions. When I see these cards in my recipe box, I immediately know to pay attention to them.
These are also great when you’re sharing recipes with family and friends.
Here’s your first recipe Mickey and Mini’s Pumpkin Whoopie Pies
This is what you’re going to need:
- Dig in the kitchen cupboards and drawers for: mixing bowls, whisk, electric mixer, wooden spoon
- 2 cups of flour — your choice, try out the gluten free variety that seems really popular
- 1 teaspoon baking powder
- 1 teaspoon baking soda
- 1 teaspoon ground cinnamon
- 1/2 teaspoon salt
- 1/2 cup softened butter
- 1 cup brown sugar
- 1 large egg that you’re going to beaten ever so lightly
- 1 cup cooked pumpkin puree
- 1 teaspoon vanilla extract
Goodness, I never thought this list was going to end!
You’re going to need some more stuff to put these delicious whoopie pies together:
- For you fancy and seasoned bakers out there, you’ll need a Pastry bag with 3/4-inch opening OR, if you want to do it the easy way, I’d go for a Large Plastic Food Storage Bag and snip out a lower corner, but don’t snip it out now 🙂
- Baking sheets
- Parchment paper
- Cooling rack
- Cream cheese frosting — use your recipe or go for the store bought — or use a frosting of your choice
Let’s get these whoopie pies made, shall we:
- Heat the oven to 350 degrees.
- In a mixing bowl, whisk together the flour, baking powder, baking soda, ground cinnamon, and salt.
- In a second mixing bowl, beat the butter and brown sugar together until creamy.
- Beat in the egg, pumpkin puree and vanilla extract.
- Stir the flour mixture into the butter mixture.
- Then spoon the batter into the pastry or plastic food storage bag. Once it’s filled, snip off a corner, if you’re using a plastic food storage bag. You may want to experiment with your snips 🙂
- For the Mickey faces, pipe 2.5-inch blobs of batter on a parchment paper lined baking sheet, not too close. Remember, you need two for each whoopie pie. Use a clean fingertip to gently flatten the blobs into uniform circles. You’re going to have to keep your fingertip clean, so a wet paper towel works well or you can dip your fingertip in water — the batter is going to be sticky.
- Pipe small ear blobs at the top of each batter face, keeping them as close in size as possible. Again, use a wet fingertip to flatten them.
- Pop them in the oven and bake the Mickey pumpkin cakes until they spring back when you press down on the center. This will take 8 to 10 minutes.
- Take them out of the oven and allow them to cool on the baking sheet before transferring them to a wire rack to cool completely.
- Spoon cream cheese frosting into a pastry bag or get another handy dandy plastic food storage bag and snip off the corner.
- Pair up the baked pumpkin cakes, matching the shapes and sizes as best you can.
- Working with one pair at a time, turn one of the cakes face down and pipe moderate mounds of frosting on the face and ears.
- Top the frosted cake with its match and gently press down to spread the filling and hold the whoopie pie together.
Well, there you have it. And, I would say it is definitely worth it when you see your kids gobble them up. There is definite satisfaction in knowing you made these yourself. The big plus for me is knowing exactly what’s in it.
Enjoy the recipe cards and this great Mickey and Mini Mouse Pumpkin Whoopie Pie Recipe.