by Sharon | Jun 30, 2016
I love apple pie however I can get that delicious taste.
A cookie would hit the spot just about now.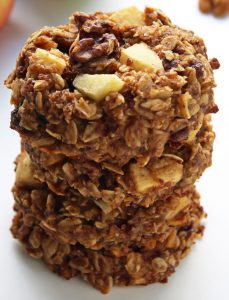
Especially one with all the ingredients of an apple pie with walnuts and raisins and diced apples to give it a satisfying crunch. These would be great for breakfast, as a snack for the kids or just any time a cold glass of milk would be welcome . . . or with coffee or hot chocolate. These would be excellent all year round.
I’m not a walnut fan, but I do like almonds. Or you can forget the nuts . . . and the raisins . . .
Fix these however you like . . . That’s the fun of making things yourself.
Apple Pie Cookies
Ingredients:
- 1 cup old fashioned oats
- 1 cup quick oats
- 1/2 teaspoon salt
- 1/2 teaspoon nutmeg
- 1/2 teaspoon cloves
- 2 eggs, beaten
- 1/2 cup unsweetened apple sauce
- 1/2 cup cane sugar
- 1/4 cup oil
- 1 cup diced apple pieces
- 1/2 cup chopped walnuts or a nut of your choice — or not nuts at all
- 1/2 cup raisins — or not
Directions:
- Preheat oven to 350° F.
- In a large bowl stir together the oats, salt and spices.
- In a small bowl whisk the eggs, apple sauce, sugar and oil. Add to the dry ingredients and stir until combined.
- Fold in the diced apples, nuts and raisins.
- Drop 1/4 cup size portions of batter onto a parchment lined baking sheet.
- Flatten the cookies a bit.
- Bake for 15 to 20 minutes until set.
- Allow the cookies to cool on the baking sheet before transferring them to an airtight container.
This recipe makes about a dozen cookies.
Have fun and enjoy!
Sharon
by Sharon | May 22, 2016
Some People Are So Clever!
Line a terra cotta pot with aluminium foil, put in some charcoal, light it and you have a mini campfire where you can roast marshmallows . . . or make some s’mores . . . or make a delicious sugar cone filled with fruit and chocolate and marshmallows . . . heat it on your mini campfire . . . 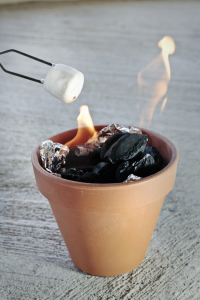
While you’re enjoying your delicious treat, you can tell some wonderful ghost stories . . .
Plus you can surprise Dad with this for Father’s Day!
And, once you do this . . . you’ve found the go-to-treat your family will ask for all summer long.
Be sure to be responsible with adult supervision. You don’t want to have a huge fire, even if you use a larger terra cotta pot . . . you just need enough heat to melt the chocolate and the marshmallows.
Sugar Cone or Waffle Cone Delicious Summer Treat Recipe
 This will be easy for you to make and find all the ingredients . . . it’s just stuff you love and would like to have all melted together into a cone.
You can make these on the grill after BBQ-ing, on a campfire and even in the oven . . . I kind of like that idea — a delicious treat that can be made throughout the year — just a thought.
It is quite clever to use a waffle cone in place of the graham crackers in the original s’mores tradition.
I wonder about adding some chopped nuts . . . or if this would be chewy enough with the cone . . . or adding some broken up pieces of graham cracker . . . or even cookie pieces . . .
These will definitely be easier to put together and have stay together from the first to last bite.
Here is a list of suggested ingredients — be sure to add some items of your own — and delete some as well:
- marshmallows
- Reese’s peanut butter cups
- chocolate bar pieces
- Rolos
- butterscotch chips
- chocolate chips
- banana slices
- sliced raspberries
- sliced strawberries
Now:
- Fill the cone with desired amounts of marshmallow and other ingredients.
- Cover the cone with aluminium foil.
- Place over the campfire for about 3-5 minutes or on a heated grill for 5-6 minutes or in the oven at 375° F for about 5=8 minutes. You want the toppings melted.
- Enjoy the warm and gooey melted feast of chocolate. marshmallow and fruit pieces.
This is definitely a winner . . . something I can see offering throughout the summer . . . into the fall . . . and winter, too!
I hope you’ll try these out and see how it works for you.
Until next time,
Sharon
by Sharon | May 6, 2016
Healthy Breakfast Or Quick Snack Full of Protein
Here’s a healthy “on the go” snack that you can make in a jiffy.
You’re going to need: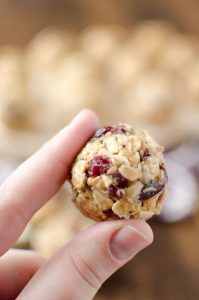
- 1 cup of oatmeal
- 1/3 cup of chopped almonds
- 1/3 cup sweetened shredded coconut
- 1/2 cup either peanut butter or almond butter
- 1/4 cup of honey
- 1 tablespoon of chia seeds
- 1/3 cup of dried cranberries roughly chopped
Here’s what you need to do now that you’ve gathered your ingredients:
- On a baking sheet you’re going to bake the oatmeal, almonds and coconut for 8 to 10 minutes at 350° F. Be sure to stir the mixture after 5 minutes. Then allow the mixture to cool after taking it out of the oven.
- Get out a medium sized bowl — put in the nut butter and microwave for 20 to 30 seconds until runny.
- Add the baked mix into the bowl along with the honey, chia seeds and cranberries.
- Form into 1-1/2 inch balls and refrigerate.
- Store in an airtight container.
- Refrigerated bites are good for about a week. They’ll keep in the freezer for up to 3 months.
I hope you’ll try this recipe. As always you can add other ingredients or substitute ingredients or just leave them out . . . Just have fun and make some healthy snacks for your busy family.
Until next time,
Sharon
by Sharon | May 1, 2016
These would be wonderful for Mother’s Day!!
I love a recipe that makes a great breakfast . . . but is great for brunch . . . and a special treat for a breakfast-dinner.
These moist little pancakes with some jam . . . and sour cream . . . would be a real hit with your family.
You’ll need:
- 32 ounces of whole milk Ricotta Cheese
- 1 egg
- 1/2 to 3/4 cups of Granulated Sugar
- 1-1/2 cups of All-Purpose Flour plus more for shaping the ricotta pancakes
- 1/2 teaspoon Baking Powder
- 1 teaspoon Vanilla Extract — this is optional
- Oil for frying up your pancakes
Let’s put these babies together:
- Combine the Ricotta Cheese with the Egg and mix it well. If you’re adding the Vanilla, add it with the egg.
- Add the Sugar and mix well.
- Add Flour and the baking powder.
- Mix it up so everything is blended into a smooth mass.
- You can use a spoon or a large ice cream scoop, scoop up the mixture and drop it into some flour. Coat it with the flour making the mixture into a ball, then gently shape it into a flat patty about 1/2 inch thick. Continue with the rest of the mixture.
- To fry the pancakes, add about a tablespoon of oil into a large skillet and heat over low-medium heat.
- Add the ricotta pancakes, cover with a lid and fry for about 2 to 3 minutes or until well browned. Turn over and do the same with the other side.
- You’re going to want to serve these warm with a side of sour cream and a jam of your choice.
This recipe makes about 25 pancakes — depending upon the size you make them.
I do hope you give this recipe a try.
Thanks for stopping by!
Sharon
by Sharon | Apr 20, 2016
Apple and Peanut Butter Dog Treats Recipe
Diva’s helping me out with this post.
Mom doesn’t like giving me people food . . . but I do find what she’s eating interesting. Not that I get very much extra food. I work really hard being cute and adorable to melt Mom’s heart . . . and you wouldn’t believe what she made for me . . .
Apple and Peanut Butter Cookies!!! Oh yes!!!!
Put me down Mom, I have to do my happy dance!!
This is a simple recipe you can make in whatever shape your furry friend would enjoy. Diva’s more into the taste than the appearance, so I make these into small squares.
All you have to do is mix them up, roll them out, cut them up and bake them.
Ingredients:
- 4 cups oat flour, plus more as needed
- 1/2 cup natural peanut butter
- 2/3 cup unsweetened applesauce
- 2 whole eggs
Directions:
- Preheat oven to 350° F.
- Combine the oat flour, peanut butter, applesauce and eggs in a large bowl. Mix thoroughly.
- If the dough is sticky, add a bit more oat flour. You want to be able to handle the dough without it sticking to your hands.
- Transfer the dough to a flat surface and roll it out — about 1/4 of an inch thickness.
- Use a cookie cutter of your choice to cut out the treats.
- Transfer onto a baking sheet lined with parchment paper.
- Bake for 20-30 minutes. The cookies should be dry and begin darkening at the edges.
- Cool completely on a wire rack and store in an airtight container or ziplock bag in the refrigerator.
There you go. They smell heavenly . . .
Be sure to check with your vet about any allergies your pet may have.
Until next time,
Sharon and Diva
by Sharon | Apr 9, 2016
Spring must be the season for egg salad sandwiches — at least at my house.
I’m sure they’re popular throughout the year.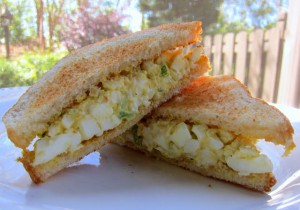
There is something about these sandwiches that definitely hit the spot on a beautiful spring day.
This recipe may be the reason why I’m thrilled about egg salad sandwiches. Try it and see for yourself.
Ingredients:
- 6 hard boiled eggs diced up in nice bite-sized pieces
- 1/2 cup diced celery
- 2 1/2 tablespoons of mayonnaise
- 1 tablespoon of vinegar
- 1/2 cup diced red onion
- 1/2 teaspoon Worcestershire sauce
- 1/8 teaspoon pepper
- You may want to add salt to taste
Directions:
- To boil the eggs: Place them in a single layer in a heavy sauce pan and cover with cold water — about an inch. Add a teaspoon of salt. Leave the pot uncovered and turn the heat to high. As soon as the water comes to a boil, turn off the heat and cover. Leave it like this for about 10 minutes before removing the cover. Next take the sauce pan with the eggs over to the sink and run cold water over the eggs for a minute.
- Next you’ll need to crack and peel the eggs, dice them and follow the list of ingredients.
- Combine all the ingredients and chill before making into sandwiches.
Some people add lettuce or spinach to their sandwich.
However, you make them, enjoy.
Sharon

