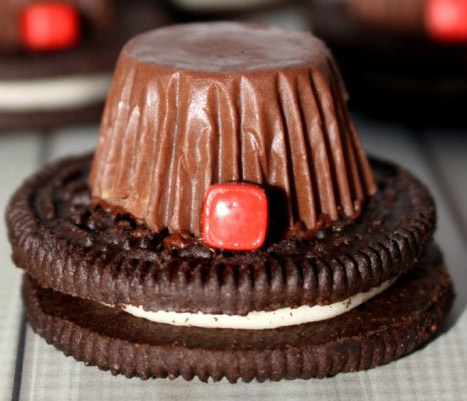
by Sharon | Nov 15, 2014
I’m into easy, no-bake recipes.
Well, that a definite laugh to call this a recipe.

What you see is what it is!
- Buy a bag or box of Oreo cookies
- Buy some mini peanut butter cups
- Buy square sprinkles or get some red hots
- You’ll also need chocolate frosting
Now, let’s assemble this simple no-bake Pilgrim Hat:
- Get out an Oreo cookie.
- You may want to either open up the Oreo cookie and scrape out the white frosting in the center and use just the one cookie portion for the hat brim OR you can scrape out the white frosting and replace with chocolate frosting OR cover the white frosting with a bit of chocolate frosting and roll in some chocolate sprinkles OR any other clever thing you can think of.
- Put a bit of chocolate frosting on the top of the peanut butter cup and place it in the center top of the oreo cookie.
- Find a little square candy sprinkle to use for the hat decoration or use a red hot. Secure in place with a dab of chocolate frosting.
There you have a clever Pilgrim Hat and you didn’t bake a thing. It will be a lovely dessert everyone will love and think you’re so clever!
Thanks for stopping by!
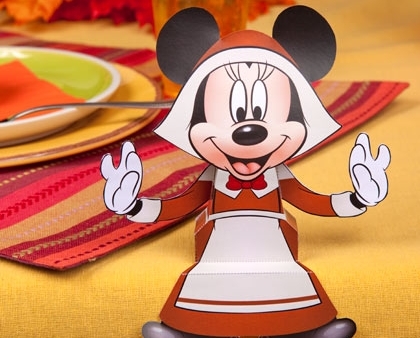
by Sharon | Nov 12, 2014
Family.Disney.com has the absolute best FREE Templates you can print out for Thanksgiving.
I don’t believe Thanksgiving would be complete without having some hostess gifts for your young guests. It gives me a warm feeling inside that I’ve given something special to prolong the celebration just a bit longer.
These candy box Mickey and Mini Pilgrims are absolutely perfect. You make them by printing them out on card stock, cut them out and assemble them. Then you fill them with something yummy or special trinkets. It’s that special touch, only you can add that makes these Mickey and Mini Candy Boxes so special.
Without further chatter, here are the pictures and the links:

Now isn’t he a handsome fellow with his Pilgrim hat, a pumpkin and his own turkey drumstick!
Click Here for the Free Template
I haven’t forgotten Mini! She does look lovely as a Pilgrim with her special bonnet, apron and a beautiful big smile.

Click Here for Pilgrim Mini Mouse
This handsome couple will definitely brighten up your Thanksgiving decor. I always like to add a bonus or two in my posts to give you something else you can use by printing out on card stock, cutting out and assembling.

Chip and Dale are fun little characters to make this special Kids’ Table sign enjoyable.
Here’s the Free Template
You’re going to need a wooden dowel and a flower arrangement or a pumpkin to secure the dowel into.

Mickey Mouse Happy Thanksgiving Napkin Rings
You can print these out on either plain printer paper or card stock. They tie the Disney theme together at the adult and kids’ tables.
I have one more surprise free template for you.
Thanks for stopping by and have a Happy Thanksgiving!
by Sharon | Nov 4, 2014
Free Paper Craft Templates for Thanksgiving are an excellent way to decorate and get the kids involved, too.
The turkey, Indians and Pilgrims are a bit boxy, but they all go together to make a beautiful centerpiece or mantle decoration.
Let’s get started, shall we:
 Isn’t this a handsome fellow? I’m thinking about having a whole bunch of these to adorn various nooks and crannies in the house. After all, this is our guest of honor . . . Click Here
 This Native American Boy and Pilgrim Girl are a wonderful pair to adorn your table or any place that brightens the Thanksgiving season. Click Here
 And here we have a Native American Girl and Pilgrim Boy. This completes a beautiful display you can make with your children. Click Here
There’s an added bonus with this free template . . .
Well, there you have a wonderful Thanksgiving collection you can display and share with family and friends. I have one more image to show you, just for fun:

Happy Thanksgiving!
by Sharon | Oct 27, 2014

I absolutely love, love, love apple pie!
I got hooked on using a small scoop to empty out an apple, then seeing what I could put inside.
I liked the idea of having single serving items. Similar to stuffed peppers. It seemed as though those were made just for me. I know it seems silly, but there is something about it that seemed special. Now, with these Apple Apple Pies I am in heaven.
I do love baked apples, but baked apples with a top crust . . . heaven! And what is inside is the stuff of a great apple pie. This is a great treat you can serve any time, but wouldn’t it be something special for Thanksgiving! You can add a scoop of vanilla ice cream on top to make this absolutely delicious.
I don’t know about you, but baking an apple pie and cutting into it, then saving the left-overs in the pie tin or on a plate all wrapped up looks kind of sad. These Apple Apple Pies are single serving or you can half them with a friend and the remaining ones are still intact and inviting.
Well, let’s see how to make this delicious apple pie. You’ll need:
- 4 to 6 Granny Smith Apples that can stand upright on their own. You’re making individual pies here and want them to stand up straight and tall to impress your guests.
- 1 teaspoon cinnamon
- 1/4 cup granulated sugar
- 1 tablespoon brown sugar
- You can make your own pie crust or buy it already made
Now, let’s put these pie together:
- Preheat oven to 375 degrees F
- Wash your apples. Pat dry with a cloth or paper towel.
- Cut the tops off the apples and discard.
- Carefully get out the seeds and husks or whatever the unappealing stuff that makes up the core of the apple. You want to be careful so you don’t damage the outside of the apple.
- You can use a spoon, melon baller or small scoop to dig out the inside of the apple. You’re going to want to chop this up and use it for your pie filling. Now, there is a fine art to this. You need to go slowly and carefully. Or if this is too much for you, dig it out however you choose and then cut up another apple or two to add to the filling. Or buy the canned apple pie filling in the store. There are always alternatives. That can be our secret.
- In a bowl, you’re going to put your apple pieces and mix up the sugars and cinnamon. You can make adjustments to the ingredients to taste.
- Fill up your hollowed out apples with the apple pie filling.
- Roll out your dough. Cut in 1/4 wide strips and make a lattice work pattern over the top of each apple.
- Put the apples in a 8″ x 8″ pan. You want to add water to over the bottom of the pan.
- Cover with foil and back for about 20 to 25 minutes.
- Remove the foil and bake for an additional 20 minutes or until the apple filling is soft and the crust is a nice golden brown.
- Let cool before serving. I do like to add a scoop of vanilla ice cream, but some people may want a hunk of cheddar cheese to go with their apple apple pie. However you decide to serve it, it will be delicious.
There you go! Something different and very eye appealing.