by Sharon | Dec 4, 2014
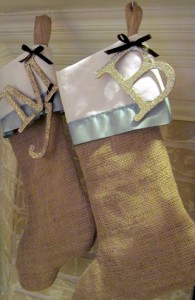
I like the rustic look of these stockings. At your favorite craft store you can get wooden letters to adorn them or put names on them using fabric paints. These letters have been “glitterized”. Glitter isn’t my thing, it gets all over everything, but for those of you who are into it — go to town!
As you’ve probably guessed these Christmas Stockings are made from burlap, but you can use whatever fabric you choose. I know of a woman who used leather and vintage fur and baubles to dress them up. She also got into a denim style with pockets. There are no limits to what you can do with stockings.
I think a “western” style might be nice with interesting handkerchiefs for adornment and use denim, too. I like the idea of having pockets on the outside where you can tuck in little goodies and also put in candy canes. They make such a nice variety of them in all color combinations and flavors.
Here’s another image showing off the mantle in a rustic style. It’s nice to bring the outdoors in with your decorating. I do like pine cones and the “southwestern” style this gives. It’s amazing what can be done with garden or artificial clippings, ribbon and imagination. It’s also nice to be able to bring in some family heirlooms or go to a thrift store to find just the right things. I know many from different cultures who like to bring that into their decorating, too. People who travel have some items they picked up and this is a perfect way to display them, too.

I know I moved away from stockings, but the whole mantle comes into play as you try to tie everything together to make an interesting focal point that attracts the eye of your visitors and guests.
I do have some free templates for you. They’re of the stockings in three sizes:
Large Stocking Template
Medium Stocking Template
Small Stockings Template
Now, for the cuff, you’ll need to work that out and the burlap loop. The loop is no big deal, just a strip of fabric and sew it on your stocking. I was thinking about the cuff. You could fold it down and then sew fabric on it. You can also add to the top of the template — if it doesn’t fit on the size paper you use in your printer, you can print out another one and tape the extra section on your template to make it longer or free hand it.
You may want to do some interesting decorating with bells, garland strips, fake fur and who knows what you’ll find that will make these stockings special. I do like giving you the basics and then you get your imagination and creativity into high gear.
I hope this Rustic Christmas Stocking images and the mantle were food for thought and the article was helpful. We always get ideas from seeing what others do and then make our own to fit our taste and preference.
I included three sizes of stocking templates. You may be able to re-size them to create the size you want. I thought the small ones would be nice to put silverware in for your Christmas dinner. There are lots of things people do for that purpose. They’d also make excellent hostess gifts filled with goodies.
Thanks for stopping by!
by Sharon | Dec 3, 2014
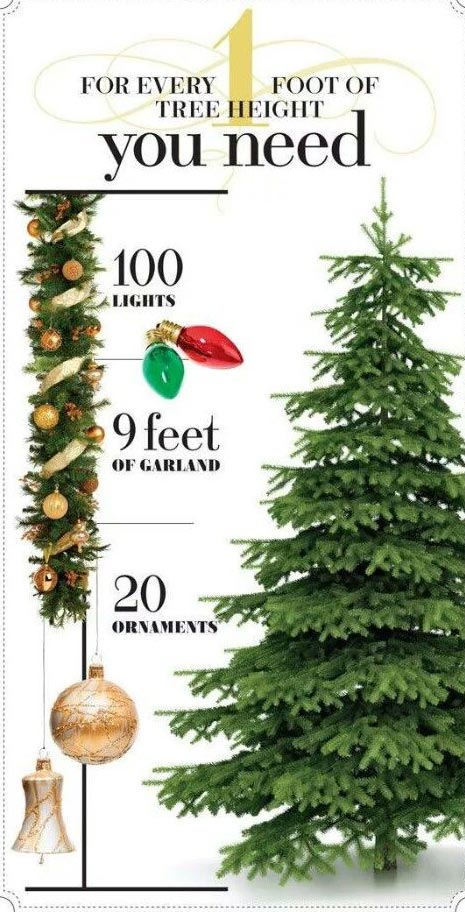
Your Christmas Tree is the focal point of your Christmas decorating. Here’s an image that gives you some basic pointers:
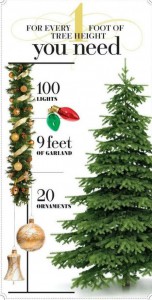
For every foot of tree height, you need 100 lights, 9 feet of garland and 20 ornaments. I have a friend with a 7 foot Christmas tree. So that means 700 lights, 63 feet of garland and 140 ornaments.
I suppose that does work out as a rule of thumb. But you can add more or less of each to your taste. Maybe garland isn’t your thing, so you add more ornaments.
It’s always fun to see how friends and family decorate their Christmas trees. Some people have more than one, depending upon the size of their house. When I had a two story house, I had a tree downstairs in the living room and one upstairs in the sitting room as my mother called it and I called it my loft. It was also interesting how I decorated them. The one in the living room was more traditional with some vintage ornaments from over the years. The one upstairs was a bit whimsical with all kinds of ornaments I picked up over the years with a particular flavor from pop culture. As I reflect on that and now have just one tree, a 4 to 5 foot tree, I go traditional and a bit whimsical and nostalgic. I go with what inspires me at the moment, not what would be a decorator’s suggestion.
I’m into pleasing me, not anyone else. From what I’ve seen, many have settled into that same mode while others are into impressing others. It’s all what one wants and feels they need to do. I enjoy hearing what every ornament means to a particular individual. It makes it much more personal and interesting than saying “My tree was designed by fancy pants decorator from fancy pants hoity toity location.” Basically, they had nothing to do with it and didn’t have time to bother with it. That’s not the message they were going for, but it was my take on it. Now, there were many who shared their vision and may have been saying to themselves, “I wish I could afford to do that.”
I was listening to a TED Talk the other day that focused on “why.” Well, that’s my take on it, it’s what I got out of it and started thinking about. Someone else may listen to it and get an entirely different message . . . but I digress . . .
“Why” gets into your feelings and core beliefs. In attaching it to tree decorating at Christmas I’m into the family traditions and the “me” element, reflecting my life. Anyone who knows me, can see in every ornament why I chose it . . . and they can relate to it, too. As I said earlier, I’m into pleasing myself. I’m living with this tree for several weeks and I want to walk past it or sit enjoying it with a smile on my face and with gladness in my heart. I can reflect on my life and those who had the most influence on me. I see it and feel it.
I also hope it reflects within TwoCansOnAString.com. I hadn’t really thought about it until now. I know when I first started the blog, it included a little bit of everything — which has now spun off into other niche websites. Although I like the other websites, this one is the one I love the most. It may have been my personal experiment into internet marketing . . . just trying it out . . . getting my feet wet. It’s not what my “marketing” friends would call a niche. I tried that after I moved the website to other hosting and lost my content, but it didn’t feel right . . . it didn’t ring true . . . it didn’t feel like “home.” My “marketing” acquaintances may not “get it”, but my friends and family do . . . and new visitors who come and feel it. . . return to this eclectic blend that could only be called “Two Cans On A String.”
by Sharon | Dec 2, 2014
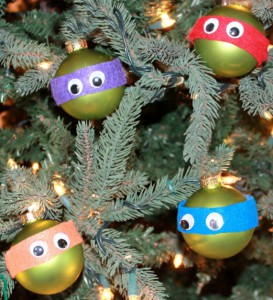
Aren’t these ornaments the best!!! And they’re so easy to make. I think it will take you longer to gather up your supplies than it will take you to make these adorable Teenage Mutant Ninja Turtle Ornaments.
The materials you’ll need are obvious, but humor me:
- Green Round Ornaments
- Felt Squares: red, blue, purple and orange Or you may be able to find Felt Strips
- Glue of your choice
- Wiggly Eyes
How to assembly them is also easy, but I’ll write them out:
- Cut a strip out of your felt square about an inch wide — depends on the size of your ornaments and the size of your wiggly eyes.
- Run glue all the way around the ball-shaped ornament.
- Wrap the felt strip around the ornament on top of the glue. You can overlap the felt strip by gluing the pieces together. Cut off excess if necessary.
- Put glue on the back of a wiggly eye and put it in place on the felt. Do the same with the other eye.
- Now repeat steps 1 through 4 for the rest of your Teenage Mutant Ninja Turtle Ornaments.
These would make great gifts for the Teenage Mutant Ninja Turtle fans.
It’s so much fun to make them yourself!
Thanks for stopping by!
by Sharon | Nov 29, 2014
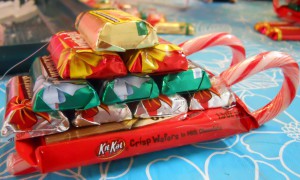
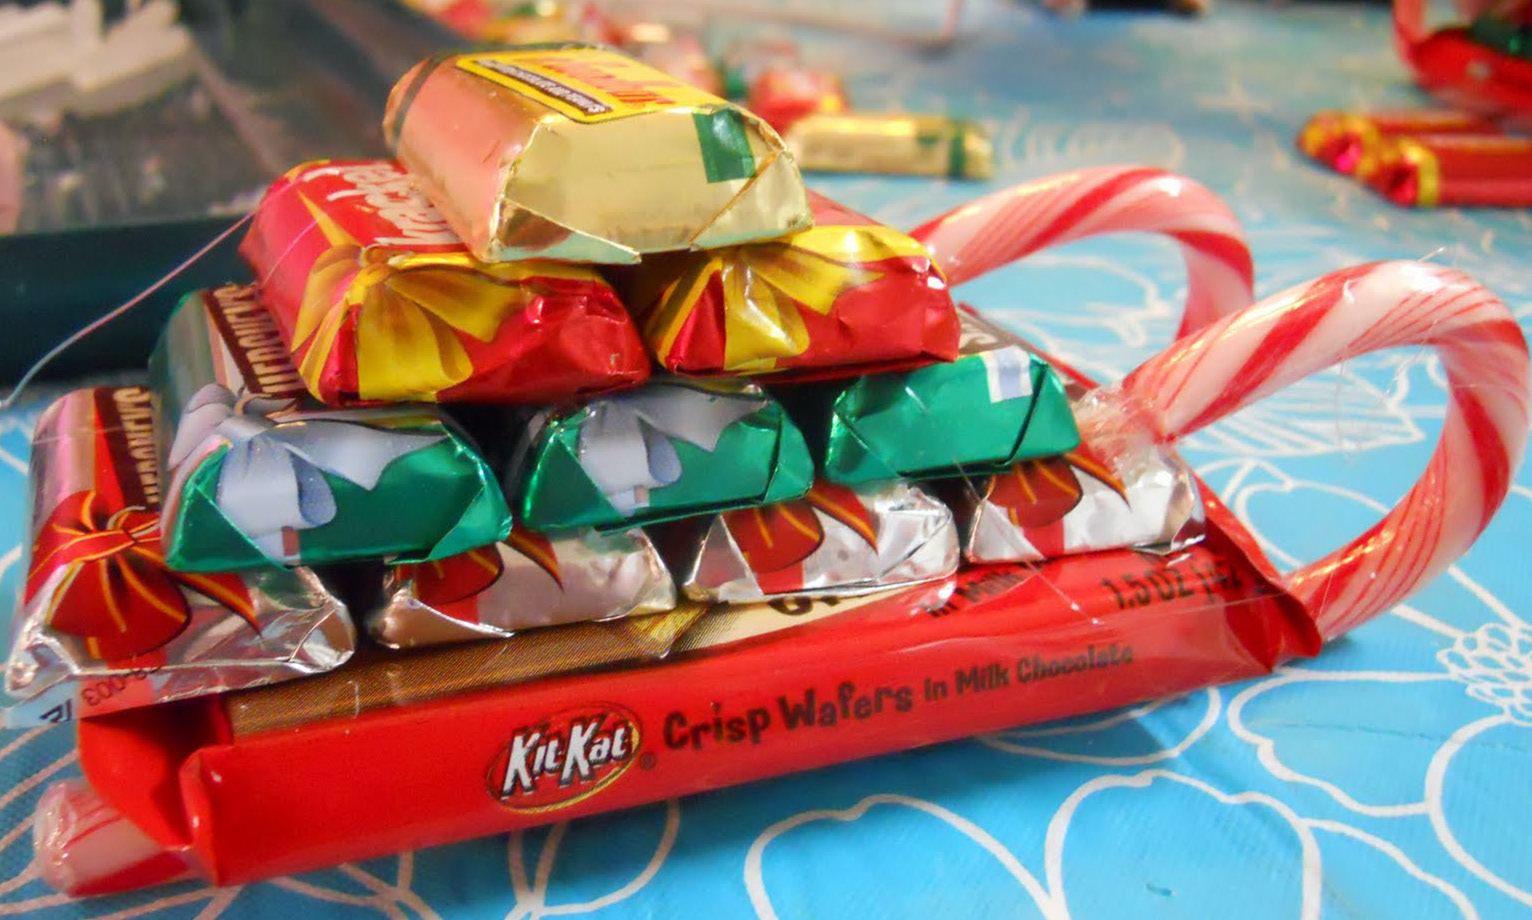
Image from http://cutediyprojects.com
When I saw these candy sleighs, I knew I had to make these. As you look at the image, you’ll get the idea of how to make them. You can use mini candies or you could use homemade candies or cookies. If you want to go that route, I’d get my candy canes set and have a square cookie or brownie as the base. I’d wrap the brownie and find something non-toxic to attach to the wrapped candy canes. Some people use hot glue which is fine for them. I’m not into burning myself so I go for Elmer’s School Glue, but you find what works for you. Then as you can see, you’re building a pyramid. They make great gifts when you add ribbon and a bow on top. These are good to have around for neighbors who stop by during the holidays.
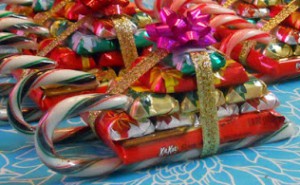
Instructions can be found at http://cutediyprojects.com
Now, get started . . . you know the children will want to give them to their friends . . . maybe even their teacher . . . you’re going to need them for your neighbors and friends . . . family will want them too . . . how large is your demand growing for this clever and tasty gift?
Thanks for stopping by! We’ll have more . . .
by Sharon | Nov 28, 2014
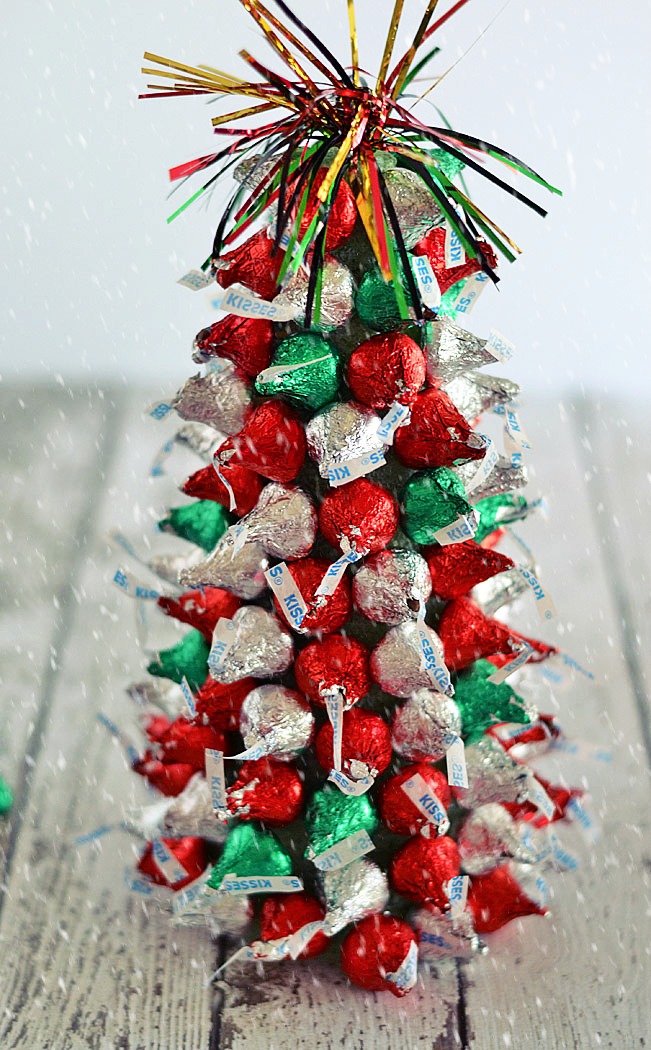
Here’s a wonderful Christmas Tree Centerpiece that’s good enough to eat!
I doubt it’s going to last through Christmas . . . maybe I should buy some more bags of Hershey Kisses . . .
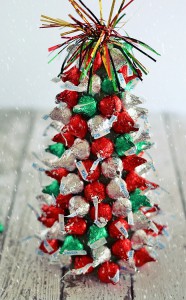
Image and Tree Idea from http://kitchenmeetsgirl.com
To make this “Kiss-Mas-Tree” you need to begin with a foam cone from your favorite craft store or dollar store. Select the size that suits the centerpiece you want to create. I ended up going for a large one and a couple of small ones. I know I’ll have nibblers — sneaky little angels they are.
You can go for the red and green ones and add the traditional silver ones for good measure or go totally silver or divide them up as I did. I made a silver and green small tree, a silver and red small tree and my large one I did with the silver, red and green.
These little kisses aren’t as soft as one would imagine. You’re going to need to have a clean turkey skewer to use to poke a little hole in the bottom of each Hershey Kiss. I used wooden round toothpicks, broke them in half . . . to secure the kiss on the toothpick and then stick it into the foam cone.
I started from the bottom and worked my way around, then up to the top. It’s a fun project for the kids to do, but keep an eye on the kisses . . .
For the top, you can get creative with the colorful garland or ribbon or stars . . . allow your imagination to go crazy! There are all kinds of great decorative touches available that you can buy and use to top these little trees off right.
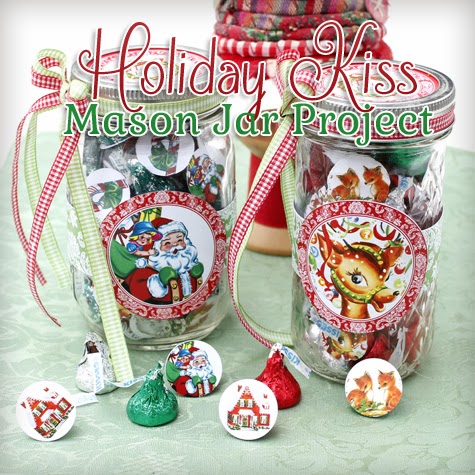
Putting these kisses in a small jar as hostess gifts is also a good idea.
I’ll need to look into finding some labels . . . but you can use any of your tree topper left-overs to decorate the lids of the jars. Something to think about.
How about this!!!!!
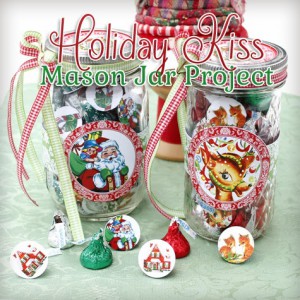
Printable Candy Jar Labels from http://thegraphicsfairy.com
Here are labels that will do these proud.
Click the link under the picture and you’ll have more labels than you may originally thought you’d need. I like being able to decorate the bottom of the kisses — they look nice through the jar. The jar labels for the front and also for the top and the lid can be embellished, too. Be sure to check these out . . .
Don’t forget to tell your friends about TwoCansOnAString.com