by Sharon | Aug 14, 2014
This is one scary pumpkin! If you dare, look closely and you’ll see pumpkin guts clinging to the skeleton rubs. You’ll need to save the insides of the pumpkin before carving the head. My concern is how is this going to smell. I’m also wondering what this would attract. I don’t know if I would want to set it out on my porch, maybe in the yard with gravestones and ghosts. I wonder if the squirrels would enjoy it, hummm.
I may opt for dry leaves. There is moss on his shoulders. This is truly a clever pumpkin-skeleton combination that I saw on Pinterest. I had to share it with you.
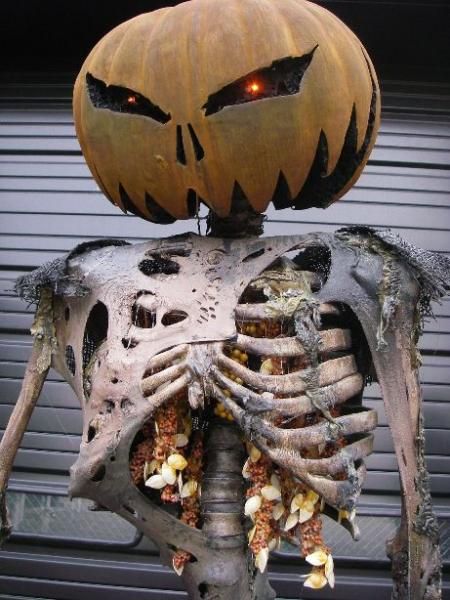
Image Compliments of http://www.halloweenforum.com
There are no DIY directions, but the picture explains it all. I also believe the lights in the eyes are battery operated tea or votive lights. You could wedge something inside the pumpkin head to set the lights on or wire them around the neck of the skeleton.
Let me see if there are any suitable links to help you out with this project.


I’m sure the photo above and the options here have gotten your imagination in gear. I do like the idea of a pumpkin head, but . . . the guts . . .
I’ll keep bringing you interesting things, we have awhile before Halloween.
Thanks for stopping by!
by Sharon | Aug 10, 2014
These Halloween Lanterns can hang indoors or outdoors and will be illuminated by a battery operated votive candle light. I buy these candle lights by the dozens to illuminate paper crafts or to put behind them to give them a creepy glow. These hanging lanterns are made from orange translucent vellum paper. They’ll give an eerie glow to wherever you hang them.
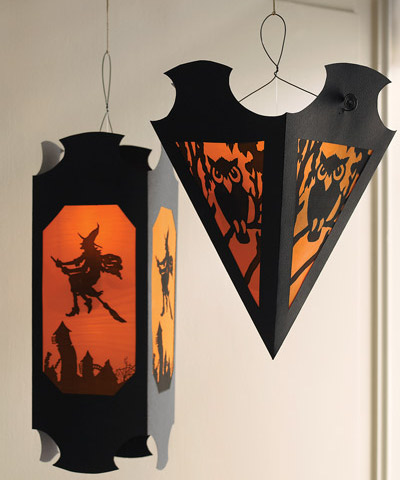
The image and free printables are compliments of http://www.marthastewart.com/913799/hanging-vellum-halloween-lanterns
Just click the link above for the directions and the free printables.
Here are links for some items you’ll need:
heavy black paper
Orange Vellum
Clear Monofilament
Battery-Operated Votive Candles
I hope you enjoy this project!
Thanks for stopping by!
by Sharon | Jul 14, 2014
Who doesn’t love a ghost, bat or vampire wrapped around a candy bar? The Free Templates allow you to make these Halloween favorites for your Halloween trick-or-treaters, school parties, family, neighbors and friends, at work or for complete strangers as the mood strikes you. Spread the gift of giving throughout this Halloween Season. These are easy enough for kids to cut out and write something inside. You can embellish these Halloween icons however you choose to make them extra special.
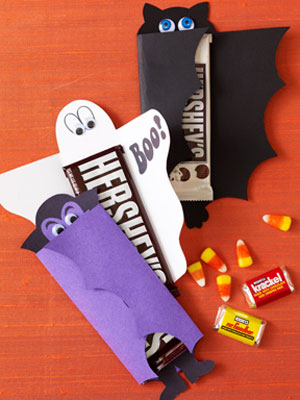
The image and Free Templates are compliments of http://www.womansday.com
Here are the Free Template Links:
Bat Chocolate Bar Cover Template
Dracula Chocolate Bar Cover Template
Ghost Chocolate Bar Cover Template
You can use these as a template and trace onto colored paper or you can print them out onto the paper. If using as a template I suggest using a heavy cardstock. You may also need some googlie eyes, colored marking pens, carbon paper and whatever other embellishments you want.
This is a fun project to do with the kids. It’s an assembly line process of tracing, cutting, decorating writing a message inside and wrapping around a candy bar. I closed mine with a small piece of tape, but you can wrap each one up with a ribbon or whatever clever idea you have.
by Sharon | Jul 9, 2014
This is an excellent DIY Halloween project that is fun to make and will be the envy of the neighborhood.
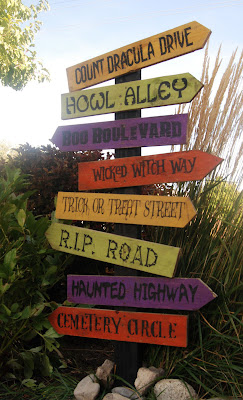
This project is courtesy of http://www.burtonavenue.blogspot.com
Here are some Halloween fonts you may like to use for unique lettering of your signs:
Sketch Bones Ghoulish Head Hunter Pumpkins Along Came a Spider Horrible Squish Pumpkin Face Jackie O’Lantern Frankentoho Halloween Spider Belfry You Murderer Wild Wood Bleeding Freaks Nightmare Blood of Dracula Skullphabet Haunting Attraction Bloody Slime Jack-O-Lantern
For this project you’ll need:
- pallet wood to make the signs
- various colors of paint for your signs
- a 2″x4″ sign post
Each sign is not of uniform length to make each sign unique. You’ll want to place them at angles to make the sign post attractive and eye catching. You’ll want to paint the 2″x4″ post and allow to dry before attaching the signs and placing it into the ground. It’s a nice touch to put rocks around the bottom.
Each piece of pallet wood is cut at different lengths with one end cut into a point to indicate if that particular street, circle, drive, boulevard, court, avenue, way, road, alley or highway is to the right or to the left. Just as a rule of thumb for this project, but the pallet in half, but don’t measure to make the lengths vary as will the lettering on the signs. For longer sign names, you may not need to cut the pallet other than to make the point.
You will want to sand any rough edges to keep from getting splinters and for easier painting. The edges are painted black on each sign — you may also want to paint the post black.
I would get my names of the various signs together and select my fonts, cut out the lettering and place it on the pallet before cutting.
The easiest way to do the signs is to paint the pallet piece, make a stencil out of vinyl for the lettering, secure it to the pallet and paint the inside of the stencil.
Making vinyl stencils may be difficult for many to do and very time consuming, especially if you are to make many different signs. That may be why you should start your projects early or get a little help with a die cutting machine. One very popular and versatile one is Silhouette Cameo. It may be a bit pricey, but if you’re going to do a lot of craft projects for holidays and special occasions, this die cutting machine is a “must have” item.
This is a fun and rewarding project. This one is specifically for Halloween, but you can adapt the concept for other holidays.


