by Sharon | Jul 15, 2014
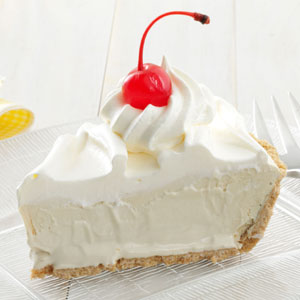 Image Courtesy of http://www.tasteofhome.com
It may seem unbelievable, but you can make this Root Beer Float Pie without baking, you just need your refrigerator.
The ingredients are simple enough as is the process. Are you ready to begin?
You’re going to need:
9 inch graham cracker crust which you can find in your grocery freezer section or you can make your own:
8 ounces of frozen whipped topping, thawed
1 package instant vanilla pudding mix
3/4 cup cold root beer
1/2 cup milk could be low-fat
Let’s get this mixed up:
1. In a large bowl you’re going to whisk the root beer, milk and pudding mix for 2 minutes.
2. You’ll need 1/2 a cup of whipped topping for garnish, so set that aside and refrigerate.
3. Fold in half of the remaining whipped topping into the root beer, milk and pudding mix mixture.
4. Spread into the graham cracker crust.
5. Spread the remaining 1/2 of the whipped topping over the pie.
6. Refrigerate for a minimum of 8 hours or overnight.
When serving you’ll need the 1/2 cup of whipped topping you set aside to put a spoonful or so on each piece and top with a maraschino cherry.
This recipe makes 8 servings more or less depending upon how large or small you cut the pieces.
No bake recipes are fun and refreshing. Absolutely great for National Root Beer Float Day August 6!
But this is a great recipe you may want to make at another time of the year.
by Sharon | Jul 15, 2014
There’s the right way and the wrong way to let the late Trick-or-Treaters know that you’re out of candy or just had enough of answering the door — you have a life and your favorite program just came on or you want to relax in your favorite chair and read a good book . . . or read the Legend of Sleepy Hollow or some Poe Poems. It’s your night, too. Pop a movie in your DVD and cozy up with some pop corn and the left over Halloween candy. HeeHee!

This Free Printable is compliments of http://hellocuteness.com/2013/10/free-printable-out-of-candy-halloween-door-sign/ You need to click this link to get to the Out of Candy Sign Printable download.
You can put it in a frame and set it on your porch bench or table, print it out on glossy photo paper or make a fancy wreath with this in the center.
I’ve printed mine on glossy photo paper and used the blue painter’s tape rolled behind it to attach it to my door so it wouldn’t leave a mark when I remove it. I have a round wreath I bought at K Mart a few years ago on my door and this fits perfectly inside.
Oh My Goodness! Just punch a hole in the top center, put an orange ribbon through it and hang it on your door knob like a Do Not Disturb Sign. You’ve had a busy day, you need to get off your feet and enjoy yourself.
It’s a fun and clever sign you may want to save and use year after year.
by Sharon | Jul 14, 2014
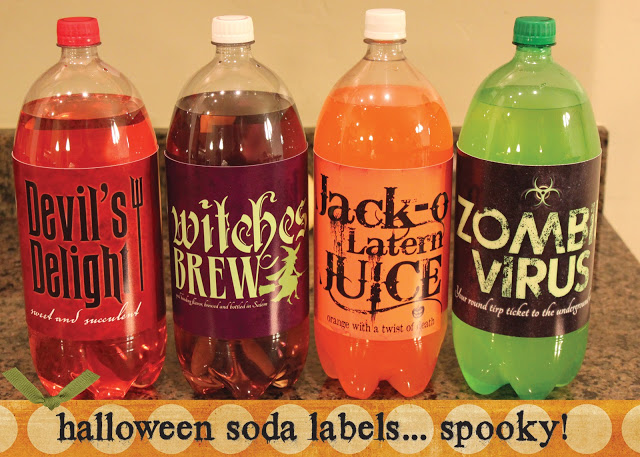
For this Awesome Free Printable, you’re going to need legal size paper to print it all out on one sheet. This is definitely worth buying the ream of legal size paper or, if you prefer, get it printed out at your local copy center. I prefer doing my projects at home and having everything handy no matter what time of day or night I decide to work. I may also need to buy several different sodas and replace those that are empty throughout the party. Or, you can decide on just the flavors you know your guests will enjoy. I think they are all clever and I want to give my guests choices of: Zombie Virus, Witches Brew, Devil’s Delight, Jack-o-Lantern Juice, or Spider Venom.
This Awesome Free Printable is compliments of http://www.c2marcano.blogspot.com
You can Download them Here
The Zombie Virus works well with a green bottle like 7-Up, Mountain Dew or Sprite. Jack-o-Lantern Juice has to be orange soda. With the Witches Brew you have a choice of going green or try grape soda or be bold with root beer. The Devil’s Delight would go well with something red and fruity. Then there’s the Spider Venom which would be excellent for the cola drink of your choice.
It’s your party, buy what you like and slap on the labels! Variety may be nice, but not necessary.
by Sharon | Jul 14, 2014
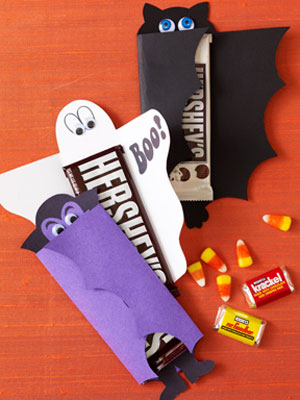
Who doesn’t love a ghost, bat or vampire wrapped around a candy bar? The Free Templates allow you to make these Halloween favorites for your Halloween trick-or-treaters, school parties, family, neighbors and friends, at work or for complete strangers as the mood strikes you. Spread the gift of giving throughout this Halloween Season. These are easy enough for kids to cut out and write something inside. You can embellish these Halloween icons however you choose to make them extra special.
The image and Free Templates are compliments of http://www.womansday.com
Here are the Free Template Links:
Bat Chocolate Bar Cover Template
Dracula Chocolate Bar Cover Template
Ghost Chocolate Bar Cover Template
You can use these as a template and trace onto colored paper or you can print them out onto the paper. If using as a template I suggest using a heavy cardstock. You may also need some googlie eyes, colored marking pens, carbon paper and whatever other embellishments you want.
This is a fun project to do with the kids. It’s an assembly line process of tracing, cutting, decorating writing a message inside and wrapping around a candy bar. I closed mine with a small piece of tape, but you can wrap each one up with a ribbon or whatever clever idea you have.
by Sharon | Jul 13, 2014
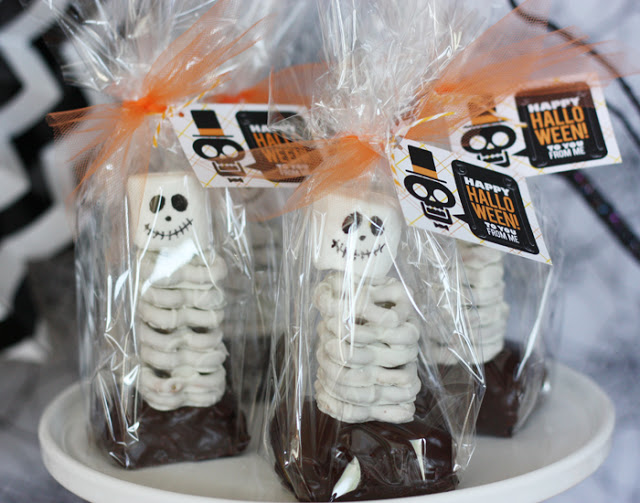
Look what we have here! This is a definite taste sensation! My only question is How do you eat it? From the marshmallow head, skeleton body to the brownie base, I’m thinking some dismantling may be in order to get a really good bite out of this. Or, you may want to eat it piece by piece from the bottom to the top. It would be interesting to present these at a party and watch how others go at it and devour it. I know some who will save the brownie for last and others will eat it first, then try to trade you their skeleton for your brownie.
This image is compliments of http://www.wantsandwishesdesign.com
As mentioned above, this happy skeleton is sitting on a brownie. He’s made from mini pretzels dipped in white chocolate with a marshmallow head decorated with black frosting gel.
I don’t think you really need a recipe, but I’ll do my best to satisfy your sweet tooth — and you know this is going to be sweet. It will also satisfy those who love, love, love chocolate.
Here’s a Brownie Recipe inspired from http://www.allrecipes.com that isn’t too thick nor too thin which I think would be perfect for this project. You can frost them or not.
Ingredients for making 16 Brownies
1/2 cup butter
1 cup white sugar
2 eggs
1 teaspoon vanilla extract
1/3 cup unsweetened cocoa powder
1/2 cup all-purpose flour
1/4 teaspoon salt
1/4 teaspoon baking powder
Frosting:
3 tablespoons softened butter
3 tablespoons unsweetened cocoa powder
1 tablespoon honey
1 teaspoon vanilla extract
1 cup confectioners’ sugar
Directions:
- Preheat oven to 350 degrees F (175 degrees C).
- Grease and flour an 8-inch square pan.
- In a large saucepan, melt 1/2 cup butter.
- Remove from heat, and stir in sugar, eggs, and 1 teaspoon vanilla.
- Beat in 1/3 cup cocoa, 1/2 cup flour, salt, and baking powder.
- Spread batter into prepared pan.
- Bake in preheated oven for 25 to 30 minutes. Do not overcook.
To Make Frosting:
- Combine 3 tablespoons softened butter, 3 tablespoons cocoa, honey, 1 teaspoon vanilla extract, and 1 cup confectioners’ sugar.
- Stir until smooth.
- Frost brownies while they are still warm.
Now we have the base for the skeleton.
For the skeleton you’ll need:
- A bag or two of White Chocolate Melts
- A bag of Mini Pretzels
- A bag of Marshmallows
- A tube of Black Frosting Gel
Directions are basically an assembly line process:
- Melt the white chocolate melts in the microwave (I don’t melt the whole bag at once. I prefer to use what I make and then melt a fresh batch.)
- Dip a mini pretzel into the melted white chocolate, place on wax paper
- Dip another mini pretzel and place it on top of the previously dipped pretzel
- Do this until you have a stack of 6 pretzels — you can have more or less, depending how you want your skeleton to look.
- You may want to add the marshmallow “head” — dip it in the white chocolate just to get the bottom to stick to the top pretzel
- You can either decorate the marshmallow faces before or after you set them on your stack of white chocolate pretzels
- Repeat this process until you have 16 skeletons to put on top of your brownie squares
- You can either stick the skeletons on your brownie squares with white chocolate or the brownie frosting.
There you have your Delicious Skeleton On A Brownie Halloween Treats.
You can put these in sandwich size zip lock bags or on a plate, however you prefer to serve them. If you bag them, you’ll need to print out something clever to staple to the bag, but I’m sure you’ll think of something or we’ll have something here you can use. To tell you the truth, I think homemade labels give more of a personal touch than something printed out, but I’ll see what I can find suitable for this project.
Here’s a Free Printable compliments of http://www.sherbetblossom.com
Or you may like a variety of labels for your various Halloween projects compliments of http://www.mygrafico.com/freebies/free-printable-halloween-party-kit/prod_5511.html


