by Sharon | Jun 8, 2015
It’s just about that time of year when we celebrate America’s Independence!
I saw this image on Pinterest and had to give it a quick look . . . basically what you see is what you have.
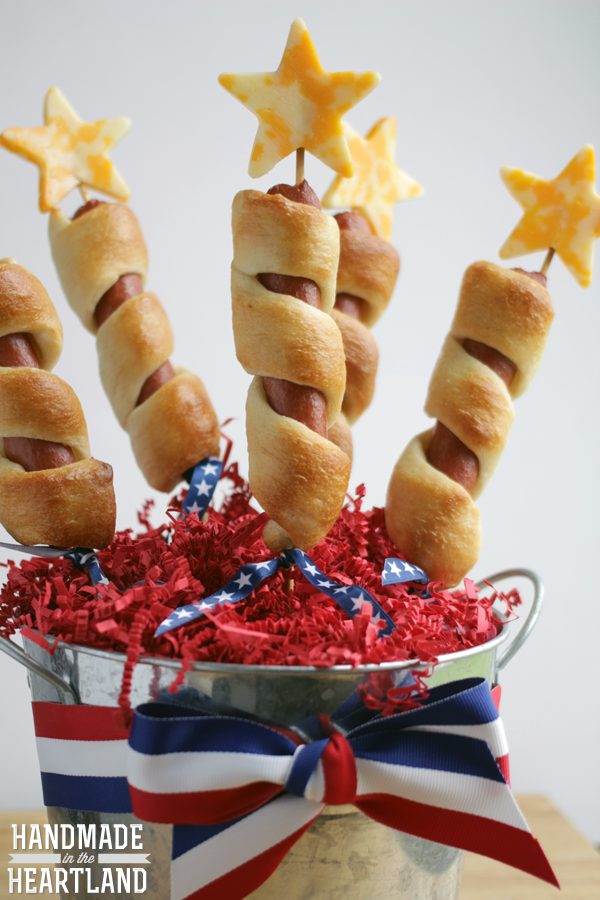
Recipes with pictures are much more exciting than words, but, of course, I’m going to tell you all about it. These images from Handmade in the Heartland show the finished product and the beginning process. It is an impressive way to make patriotic hot dogs for the 4th of July. Your guests are going to flip over these!
What You’ll Need To Buy:
- Thick slices of Colby Cheese Slices or any cheese of your choice from your favorite deli where you can get it sliced — you want your slices to be 1/4 inches to 3/8 inches thick.
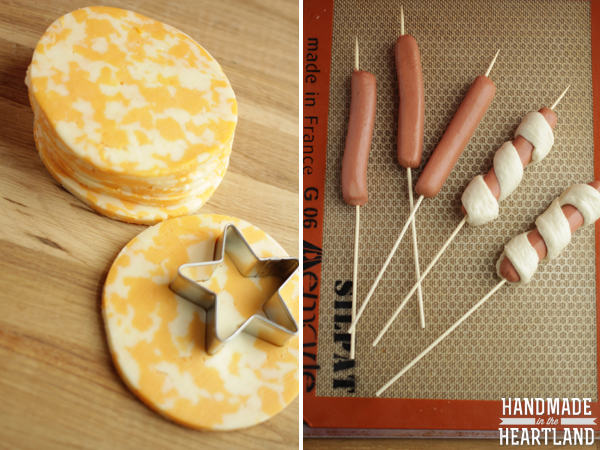
- Star Cookie Cutter — large for the star on top, but also a small one for little stars to use for extra cheese to decorate your plate.
- Wooden Skewers
- 1 can refrigerated bread stick dough
- 1 or 2 packages of hot dogs of your choice — depends upon your crowd
Bringing It All Together:
- Carefully push your wooden skewers through your hot dogs — you want it to go all the way through so you can have room to place your cheese star on top. These skewers are long, so you’ll have plenty of stick for handling and giving your hot dog a look of a fire cracker.
- Take a piece of bread stick dough and carefully wrap it around your hot dog starting at the bottom and winding your way up the hot dog — making a nice spiral.
- As you have probably guessed, these don’t go on the grill, but are put in the oven following the baking instructions on the bread stick dough can. Before baking, put them on a nonstick cookie sheet — you may want to also use parchment paper to line the pan, but you don’t have to.
- While your wrapped up hot dogs are baking, cut the stars out of the cheese.
- After your hot dogs have cooled, put your large cheese stars on the skewer at the top of your hot dog.
- They’re impressive to put in a nice bucket with red, white and blue confetti paper with a nice chunk of styrofoam hidden under the colorful paper. Presentation is very important — this will truly wow! your guests.
- I’m sure you’ll find a use for your left-over cheese . . . those cutter cutter scraps could be melted into a cheese sauce you can use for dipping your hot dog into . . . or to make some nachos . . .
I hope this recipe brings some joy to your 4th of July celebration.
by Sharon | Jun 6, 2015

This Hearty Egg Breakfast Recipe could also work for Brunch or even Dinner
Initially I thought this was going to be an easy recipe, just throw everything in one pan and you’re good to go . . . but there’s a lot of chopping and shredding and you’re going to dirty up two bowls for the 4 eggs you separate — one for the whites and the other for the yolks.
I’ll quit complaining and get on with the recipe.
But, before I do, I’d like to say that this recipe is only a suggestion. You can add to it or delete from it. This is merely a suggestion.
Here we go with the ingredients:
- I already mentioned separating 4 eggs — whites in one bowl and yolks in another
- 1/2 cup of cheese — it could be sharp cheddar or it could be a cheese of your choice
- 1/2 cup of chopped tomatoes
- 1/2 cup of meat — this could be interesting — bacon, ham, sausage, pepperoni, steak, roast beef — whatever you want to put into this delicious egg dish
- 1/4 cup chopped green onions or you could go with a regular white onion or a red onion or is it purple . . .
- Now, you can garnish with parsley or with chives or with mushrooms, green bell pepper slices — do what sounds good to you
- Toast
Now for the directions:
- I’m sure you’ve already separated your 4 eggs and sliced and diced the other ingredients — if not, get to work!
- You’re going to start out by cooking only the egg whites for 2 to 3 minutes on a low to medium heat
- Add the cheese, tomatoes, onions, meat and whatever you decided to chop up
- Continue cooking for another minute or two
- Add in the egg yolks and mix everything together evenly
- Continue cooking for 3 to 4 minutes
- Serve on toast, garnish with parsley or salsa or green bell peppers or avocado or whatever your heart desires — did I hear bacon bits?
I know I added more ingredients at the end, but you get the idea — this is your egg breakfast so make your family proud!
by Sharon | May 30, 2015
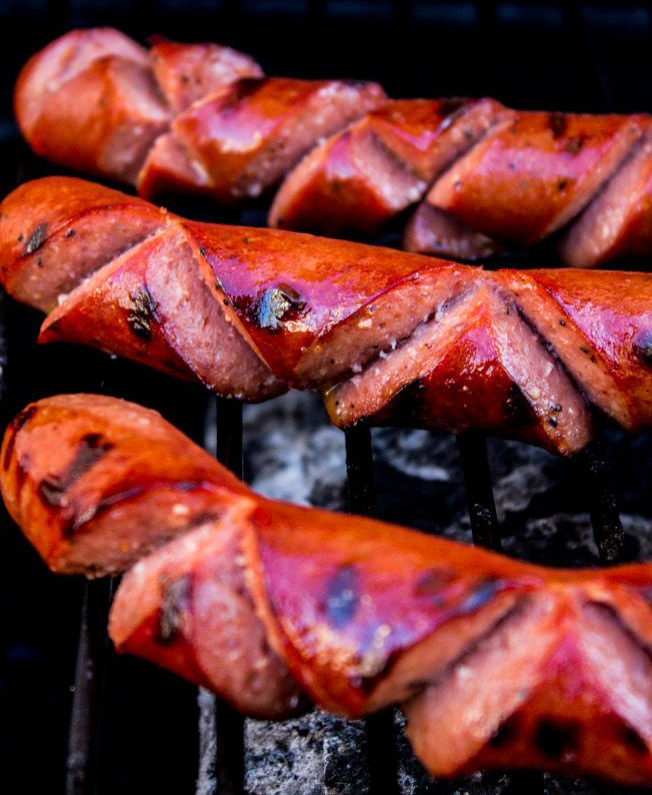
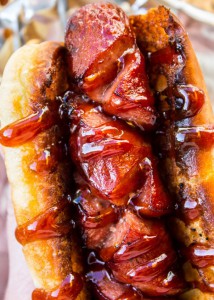
 It’s definitely that time of year when the bar-b-ques are working overtime in the neighborhood — especially in your own backyard. Hot Dogs seem to be on the grill as much as hamburgers, chicken and steak. But, as you can see from this picture it’s the cuts on the hot dogs of your choice that brings out the best tasting hot dog this side of heaven. And, you add some excellent sauce along with onion, cheese, or sauerkraut, banana peppers, even pickles or sweet pickle relish . . . getting hungry?
One neighbor swears by this sauce that has been handed down in his family. It’s important to allow people to talk . .. and talk they will. As it turned out, it’s not actually a secret family recipe, but a recipe his grandmother clipped out of the newspaper back in the 50’s. Now that I think about it, it may be a secret family recipe, because we don’t know the newspaper and don’t necessarily want to look through newspaper archives . . . and you never know what dear ol’ grandma added or deleted or substituted from the original recipe . . . or how it changed over time . . .
Hot Dog Heaven Sauce Recipe
This recipe makes approximately 1 and 1/2 cups of sauce
Sauce Ingredients:
- 3/4 cup of ketchup
- 3/4 cup of brown sugar
- 1 tablespoon BBQ sauce — that’s your choice since there are so very many on the market
- 1/4 cup of honey
- 1 teaspoon cider vinegar
- 1 and 1/2 teaspoons Worcestershire sauce
- 1/2 teaspoon onion powder
- dash of black pepper
Sauce Directions:
- Put all the ingredients in a small saucepan and set over high heat.
- Stir occasionally until the mixture just starts to bubble.
- Remove from heat.
- Allow to cool completely.
- It’s up to you if you want to serve your sauce at room temperature or chilled.
Let’s get down to the hot dogs!!
- You’re going to want to set your grill to medium heat — that’s if you have one of those fancy pants bbqs. For the rest of us . . .
- Use a sharp serrated knife to make diagonal cuts into the hot dog. You’re going to have to cut deep into the hot dog, more than halfway through. You’re going to make large “V’s” or “W’s” all the way down the hot dog. Check out the picture at the top of this blog post.
- Grilling is up to you. Some like to grill the hot dogs to black, some just with some black spots.
- You will notice that the hot dogs will be curling up into happy faces. That’s because of the cuts.
Indulge me for a moment to talk about the buns you choose. Now, for this to be a Heavenly Hot Dog, not just any ol’ bargain bun will do. You want something soft, that truly hugs the hot dog and gives you a soft blend of flavor . . . not just the bun . . . you want it to compliment the hot dog, sauce and other stuff you may add inside the bun.
You’re going to butter your hot dog buns and place them on the grill just long enough to get them a bit toasted on the edges.
Now, you’re ready to put the hot dog in the bun, top with the delicious sauce and any other toppings you desire.
If you don’t plan to serve them right away, wrap them in aluminum foil to keep them warm.
That’s it!! Enjoy!
Thanks for stopping by!!!
by Sharon | May 24, 2015
Every once in awhile a recipe comes along that knocks your socks off. With all the variations of S’Mores, they may have come a long way from the original, but it may be trying to improve on the original. In any case, I’ve come across a great easy recipe that you can mix up and make your own variations to . . . but the major thing is to put marshmallows on the top and toast them to the consistency we all find absolutely delicious.
Here’s what you do:
- Get a box of your favorite Brownie Mix
- Buy some Snicker Bars or a package of the minis Or a candy of your choice
- And don’t forget a bag of Marshmallows — I go for the regular sized ones, but you can use the minis
Now:
- Prepare your brownie mix, preheat your oven and all that good stuff
- Cut up your Snicker bars or minis into the brownie mix
- Prepare your muffin tins/cupcake tins
- Pour or spoon the batter into the tins — or you can put the batter into a zip-lock bag, zip it up, cut a hole in the bottom and fill your tins about 3/4 full
- Bake according to the directions on the box of brownie mix
- Allow to cool 10 minutes in the tins
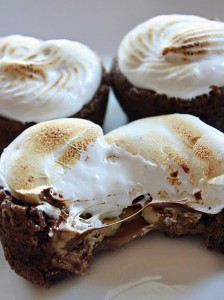
- Put the marshmallows on the top of each cupcake
- Place under the broiler for about a minute
- Rotate the tin and keep under the broiler until marshmallows are toasted — you may have to rotate the tin again
- Allow to cool before serving
Yummmy!! Your family will be asking for s’more.
by Sharon | May 11, 2015

This is truly a yummy idea for Memorial Day! It’s an excellent way to celebrate and honor all the brave soldiers who fought for our freedom. It’s also an excellent idea to use for Flag Day (June 14), the 4th of July, Veterans Day and all the wonderful American holidays that come around throughout the year.
I do have a recipe for you, but this is more of a technique. I enjoy anything that makes my baking projects easier. I think you’ll enjoy this.
First, the picture. You can learn so much more from a picture than the yackity-yacking of a description.
You see!! What did I tell you!! Now you can see why I’m so excited about this patriotic cupcake and why I call it more of a technique than a recipe. I know you’re way ahead of me in making other color combinations for other holidays and celebrations.
It’s now time for me to get this recipe going with ingredients and directions.
Ingredients:
- Boxed White Cake Mix or you could make it from scratch
- Red Food Coloring
- Blue Food Coloring
- 3 Quart Size Ziplock Brand Bags
- 3 Twist Ties
- Masking Tape
- Vanilla Frosting
- Red, White and Blue Sprinkles
Directions:
- I’d begin by reading the box instructions. Preheat the oven as directed. Get out the muffin tins and line them with the cupcake liners. Now mix up the cupcake batter. If you made your own cake mix, you know whether to preheat the oven and already have the muffin tins lined with cupcake liners. And you’re mixing up your batter.
- Divide the cupcake batter evenly into three bowls. In the first bowl add 10 drops of red food coloring and stir until the color is thoroughly combined. In the second bowl add 10 drops of blue food coloring and mix until the blue color is thoroughly mixed in the batter. In the third bowl, you’ll have your white batter.
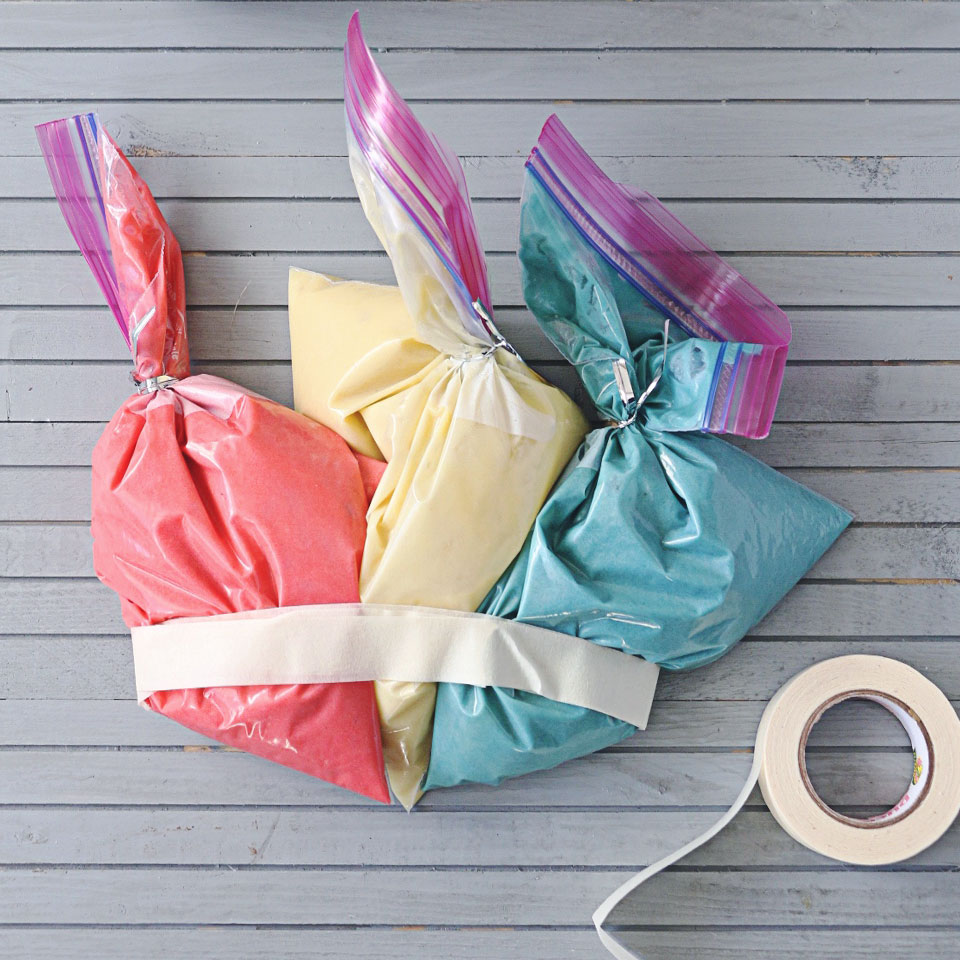
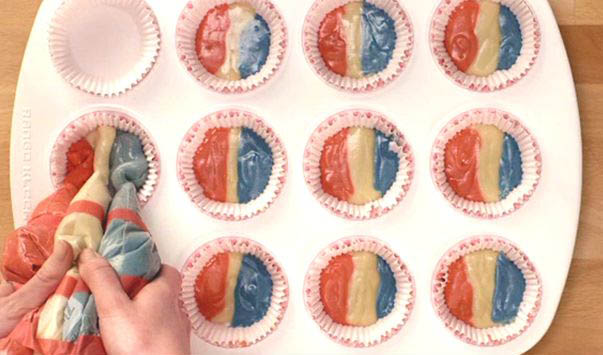
- Get out your three Ziplock Bags and place the batter in the first bowl in one Ziplock Bag. Then put the batter from the second bowl into a fresh Ziplock Bag. And the third Ziplock Bag is for the third bowl of batter. You now have three bags of batter.
- Tie off each bag with a twist tie. You want them to look like triangular piping bags. This may get a bit confusing so read carefully: Gather the bags together in a straight horizontal row and position them so the bottom tips touch. (You probably already did this, but I would arrange them in order: Red, White and Blue.) Secure all three bags together at the bottom by wrapping masking tape around the bags, creating one large piping bag.
- Here’s a picture in case you got a bit confused:

- You’re going to now want to carefully cut the bottom tips out of the Ziplock Bags. You will want them to be as equal as possible so when you squeeze, you’ll get even strips of red, white and blue. I guess I don’t have to tell you, but I’d hold the bags up so the batter isn’t in the tip I’m cutting off. Then I’d very carefully turn the bags over and squeeze gently in a cupcake liner. It may run out quite freely so be ready to lift up your batter bags. You don’t want to overfill the liners. It is amazing when the batter flows out evenly to make your red, white and blue batter stripes.
- After baking according to the box directions. Let them cool before adding the frosting and the sprinkles. Since you were so good with the piping bag technique for the batter, you may want another Ziplock Bag to use for the frosting.
This is a great recipe technique that may take some practice. I like using this technique when I’m making regular muffins and cupcakes. I don’t have the drips and mess.
Have fun!
Thanks for stopping by!
by Sharon | Apr 28, 2015
Easy Recipes for Breakfast are always the best and these Bacon and Egg Cheese Bites won’t disappoint.
This recipe makes 10 servings.
You’re going to need:
- refrigerated crescent dough
- 10 pieces of partially cooked bacon
- milk
- 6 eggs
- shredded cheese of your choice
Putting it together:
- Preheat oven to 350°F
- Spray muffin tin with non-stick cooking spray
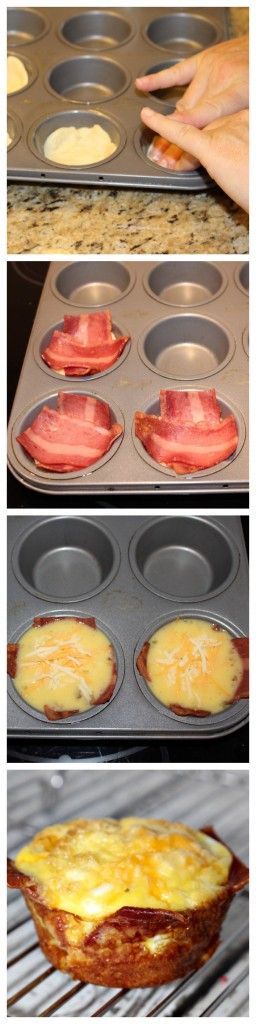
- You’ll need to unroll the crescent dough and make one big sheet by sealing the perforations. Then you’ll cut the dough into even squares.
- Place the dough into the muffin cups covering the bottom and a bit up the sides.
- In a bowl whisk your eggs with a bit of milk to make them nice and fluffy.
- Cut partially cooked bacon strips in half and place on top of the crescent dough in a criss-cross pattern as shown in the picture.
- Pour egg mixture in the muffin cup approximately 2/3 full.
- Bake for about 18 minutes or until the eggs set.
- Let cool for a few minutes.
- Loosen with a knife and pop them out of the pan.
- Serve with fruit or tomato slices and enjoy!
This is a great recipe for the family on the go!