by Sharon | Feb 18, 2016
Oh yes, we can’t seem to escape butter beer.
Yet another recipe with the butter beer theme.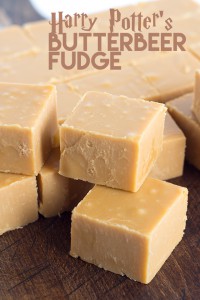
This time it is fudge . . . and no one can resist fudge!
Let’s get started!
Ingredients:
- 3/4 cup butter
- 1/2 cup half and half
- a 7.5 ounce jar of marshmallow cream
- 2 cups granulated sugar
- 1/2 cup packed brown sugar
- 1 – 1/2 teaspoon rum extract
- 1 -1/2 teaspoon imitation butter extract
- 11 ounces of butterscotch chips
Directions:
- Prepare an 8 x 8 inch pan by lining it with aluminium foil and spraying with non-stick cooking spray.
- In a saucepan, put in the butter, half and half marshmallow cream and sugars.
- Stir to combine over medium heat.
- Once the mixture comes to a boil, allow to boil for 5 minutes.
- Remove from heat and add in the extracts and butterscotch chips.
- Mix until the chips are completely melted.
- Pour into the prepared pan and give it a few taps to smooth the top.
- Place pan in the refrigerator and chill.
- When ready, cut and serve.
That seemed easy enough.
Until next time,
Sharon
by Sharon | Feb 17, 2016
A Delicious Recipe That Will Have Your Family Wanting More . . . Please.
Let’s get on with the recipe: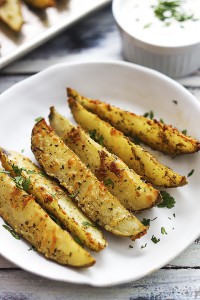
Ingredients:
- 3 to 4 large russet potatoes sliced into wedges
- 4 tablespoons olive oil
- 2 teaspoons salt
- 2 teaspoons garlic powder
- 2 teaspoons Italian seasoning
- 1/2 cup shredded parmesan cheese
- You may want to use fresh parsley or cilantro
- And as a dip, you may want to use Ranch Dressing or Blue Cheese Dressing
Directions:
- Preheat oven to 375° F.
- Lightly grease a large baking sheet and set aside.
- Place potato wedges in a large bowl.
- Drizzle with olive oil and toss to coat.
- In a small bowl whisk together salt, garlic powder and Italian seasoning.
- Sprinkle potato wedges with the shredded cheese. Toss to coat, then sprinkle with the seasoning mixture.
- Place potato wedges on prepared baking sheet in a single layer with skin sides down.
- Bake for 23 to 35 minutes until potatoes are fork tender and golden.
- Sprinkle with freshly chopped parsley.
- Dip into Ranch or Blue Cheese Dressing.
This is a delightful snack to have on a day when you want something, but not sure what. You can’t go wrong with potatoes . . . I do hope you’ll try this recipe.
Until next time,
Sharon
by Sharon | Feb 16, 2016
Oh yes! A Harry Potter Fan Delight!!
Have you tried the Harry Potter Butter Beer?
If so, and even if you haven’t, you’ll love these cupcakes!!
Let’s Get Started With This Recipe!!!
It may seem a bit complicated . . . but it’s fit for the Great Harry Potter!!!
Cupcake Ingredients:
- 2 cups all-purpose flour
- 1 cup light brown sugar
- 1 teaspoon baking soda
- 1 teaspoon baking powder
- 1/2 teaspoon salt
- 3 large eggs
- 1/2 cup vegetable oil
- 1 teaspoon imitation butter extract
- 1 teaspoon vanilla extract
- 1/2 cup buttermilk
- 1/2 cup cream soda
- 1 cup Heath Toffee Bits — not the ones with chocolate
Sauce Ingredients:
- 3/4 cup butterscotch chips
- 1/2 cup heavy cream
Frosting Ingredients:
- 2 cups heavy cream
- 1/3 cup butterscotch dry instant pudding mix
- 1/2 cup confectioner’s sugar
- 3 teaspoons imitation butter extract
Toppings:
Cupcake Instructions:
- Preheat oven to 350° F.
- Line cupcake pan with liners.
- Combine flour, sugar, baking soda, baking powder and salt in a medium sized bowl and stir with a whisk until well mixed and smooth.
- Get out the stand mixer fitted with a whisk attachment and a large bowl, beat together the eggs, oil, extracts and buttermilk.
- Beat in the dry ingredients and the cream soda, alternating between the two until the batter is smooth.
- Mix in the toffee bits.
- Add 1/4 cup batter to each cupcake liner and bake for 18 to 22 minutes.
- Remove from oven and transfer to a cooling rack.
- Bake remaining cupcakes.
- Meanwhile . . . make the sauce by placing the butterscotch chips in a small metal bowl and heating the heavy cream in a small sauce pan over medium heat.
- Bring the cream to a simmer, then pour it over the butterscotch chips. Let set for 3 to 4 minutes.
- Then, whisk the cream and chips together until a rich sauce forms.
- Put it in the refrigerator to cool and thicken for about 30 minutes.
- Time to prepare the frosting by combining all the ingredients in a large stand mixer bowl fitted with a whisk attachment and beat on medium high speed for about 3 to 4 minutes until light and fluffy frosting forms.
- Place the frosting to a pastry bag
- Remove sauce from the fridge and dip the tops of the cupcakes into it. Allow to set for about 15 minutes.
- Pipe the frosting onto the cupcakes and finish with sprinkles.
There you have your Butter Beer Cupcakes.
Thanks for stopping by!
Sharon
by Sharon | Jan 27, 2016
Baked Caramel Corn From Scratch
Yes, you make your own caramel and pop your own corn.
No, not the microwave stuff. You’ll need a popper . . . it’s about flavor, which must be savored . . . and anticipated.
This is an old family recipe . . . it does pay off to save old recipes tucked away . . . I can’t for the life of me know why my grandmother put this recipe . . . never mind . . . let’s just say she hid her recipes in clever places.
All right! Enough chatter . . . Let’s get to the recipe!
You can add your favorite nuts to this recipe. I prefer it without, but that’s just me.
You’re going to need:
- 1 cup of butter
- 2 cups of brown sugar
- 1/2 cup of light corn syrup
- 1 teaspoon of salt
- 1/2 teaspoon of baking soda
- 24 cups of popped popcorn
Now, let’s get down to business:
- Preheat your oven at 250° F
- You’re going to pop the popcorn in a popcorn popper for best results — don’t sneak in the already popped stuff or the microwave variety . . . good old fashioned popcorn.
- Get out your saucepan . . . we’re going to make the caramel.
- Your saucepan and stove top are going to get real chummy while you carefully melt the butter — be careful, you don’t want it to burn.
- Add the brown sugar, corn syrup and salt.
- You’re going to be doing a lot of stirring while you bring the pot of buttery sweet brown sugar mixture to a boil.
- Stop stirring, allowing the pot to boil for about 5 minutes.
- Remove your homemade caramel from the heat and stir in the baking soda.
- Get out the turkey roaster . . . no, I’m not kidding. You’re going to need it for all your popped corn.
- Once the popped corn (without the unpopped kernals) are in the turkey roaster, slowly and gently pour over your popped popcorn.
- Bake at 250° F for about an hour.
- No, don’t sit down and wait for the timer. Every 15 minutes or so, you’re going to have to stir the popcorn to make sure every piece is covered with the golden delicious caramel . . . and not burning this delicious treat on the bottom of the roaster.
- As the caramel popcorn is baking you’re going to need to taste it from time to time, closer to the end of the hour. Be careful!!! It’s been in the oven at 250° F. Be sure to blow on it — Don’t just pop it in your mouth!!!! Now, if it sticks to your teeth or is sticky and gooey, it’s not done. You want it crunchy not sticky.
- Remove your caramel popcorn from the roaster and break the clusters of popcorn apart. Be careful, it’s HOT!!!
- Allow to cool in the roaster, stirring it with a wooden spoon every 5 to 10 minutes to help it cool.
- I know you’re going to take a nibble or two. The popcorn gets cruncher as it cools.
- Grandma always put it in a crystal bowl . . . yes, put it in your fanciest bowl!!! This is an heirloom recipe!!!! Treat it with respect!!
All right, enough!!!
Speaking of enough . . . I hope you made plenty!! Your family is going to go wild over this!!!!
But, take your time . . . it’s not a gobbled down treat (even though it was cooked in a turkey roaster)!! Savor the flavor!
Until next time,
Sharon
by Sharon | Dec 22, 2015
These Meringues Are A Treat To The Eye With An Irresistible Taste
It’s definitely time to be thinking about the variety of cookies you want to make for family, friends and neighbors.
Christmas is just a few days away . . . oh my! Time to get to work!!!
It is raining today . . . a good day to stay indoors and bake cookies. So, let’s get started with these beautiful Star Mint Meringues.
Star Mint Meringue Cookies Recipe
Ingredients for 24 cookies:
- 3 egg whites
- 1/4 teaspoon cream of tartar
- 1/4 teaspoon peppermint extract
- 1/8 teaspoon salt
- 3/4 cup of sugar
- Red paste food coloring
Directions:
- Preheat oven to 200° F.
- Line a cookie sheet with parchment paper and set aside.
- In a large mixing bowl beat egg whites, cream of tartar, peppermint extract and salt with an electric mixer on medium speed until stiff peaks form and the tips curl.
- Gradually add sugar — just a tablespoon at a time. Beat on high speed until you have stiff peaks and the tips stand straight.
- With a new small paintbrush, brush stripes of red food coloring on the inside of a decorating bag fitted with a 1/2 inch open star tip.
- Carefully spoon the egg white mixture into the decorating bag.
- Pipe 2 inch stars 1 inch apart onto the prepared cookie sheet.
- Bake 1 and 1/3 hours or until the meringue appears dry and the cookies are firm when lightly touched.
- Transfer the cookies to a wire rack to cool thoroughly.
Now that wasn’t so bad. I hope you like this recipe and give it a try.
by Sharon | Dec 10, 2015
Do You Believe It?
Yes, the webinar I attended was 5 hours long with a 10 minute break.
There was time for questions and answers and clarification. That ate up some of the time, yet it was full of useful information. And my conclusion . . .
I’m going back to how it was before with a focus on holidays and crafts and whatever interests and amuses me.
I was leaning in that direction, but this webinar basically told me it was for the best . . . and my stats weren’t all that wonderful. That may have had some bearing on my decision.
I’m a blogger and TwoCansOnAString.com is actually my favorite blog. But lately I wasn’t feeling that great about it.
This webinar also showed me how I do need to eliminate a few more blogs. It’s difficult to have so many of them and add to them regularly. So I’ve been messing up by splintering my focus.
It was interesting to learn that some people started a website not out of their passion, but because they thought they should do it in a particular way. That’s basically what happened to me with the changes I made.
Well, I found it wasn’t working for me . . . and obviously for you . . . so I’m back to doing my own thing and seeing if I can get you back or get a whole bunch of new people. I’m not claiming it will be “better.” It will be what I do and what I’ve done over the past year or so.
I want to just have fun again. That will make it enjoyable for all concerned.
Too Much Information
When I learn something new . . . it usually contradicts something I’ve learned . . . and I need to look at why it’s this way. Was there a change or is this a different type of blog?
Well, it is a different type of blog.
Quite honestly, it is the type of blog everyone on-line should strive to have, but that’s my opinion which may not be worth all that much.
All I know is that what I was doing wasn’t working and I’m going to go back to my own concept of what blogging is to me here at TwoCansOnAString.com
Since This Is A New Post For Getting Back To Normal
I was thinking about a fun project the whole family would enjoy.
A picture basically says it all. So you decide what you’ll need to make them. This is going to be your family project.
You decide upon the size of candy cane, the size of marshmallows — I was thinking of using one of those jumbo marshmallows for the body and a regular sized one for the head.
In the picture the hat is a Hershey’s Kiss, but I was thinking of a Rolo or a mini Peanut Butter Cup. There’s the Twizler type of scarf you could make from a fruit roll up. Then add branch arms using a creative mix of Twizlers.
There’s M & M’s for the buttons, but you can use what you want. Also black frosting gel for the eyes and orange frosting gel for the nose. And some white frosting to stick the hat, eyes, nose and buttons on the marshmallows.
I think I pretty much have it covered, but you may have other ideas of your own.
It’s interesting to see what your kids create. They’re always better than what we think.
They can be eaten “as is” or dunked in hot chocolate. That should be a deliciously gooey mess that will delight the eye and the taste buds.
Enjoy this fun recipe for these delightful Snowmen On A Candy Cane.
Sharon

