by Sharon | Aug 7, 2015
Summer comes in all flavors, but the combination of raspberries and coconut is absolutely outstanding!
Here’s a recipe for a Raspberry Coconut Bread that you will definitely love. It would be a great breakfast treat, a sweet afternoon snack and a surprise for dinner dessert. Bring the taste of summer into your home.
Raspberry Coconut Bread Recipe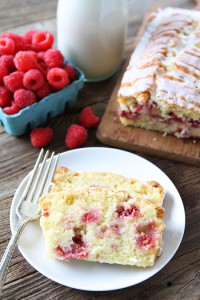
Ingredients For The Bread:
- 1-1/2 cups of all-purpose flour
- 1/2 teaspoon salt
- 1 teaspoon baking powder
- 1 cup granulated sugar
- 3/4 cup milk of your choice — you may want to go for a flavored milk
- 1/2 cup melted coconut oil
- 2 large eggs
- 1 teaspoon vanilla extract
- 1 teaspoon coconut extract
- 1/2 cup sweetened coconut flakes
- 1 cup fresh washed and cleaned raspberries
Ingredients For The Coconut Glaze:
- 1 cup powdered sugar
- 1-1/2 tablespoons milk
- 1/2 teaspoon coconut extract
Directions For The Bread:
- Preheat the oven to 350°F.
- Spray an 8-1/2 by 4-1/2 inch loaf pan with cooking spray.
- In a large bowl, whisk together the flour, salt, baking powder and sugar.
- In a medium sized bowl combine the milk, coconut oil, eggs, vanilla extract and coconut extract..
- Slowly add the wet ingredients to the dry ingredients, stirring until combined.
- Gently stir in the coconut and raspberries.
- Pour the batter into the loaf pan.
- Bake for an hour or so or until a toothpick comes out clean.
- Allow the loaf to cool in the pan for about 15 minutes or so before removing from the pan.
- Allow the loaf to cool completely on a wire rack.
Directions For The Coconut Glaze:
- In a small bowl combine powdered sugar, milk and coconut extract. Whisk until smooth.
- Drizzle the glaze over the bread.
- Cut the bread into slices and serve.
I love to change recipes . . . you can have flavored milk of the almond or coconut variety for this recipe. You can add some other berries or substitute them in this recipe. I do like the idea of a loaf rather than a round cake, but if that fits with the look you’re going for, use whatever baking pan you prefer.
I’m sure this recipe will be good all year round with frozen fruit.
Thanks for stopping by!
by Sharon | Aug 3, 2015
I love quick and easy recipes, especially if I want a delicious snack. 
Too often we want to prepare something for the family, but it is so much like preparing a whole meal. I love having something quick, easy and delicious to take to get-togethers or to have for guests to munch on while talking or playing a board game. . . or telling ghost stories.
This Potato Skins Recipe fits the bill.
Delicious Potato Skins Recipe
Ingredients:
- Wash 4 large baking potatoes
- 3 Tablespoons of melted butter
- 2 teaspoons of kosher salt
- 1-1/2 cups of shredded cheese
- 7 slices of cooked and crumbled bacon
- You may want some sliced green onions or maybe a garnish of black olives — anything that would make these potato skins look and taste delicious — use your imagination and have some fun.
- After they’ve cooked and before serving a bit of sour cream might be nice.
Directions:
- Preheat oven to 400°F.
- Cover a baking sheet with foil and spray with cooking spray.
- Wash the potatoes, cut the ends off, discard. Cut the rest of the potatoes into 1/2 inch slices.
- Brush both sides and edges of the potatoes with the melted butter and sprinkle with salt.
- Place on the foil covered pan and bake for 15 to 20 minutes or until lightly browned. Turn the potatoes over and brown the other side for 15 to 20 minutes or until lightly browned.
- When potatoes are done, top with cheese, bacon bits, green onions, black olives or whatever you decide and continue baking for 3 to 5 minutes or until the cheese is a bit bubbly.
- Take them out of the oven, transfer to a serving dish and have some sour cream handy to top them off.
I think this is the best recipe for potato skins. They even look nice . . . and you can add so much to this recipe.
Thanks for stopping by!
by Sharon | Aug 2, 2015

Cinnamon and Sugar Pita Chips . . . are you kidding me?!!! What’s wrong with Cinnamon Toast?
I grew up on Cinnamon Toast. It’s a simple recipe:
- Toast your bread
- While hot spread on butter
- Sprinkle a bit of sugar over the melted butter
- Gently shake on some ground cinnamon over the sugar that’s melting into the butter
- Eat immediately!
There you have it — the old fashioned cinnamon toast without the frills! You can cut the crust off and cut into triangles, but we liked our cinnamon toast intact so we could savor every single bite. It was great for a snack and also while eating hot oatmeal. My dad would do this occasionally and, of course, my brother and I had to do the same. Absolutely delicious!
All right, now with the Cinnamon and Sugar Pita Chips Recipe
This recipe makes approximately 32 Pita Chips
Ingredients:
- 4 pita rounds
- 4 tablespoons of melted butter or coconut oil
- 4 teaspoons granulated sugar
- 1 teaspoon ground cinnamon
Directions:
- Preheat oven to 400°F
- Line a baking sheet with aluminum foil and lightly spray with cooking spray.
- Cut each pita into eight equal wedges
- In a small bowl, stir together the granulated sugar and ground cinnamon
- Brush both sides of each pita wedge with melted butter or the coconut oil.
- Sprinkle cinnamon/sugar mixture evenly over both sides of the wedges and place on baking sheet in a single layer.
- Bake for 13 to 15 minutes or until the wedges have become a bit crispy.
- Cool and enjoy.
Hope you enjoy both of these recipes.
by Sharon | Jul 31, 2015
Here’s a brilliant idea for your summer get-togethers
A major candy run to your nearest market will bring you such a variety of chocolates for your S’Mores Platter. There is no limit to what you can put together to create these delicious treats the whole family will love.
The greatest thing is homemade marshmallows! I like that you can slice them up so they’ll fit right into your graham crackers.
Here’s a recipe for Vanilla Marshmallows
This recipe makes 36 small squares
Ingredients:
- 2 tablespoons powdered unflavored gelatine
- 1/2 cup cold water
- 2-1/4 cups sugar
- 1/2 cup corn syrup or glucose
- 3/4 cup water
- 1-1/2 teaspoons vanilla extract
- 1 cup powdered sugar for dusting
Directions:
- Put the first 1/2 cup of cold water in the bowl of a standing mixer. Sprinkle the gelatin on top and let it hydrate.
- Line a baking pan with 2 inch sides with parchment paper and spray the entire surface with vegetable spray.
- In a medium saucepan, put sugar, glucose or corn syrup and the remaining water. Cook over medium heat until dissolved. Be sure to brush the sides of the pan, above the mixture, with a wet brush so crystals won’t form.
- Increase the heat to high, put the candy thermometer on the pan, boil until the temperature reaches 248°F.
- Using the wire whisk on your mixer, whisk the gelatin in the bowl. Slowly pour the sugar mixture into the gelatin while beating at high speed. Be careful not to pour it directly over the whisk, but between the side of the bowl and the whisk. That gets the majority of the syrup into the gelatin and not stuck in the beaters or sides of the bowl.
- Keep beating until the consistency is fluffy, like a thick meringue. All vanilla and mix.
- You’re ready to transfer the fluffy marshmallow mixture to the prepared pan. Smooth the top with an oiled or sprayed spatula.
- Allow to dry at room temperature for an hour and sprinkle with powdered sugar.
- Let dry for a few hours until it’s no longer sticky and can be taken out of the pan.
- Lift the parchment paper to unmold your marshmallows
- Use an oiled or sprayed kitchen knife to cut your marshmallows.
- Dust each square thoroughly with powdered sugar.
- Store in an airtight container for up to 2 weeks.
Give it a try.
They’ll truly be a great hit!
by Sharon | Jul 29, 2015
Shredded Chicken Wrap Recipe
You can never go wrong with chicken. The whole family seems to love it . . . and they’ll love this recipe as is or after you change some ingredients to your liking. Oh, the great news is that you cook it in your slow cooker!!
Ingredients:
- 2 pounds of chicken breast
- 1/2 cup Zesty Italian Dressing
- 3/4 tablespoon minced garlic
- 1/2 tablespoon chili powder
- 1/2 tablespoon ground cumin
- 1 ounce package of Dry Ranch Dressing mix
- 1/2 cup water
For Toppings You May Like:
- chopped tomatoes
- chopped olives
- fresh lettuce
- fresh spinach
- a creamy dressing of your choice
Directions:
- Spray the inside of the slow cooker with cooking spray.
- Add all ingredients except the chicken into the slow cooker.
- Mix up the ingredients until it is combined.
- Add the chicken and cook on low for 4 to 6 hours or on high for 3 to 4 hours. You want to cook it long enough so the chicken is thoroughly cooked.
- Remove the chicken from the slow cooker once it’s done and shred it.
- Return the shredded chicken to the slow cooker and mix with the juices.
- Enjoy!
It’s great wrapped in a tortilla or soft taco shell or lettuce or spinach leaf.
Thanks for stopping by!
by Sharon | Jul 24, 2015
I’ve been building another website.
I guess I do get a bit bored and look into things to do. I really don’t need another website — this is #5. It’s about the internet marketing community I belong to. I thought since I was part of it, I should promote it. They have a Boot Camp program of instructional videos. I’ve really been into those and following through with the tasks they place in front of me. I thought I could always learn something new. It does take time away from my other 4 websites. I’m doing a bit of a catch-up now. I need to keep my priorities straight and not allow the new website to take over.
If you’re interested in building your own website and earning some passive income, you may want to sign-up as a FREE Starter Member. You can look around and see if this would be right for you. My new website is: http://indefinitevacation.com It’s new, I’ve just started with it, but you may find it interesting. I have some pages and posts with information you may find interesting.
I found this place that has discount prices on books — I have a Kindle, but I have friends with Nooks.
There are plenty of free titles you may want to check out. It’s FREE and you fill out your interests and everyday they have a selection from which you can choose — and many of the titles/books are FREE you can put in your Kindle or Nook. I don’t know how many free books I added to my Kindle for my summer reading. Here’s the link: http://bookbub.com
I tried out a new recipe!!
Here’s a Summer Veggie Salad You Grill on the BBQ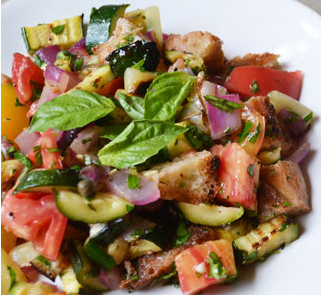
Recipe makes 6 – 8 Servings
Ingredients:
- 3 large assorted bell peppers, cut in 1-1/2 inch strips
- 1-1/2 pounds of your favorite squash, cut in 1/3 inch strips
- 1 medium red onion, cut in 1/4 inch thick rounds
- 1 loaf French Bread, cut crosswise into 1 inch thick cubes
- extra-virgin olive oil
- 1 clove of garlic, peeled
Now for the Dressing:
- 1/4 cup fresh lemon juice
- 2 tablespoons red wine vinegar
- 1 tablespoon grated lemon peel
- 1/3 cup extra-virgin olive oil
- 1 pound heirloom tomatoes
- 1/4 cup fresh parsley, chopped
- 1/4 cup basil or herb of your choice
Let’s Get This Salad Put Together:
- For the salad: Prepare the bbq medium heat.
- Brush both sides of bell peppers, squash, onion and bread slices lightly with olive oil, sprinkle with salt and pepper to taste.
- Grill vegetables until tender and brown — approximately 4 minutes per side for peppers and squash and 3 minutes per side of onions.
- Grill the bread until browned and crisp, turning occasionally. Cool, then rub with cut sides of garlic. Tear the bread into 3/4 inch pieces and place in a large bowl. Chop the garlic you were using and toss that in the bowl.
- Cut the grilled vegetables into 1 inch pieces and add to the bowl with the bread and garlic.
- For the dressing: Whisk first 3 ingredients in a small bowl to mix.
- Gradually whisk in 1/3 cup oil. Season to taste with salt and pepper.
- Add the dressing, tomatoes with juices and all remaining ingredients into the salad and toss.
- Let it stand for 20 minutes allowing the bread and veggies to soak up the dressing.
It was easy and you’ll love it!


