by Sharon | Sep 18, 2015
These are absolutely delicious and not that difficult to make.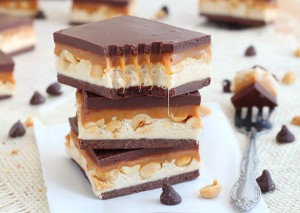
This is one candy bar that seemed to be the right combination of everything I craved in a candy bar. Now I can make them myself!
Let’s get started!
Ingredients:
- 1 cup of semisweet chocolate chips for the bottom layer of the Snickers Bar
- 3 tablespoons creamy peanut butter to be mixed with the chocolate chips for the bottom layer of the Snickers Bar
- 7 ounces marshmallow cream
- 1/4 cup creamy peanut butter
- 1-1/2 cups confectioners powdered sugar
- 1 cup unsalted peanuts
- 11 ounces of caramels
- 1/4 cup of heavy cream
- 1 cup of semisweet chocolate chips for the top layer of the Snickers Bar
- 3 tablespoons of creamy peanut butter to be mixed with the chocolate chips for the top layer of the Snickers Bar
Directions:
- Line an 11 x 7-inch baking pan with parchment paper.
- Place the chocolate chips with 3 tablespoons of creamy peanut butter in a microwavable bowl. Set in the microwave for about a minute. Stir until the peanut butter and chocolate chips are combined and smooth. If necessary, microwave for a few more seconds.
- Pour the melted chocolate/peanut butter mixture in the prepared pan. Spread evenly and put in the freezer for 2 to 3 minutes to harden.
- In a clean bowl, you’re going to put in the marshmallow cream, 1/4 cup of creamy peanut butter and the powdered sugar.
- Using a wooden spoon or spatula stir until it forms a soft doughy consistency.
- Remove the “dough” and press it with your fingers on top of the chocolate layer in the pan that should have hardened in the freezer.
- Sprinkle the peanuts on top and gently press them in the doughy layer.
- In a small saucepan add the caramels and heavy cream. Cook over a medium heat, stirring constantly until the caramels have melted. Then pour it into the pan over the peanuts layer in the pan. Spread it evenly with the back of a spoon.
- Refrigerate for 5 minutes or until set.
- In a microwavable bowl, you’re going to melt a cup of chocolate chips and the 3 tablespoons of peanut butter as you did for the bottom layer. (See Step 2)
- Pour the melted chocolate and peanut butter over the caramel layer and spread evenly.
- Place the pan in the refrigerator for 10 minutes to allow the chocolate to set.
When you’re ready to serve, cut into bars with a sharp knife. This will be a delicious treat and surprise for your family and friends.
Thanks for stopping by. I hope you enjoyed this recipe. Please leave me a comment.
Sharon
by Sharon | Aug 31, 2015
 I absolutely wasn’t going to jump into Halloween!
Then . . .!
I thought of The Wicked Witch of The West from the Wizard of Oz and then I saw the picture below and 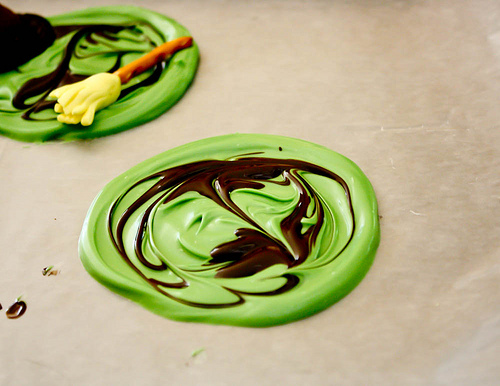 these Melted Wicked Witches of the West were born! It is such a fun concept. The kids will eat them up!! This will truly be the highlight of any Halloween Party for kids as well as for adults. Remember the line: “I’m melting, I’m melting!” Oh yes, indeed!!!
You can make the Wicked Witch goo by melting green candy melts and dark chocolate candy melts separately in the microwave.
You won’t need much of the dark chocolate candy melts. A bag of the green candy melts made about 2 dozen of these melted wicked witches and as you can see from the picture, you just need to drizzle the dark chocolate in to make it look interesting — maybe give it a gentle swirl.
Do you see the witches hat and broom? You’re going to want to make those first before melting the candy melts. I guess I better stop dreaming about these gooy witches and get down to business.
Ingredients for the Melted Wicked Witches of the West Food Craft Recipe:
- A bag of green candy melts for 2 dozen of these beauties
- A bag of dark chocolate candy melts to drizzle into the green globs and to attach the kisses to the Oreo to make the witch’s hat
- A bag of pretzel sticks for the broom handles
- Yellow Laffy Taffy
- Oreo Cookies
- Hershey Kisses
To make the wicked witch’s hat you’ll need half an Oreo cookie and stick a Hershey’s Kiss on the non-filling side of the cookie. These you can make after you melt the candy melts and made your green gooy globs on a large cookie sheet covered with wax paper. I’d go with a little bit larger size than a regular cookie — maybe a cookie and a half size — especially if you want to put these in ziplock bags for Halloween Party Favors.
To make the witch’s broom you’ll flatten the yellow taffy and cut it in half horizonally, then cut the the broom fringe with sharp scissors and attach the non-fringed side of the broom bristles to a pretzel stick.
All right, you got your brooms made, right? You’ve melted your green and dark chocolate melts in separate bowls, right? You put wax paper on a large cookie sheet, right?
Let the assembly begin!
Spoon a nice generous amount of green candy melts onto the cookie sheet, trying to keep it in a neat circle. Drizzle the dark chocolate into the green goo and give it a swirl with a toothpick or butter knife. Separate an Oreo Cookie and put the frosting side into the green goo to the left edge. Add an unwrapped candy kiss dipped into the melted dark chocolate candy melt and attach to the center of the Oreo Cookie. Now put your pretzel broom into the green goo to the right. There you have it!
Continue the process until all of your Melted Wicked Witches of the West are complete and set in the refrigerator to cool.
I’m sure you’ll get the feel of making these in no time. You could be making quite a few of these once you get started. Have fun!!!
Sharon
In case you’re having difficulty finding the ingredients, here are some links:


Thanks for stopping by!
by Sharon | Aug 30, 2015
August is almost over. September is within sight. My thoughts turn to apples and all the great fall recipes.
Bet you thought the subtitle was going to rhyme. Sorry, not a poet. It’s just a statement. Trying not to jump into Halloween. I’ve been doing quite a bit of that lately.
Wouldn’t these cookies go great with vanilla ice cream?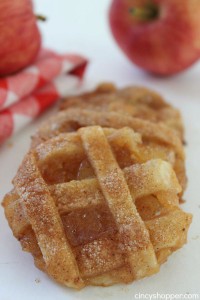
I know I’m a bit boring when it comes to pies and ice cream. I go for the very traditional. My mother was always baking pies. She got it from her mother. So, it’s a tradition. And that tradition isn’t following a recipe. You just “know.” I cheat . . . I taste. I’m not claiming to be the pie maker like my mother nor my grandmother. I at least don’t get “that look” when my mother would ask, “What kind of pie would you like?” I don’t know why she’d give me “that look,” she knew before she asked what I’d say . . . apple. And my brother had his favorite: Lemon Meringue. So, my mother was left to decide for herself. Of course, she baked all kinds of fruit pies . . . but your favorite was always your favorite.
Caramel Apple Cookies Recipe
Ingredients:
- 1 package Refrigerated Pie Crust which is 2 crusts
- 5 ounce Caramel Topping
- 10 ounce Apple Pie Filling
- 1 Egg
- 1 teaspoon Cinnamon
- 1/4 teaspoon Nutmeg
- 1/4 cup Sugar
Directions:
- Preheat oven to 350°F
- Spray cookie sheet with non-stick spray and set aside.
- Dust work area with flour and roll out crusts. One is for the cookie and the other is for the lattice on the top of the cookie.
- Using one crust, cut out circles for the cookies.
- Spread a thin layer of caramel on these cookie disks.
- Cut the pie filling into smaller pieces and spread over the top of the caramel.
- Cut the other crust into 1/2 inch strips. You’re going to use these strips to create a lattice over the apple filling.
- Once you’ve created the lattice over your cookies, transfer them to the prepared cookie sheet.
- Beat the egg in a bowl until well blended.
- In another bowl mix together the sugar, cinnamon and nutmeg.
- Brush lattice tops with egg wash and sprinkle with sugar mixture.
- Bake for 20 to 25 minutes until golden brown.
There you are . . . they’re as delicious as they are lovely to the eye.
Please leave me a comment about these great cookies.
Thanks for stopping by!
Sharon
by Sharon | Aug 7, 2015
Summer comes in all flavors, but the combination of raspberries and coconut is absolutely outstanding!
Here’s a recipe for a Raspberry Coconut Bread that you will definitely love. It would be a great breakfast treat, a sweet afternoon snack and a surprise for dinner dessert. Bring the taste of summer into your home.
Raspberry Coconut Bread Recipe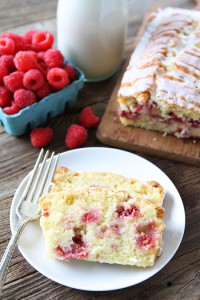
Ingredients For The Bread:
- 1-1/2 cups of all-purpose flour
- 1/2 teaspoon salt
- 1 teaspoon baking powder
- 1 cup granulated sugar
- 3/4 cup milk of your choice — you may want to go for a flavored milk
- 1/2 cup melted coconut oil
- 2 large eggs
- 1 teaspoon vanilla extract
- 1 teaspoon coconut extract
- 1/2 cup sweetened coconut flakes
- 1 cup fresh washed and cleaned raspberries
Ingredients For The Coconut Glaze:
- 1 cup powdered sugar
- 1-1/2 tablespoons milk
- 1/2 teaspoon coconut extract
Directions For The Bread:
- Preheat the oven to 350°F.
- Spray an 8-1/2 by 4-1/2 inch loaf pan with cooking spray.
- In a large bowl, whisk together the flour, salt, baking powder and sugar.
- In a medium sized bowl combine the milk, coconut oil, eggs, vanilla extract and coconut extract..
- Slowly add the wet ingredients to the dry ingredients, stirring until combined.
- Gently stir in the coconut and raspberries.
- Pour the batter into the loaf pan.
- Bake for an hour or so or until a toothpick comes out clean.
- Allow the loaf to cool in the pan for about 15 minutes or so before removing from the pan.
- Allow the loaf to cool completely on a wire rack.
Directions For The Coconut Glaze:
- In a small bowl combine powdered sugar, milk and coconut extract. Whisk until smooth.
- Drizzle the glaze over the bread.
- Cut the bread into slices and serve.
I love to change recipes . . . you can have flavored milk of the almond or coconut variety for this recipe. You can add some other berries or substitute them in this recipe. I do like the idea of a loaf rather than a round cake, but if that fits with the look you’re going for, use whatever baking pan you prefer.
I’m sure this recipe will be good all year round with frozen fruit.
Thanks for stopping by!
by Sharon | Jul 14, 2015
I went out the other day for a hamburger at my favorite fast food place. I was disappointed and thus unsatisfied. Not only was the meal more expensive than the last time I went plus the gas to get there . . . I would have been much better off making something at home. But for some reason I craved fast food and bought into the convenience angle. I’m thinking more about the quality, now, or lack thereof.
I was on “live chat” with my internet marketing group and one disappointed member was ranting about a different fast food place that didn’t get the order right, plus what she received wasn’t all that great. Sometimes it isn’t worthwhile to drive back and get what you want and return what you don’t.
I’m not going to rant about fast food. I’m just saying the quality may not be what you remember from a previous visit. And I’m talking about just two particular places that I’m not going to name. You and your friends and family may have had similar experiences or your favorite fast food establishment is all right. It may all be a matter of perspective. Or the fast food place was having an off day. I remember going to one awhile back that everyone was saying had excellent food. I didn’t agree. I felt it was a wasted trip . . . but I did learn not to go back. It’s not about what others like, it’s about what you like. And right now, I’m liking what I make at home much better.
This should probably be a great opening for a recipe. I’m thinking about it. Something cool and delicious for summer.
Lettuce Wrap Chicken Club Sandwich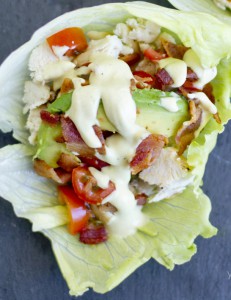
The really cool thing about this sandwich is that you can wrap it up in a lettuce of your choice and put in the ingredients you want . . . wrap it up and eat it or use a fork and eat it as a salad. You can use a salad dressing of your choice as well. It’s something different and quite refreshing.
Ingredients:
- Cook and dice a chicken breast
- 1 diced tomato or you can use cherry tomatoes
- 1/2 of a diced up avocado
- 2 cooked slices of bacon, diced
- 2 iceberg or romaine lettuce leaves
- salad dressing of your choice
- ground pepper to taste
Add any other ingredients you want or remove ingredients and replace with other ones.
Directions:
- Cook your chicken and bacon before beginning.
- Dice up all the ingredients.
- Set out your lettuce leaves and fill them up.
- Top with your favorite salad dressing.
- Fold your lettuce around your ingredients and you’re going to have a refreshing taste sensation in your mouth.
- I did forget to tell you to have it on a plate and have a few napkins handy.
- Enjoy!!
You could use a cheese of your choice or maybe some vegetables. I like having some grated carrots on top, but you can decide what would be best for the look and taste of your “sandwich.”
Thanks for stopping by!


