by Sharon | Oct 27, 2014

I absolutely love, love, love apple pie!
I got hooked on using a small scoop to empty out an apple, then seeing what I could put inside.
I liked the idea of having single serving items. Similar to stuffed peppers. It seemed as though those were made just for me. I know it seems silly, but there is something about it that seemed special. Now, with these Apple Apple Pies I am in heaven.
I do love baked apples, but baked apples with a top crust . . . heaven! And what is inside is the stuff of a great apple pie. This is a great treat you can serve any time, but wouldn’t it be something special for Thanksgiving! You can add a scoop of vanilla ice cream on top to make this absolutely delicious.
I don’t know about you, but baking an apple pie and cutting into it, then saving the left-overs in the pie tin or on a plate all wrapped up looks kind of sad. These Apple Apple Pies are single serving or you can half them with a friend and the remaining ones are still intact and inviting.
Well, let’s see how to make this delicious apple pie. You’ll need:
- 4 to 6 Granny Smith Apples that can stand upright on their own. You’re making individual pies here and want them to stand up straight and tall to impress your guests.
- 1 teaspoon cinnamon
- 1/4 cup granulated sugar
- 1 tablespoon brown sugar
- You can make your own pie crust or buy it already made
Now, let’s put these pie together:
- Preheat oven to 375 degrees F
- Wash your apples. Pat dry with a cloth or paper towel.
- Cut the tops off the apples and discard.
- Carefully get out the seeds and husks or whatever the unappealing stuff that makes up the core of the apple. You want to be careful so you don’t damage the outside of the apple.
- You can use a spoon, melon baller or small scoop to dig out the inside of the apple. You’re going to want to chop this up and use it for your pie filling. Now, there is a fine art to this. You need to go slowly and carefully. Or if this is too much for you, dig it out however you choose and then cut up another apple or two to add to the filling. Or buy the canned apple pie filling in the store. There are always alternatives. That can be our secret.
- In a bowl, you’re going to put your apple pieces and mix up the sugars and cinnamon. You can make adjustments to the ingredients to taste.
- Fill up your hollowed out apples with the apple pie filling.
- Roll out your dough. Cut in 1/4 wide strips and make a lattice work pattern over the top of each apple.
- Put the apples in a 8″ x 8″ pan. You want to add water to over the bottom of the pan.
- Cover with foil and back for about 20 to 25 minutes.
- Remove the foil and bake for an additional 20 minutes or until the apple filling is soft and the crust is a nice golden brown.
- Let cool before serving. I do like to add a scoop of vanilla ice cream, but some people may want a hunk of cheddar cheese to go with their apple apple pie. However you decide to serve it, it will be delicious.
There you go! Something different and very eye appealing.
by Sharon | Oct 24, 2014
Fall is baked apple time of year!

And for a little twist, how about a Baked Caramel Apple!
Ingredients
- 2 crisp apples
- 2 tbsp butter
- 3 tbsp packed brown sugar
- 1 tbsp flour
- 1 tsp cinnamon
- 4 caramels
- vanilla ice cream is optional drizzled with caramel sauce and sprinkled with cinnamon — I wonder about nutmeg instead of cinnamon
Directions
- Preheat the oven to 375 degrees.
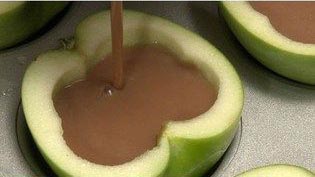
- Slice off the top 1/4 to 1/3 of the apples. Scoop out the core.
- Use a thin knife to make two, deep circular cuts around the center of the apple.
- Turn the apple over and make narrow cuts all the way around the apple.
- Place the apples in an oven safe dish and put two caramels into the center of each apple.
- Heat butter and brown sugar in the microwave for 30 second, stir and continue heating for an additional 30 seconds. Remove from the microwave and stir in flour and cinnamon. Divide the mixture over the top of the two sliced apples.
- Bake at 375 for 25-30 minutes. (Check apples after 25 minutes and continue cooking until tender. Some apples can take 45 min to 1 hour to soften.)
- Remove from the oven and use a large spoon to move the apples into bowls.
- Spread it out or it may fall out to make a really delightful display.
- Top with a scoop of ice cream, drizzle with caramel and sprinkle with cinnamon or nutmeg. I prefer nutmeg to cinnamon, but it’s your baked apple treat. The ice cream will cause the caramel in the center to harden so eat quickly or put the ice cream scoop on the side.
This is a tasty treat the whole family will love. It’s like having apple pie without the crust. Or a caramel apple that’s easy to eat.
by Sharon | Oct 23, 2014
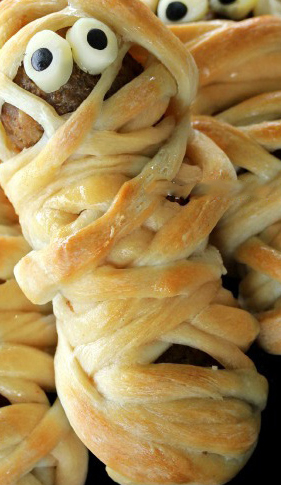
I love making mummies and filling them with all kinds of good stuff. Meatballs seems to be a major winner right now for my family.

It’s finger food at it’s absolute best.
Here’s what you’ll need to do:
You can either make your own meatballs or find some already prepared. Your meatballs need to be cooked. You then wrap them up with pizza dough or your could use another bread-type dough from the wide selection of Pillsbury brand.
I roll my meatballs in some spaghetti sauce to stick them together on a flat piece of bread dough. I then cut some strips out of the remaining bread dough (about 1/4 inch wide) and wrap up this little mummy. I leave some room for edible eyes.
I guess I forgot to tell you to preheat your oven to 350 degrees and to put your wrapped up mummies on a cookie sheet. You can either spray it with nonstick cooking spray or cover it with aluminium foil or get fancy with parchment. Whatever works for you.
Then I pop them in the oven for about 20 plus minutes until brown.
Serve them warm out of the oven. Add a salad or just have them as a snack. You may have more warmed spaghetti sauce available for dipping. Be sure to make plenty. They’re a real crowd pleaser.
by Sharon | Oct 20, 2014
I decided to give myself a bit of a break. I’ve been trying out recipes and also doing some of the paper crafts I’ve put on the website.
I know how important it is to relax and enjoy the crafts you do regularly. I know my family enjoys crafts. It’s a quiet time. It’s also a time to unwind a bit and enjoy creating something out of paper or wood. Do some painting and just enjoying life at a quieter pace. It is just too easy to get into overload or focus on all of the wrong things. Or even try to do too much and accomplishing nothing.
I was talking with some friends who got into the creepy houses. They’ve made a whole village. I’ve been working since Friday on the Haunted House. I know I could put it together faster, but I’m enjoying doing it at a leisurely pace. Then I’ll add the grave yard. I know Halloween is getting closer, but I enjoy haunted houses and just spooky stuff all year round, so I’m in no hurry.
I mentioned recipes earlier. Yes, I’ve been going through some things and I’ve gotten a bit creeped out by some, so I think I’ll go for the fun. Gross just isn’t for me at this time. I do have some gross recipes on this website, but I prefer to think of things that would be a little different, yet would fit the season.
Banana Mummy Rolls Recipe

I like this recipe because it is a make ahead recipe for a great breakfast on the go and also wonderful for an after school or after work snack. Maybe even a mid afternoon pick-me-up.
Ingredients
1 package Pillsbury Crescent sheets
1 small container Nutella or Peanut Butter of your choice Smooth or Chunky
2-3 bananas
heaping 1/2 cup powdered sugar for the glaze
milk or water for glaze
Candy eyes or you can use some M & Ms or Skittles
Instructions
- Roll out crescent sheet to about 10-11 x 6-8 inches.
- Slice into 6 equal squares. Lightly score each square in 3 equal sections, vertically (without cutting through the dough).
- Using a knife, cut horizontal strips about 1/4 inch wide down each side section.
- Spoon a couple of tablespoons of peanut butter or nutella down the middles section, leaving about 1/2 inch on both the top and bottom and place a slice of banana on top.
- Fold the right two cut sections over the head and then then alternate right and then left, leaving a small space for the eye section.
- They’re now ready to pop into the oven.
- Bake at 375 until golden brown, probably about 12-15 minutes.
- Remove from pan and let cool to room temperature.
- Mix powdered sugar with enough milk or water to form a glaze and then lightly drizzle it over the mummies.
- Let dry to the touch before serving.
- Makes 6.
This is a real crowd pleaser for the whole family — especially the kids. They get a mummy and the sweet banana favor along with a peanut butter/nutella flavor. It is a variation of the popular banana and peanut butter sandwich or putting peanut butter/nutella into a sliced banana.
As I said earlier it is great for breakfast and also as a healthy snack. Yes, you may want to serve these at your Halloween party. I think mummies could be fun all year round, so I’d keep this recipe handy for those times you just want something different.
I hope you enjoy this recipe and the crafts I spoke of earlier. You’ll find a wonderful selection in the archives of this website.
Thanks for stopping by.
by Sharon | Sep 1, 2014
This time of year is a bit strange for most of us. It’s the early closing out of summer and the hopeful welcoming of fall. This Labor Day is the point many claim is the end of summer and the beginning of fall, but the calendar and depending where you live, the weather may have something to tell you about what season we’re in.
I believe it may have much to do with what season you have in your heart. It seems every season has something valuable to offer. I absolutely love fall, but I appreciate the bbqs of summer and spring. I’m always eager to spend some time outdoors with family and friends — during that in between time of the hot summer day and before the mosquitoes come out in the evening.
Our nights have been cool to cold and this Caramel Apple Cider Recipe seems to hit the spot. Some of my friends have been suffering from summer colds and this seemed to be the right pick-me-up for my guests. It is non-alcoholic, but I’m sure, for those of you who would like to add something, that is always an option.

Image Compliments of http://www.frombraziltoyou.org
This recipe makes four servings
Ingredients:
6 cups bottled apple juice
2 teaspoons apple pie spice (You can make your own by mixing together: 4 teaspoons of ground cinnamon, 2 teaspoons of ground nutmeg and 1 teaspoon of ground allspice. Store in a small sealed jar.)
4 cinnamon sticks
About 4 to 8 tablespoons of sugar to taste
Whipped cream — I like the kind I can spritz from the can
Caramel sauce for drizzling — I use the caramel sauce you can buy for drizzling over ice cream. It comes in a plastic squeeze bottle.
Directions:
In a medium to large saucepan, combine apple juice, apple pie spice and cinnamon sticks. Cook over medium heat for about 20 minutes. Remove cinnamon sticks and stir in sugar. Pour apple cider in 2 cups, top with whipped cream, drizzle with caramel sauce. Serve immediately.
Your guests will be delighted with this dessert drink.
by Sharon | Aug 29, 2014
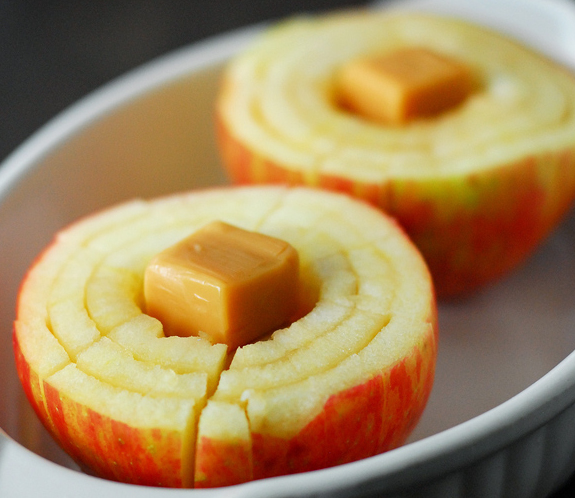
 I like something different and these Caramel Apples fit the bill. They have caramel inside of an apple. Although traditional Caramel Apples are popular, with a little bit of extra work, you can create a caramel apple treat for your family. Plus, you can create apple balls and drizzle with caramel syrup for an added treat sensation or roll these apple balls in sugar and cinnamon. Isn’t that great! You can create several different apple treats out of one simple recipe! Here’s what you do:
- Get yourself some Granny Smith Apples.
- Buy some Caramels.
- Wash the apples.
- Core the apples.
- Cut the apples in half.
- With a melon ball scooper, scoop out the inside of the apple halves.
- Melt the caramels.
- Pour the melted caramels inside the apple halves.
- With the apple balls, you can drizzle with melted caramels or roll them in a mixture of sugar and cinnamon. Or do both.
- Once the caramel has hardened inside the apple halves cut in slices and serve.
This seems to be an easier way for children and other members of your family to enjoy Caramel Apples. I like them. I also like the apple balls.